
Using a GivEnergy All-in-One and AC-coupled Inverter Together
WARNING! (2024-12) Using this automation could reduce the lifespan of the flash memory inside your inverter. It is not currently recommended to use this automation due to the high number of writes it makes to your inverter potentially leading to your inverter requiring a replacement. It may also invalidate the fair-use warranty term on your inverter. Until otherwise specified this article is for information only and any use of the balancing automation is at your own risk.
- Introduction
- Wiring Diagram
- Configuring Home Assistant
- Install the Blueprint
- Home Assistant Dashboard and Gauge Card
Introduction
Remember when I had my All-in-One installed? My AC-coupled inverter and 8.2kWh battery were ripped out and left on the garage floor. Well, I was planning to sell it on but then I decided that might be a lot of hassle and I could really do with that extra storage. So I wired it back up…
I need to start with a disclaimer: if for some reason you do decide to have a go at this I need to be clear that what I’m about to show you is currently an unsupported configuration. You can’t just call up GivEnergy and complain that it’s not working properly and you do this all at your own risk.
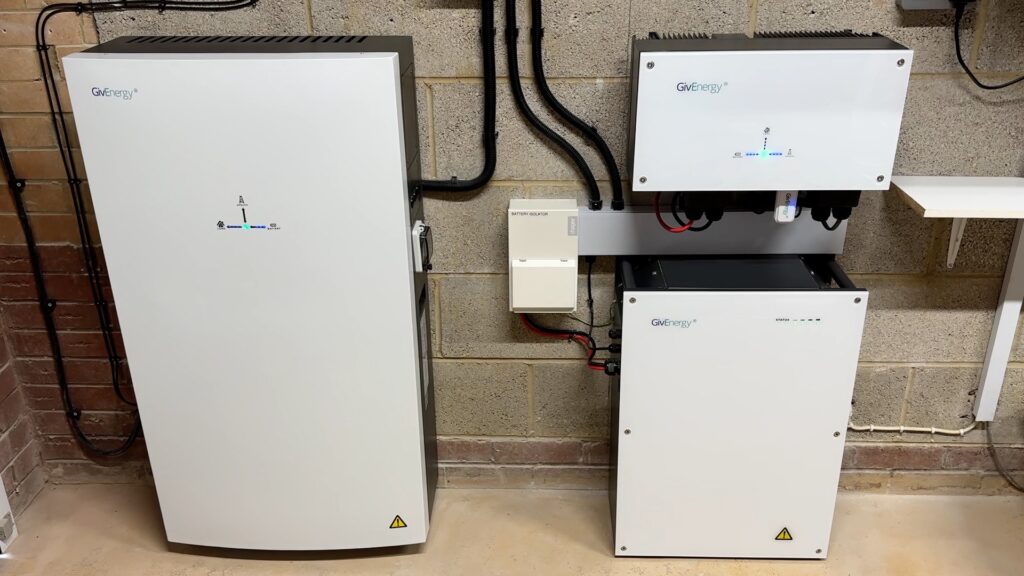
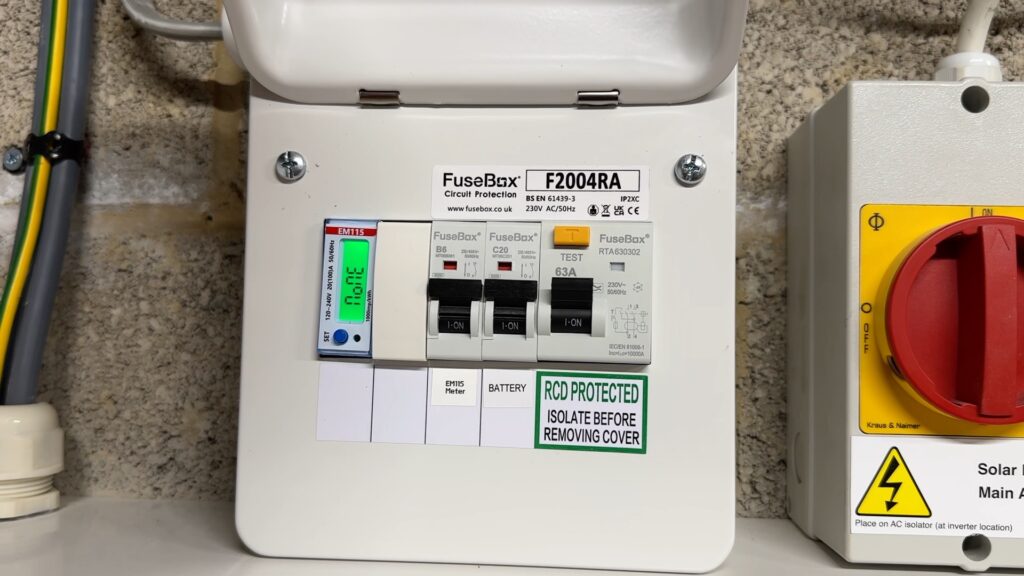
I’ve tried to make it as neat and tidy as possible, adding some trunking to hide a lot of the cables. We’ve got a new mini consumer unit just for the additional circuit that’s been put in for it, and that also houses the power meter.
Now… the problem is that the All-in-One and the AC-coupled inverter, which I’ll refer to as the AC3, are not designed to work together. If you leave them to it, they will just start cross-charging. One will start pushing power out, the other will think there’s excess to use to charge, and it slowly escalates until they’re pumping power across at full pelt. You need something to keep an eye on that. You also probably want them to stay reasonably balanced in terms of their state of charge, so that they get used equally, and one battery doesn’t wear out more than the other.
To do that you need something else. GivEnergy are working on something called an EMS, or Energy Management System, and that will be a little box that controls your inverters for you. If you have an All-in-One then you already have an EMS hidden inside the gateway but it’s not active yet at the time of writing. In the meantime I am using Home Assistant. I’m not going to go in to too much detail about Home Assistant here or how to set it up, I’ll just say that it’s a home automation product that you usually run on dedicated hardware like a Raspberry Pi. There are loads of guides out there on how to set this up including other videos on my YouTube channel and articles on this site.
Wiring Diagram
There are a few solutions that people have created for balancing GivEnergy inverters, but my solution is actually based on an automation created by Paul from GivEnergy in his spare time. He has the same setup as me and gave me a lot of advice and information to help me get this up and running, so thank you Paul, you’re a credit to your company! I’ve tweaked his automation quite a bit to meet my needs and also make it easier for anyone to configure, but it does require things to be wired up in a very specific way.
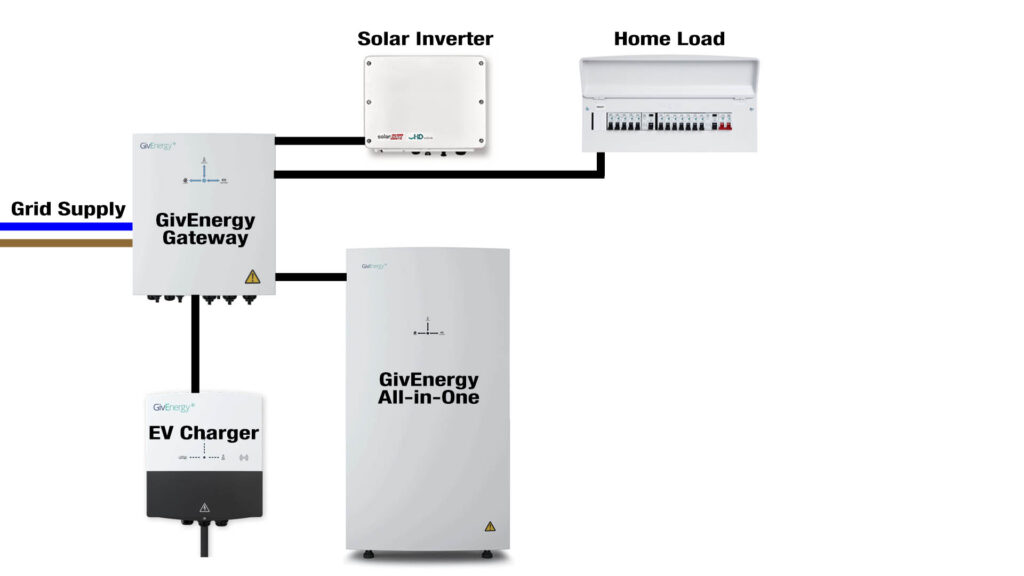

Here’s my wiring diagram for the All-in-One (see the before image). You can see that the grid feed comes into the gateway, and the All-in-One hangs off the gateway which is pretty standard. My solar inverter also hangs off the gateway which is quite important for it to be able to monitor your solar generation. My EV charger is wired into the gateway too and is connected into the grid-side but monitored, so it’s not seen as load. Finally my house load is connected off the gateway too. This is all standard stuff for an All-in-One setup.
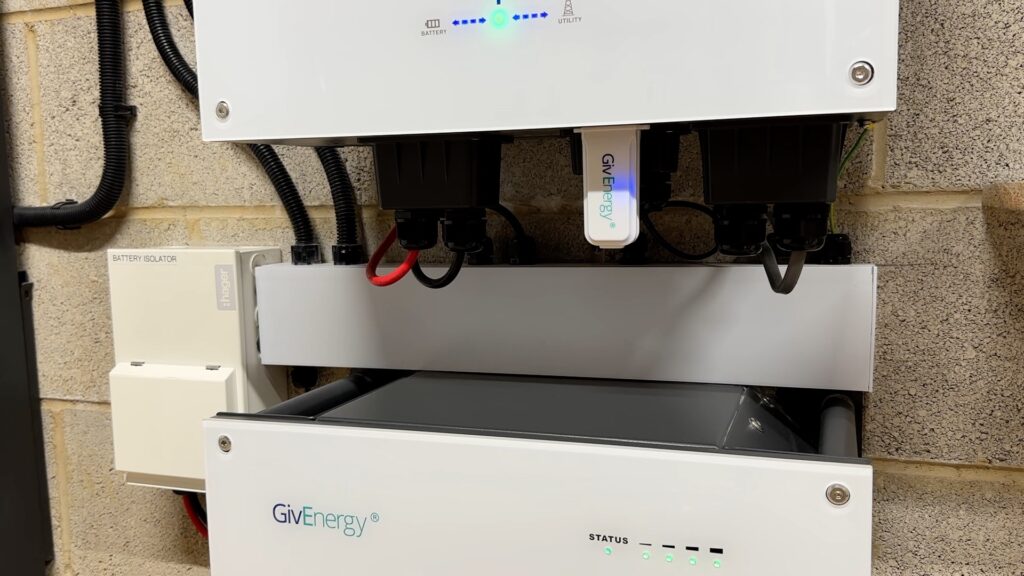
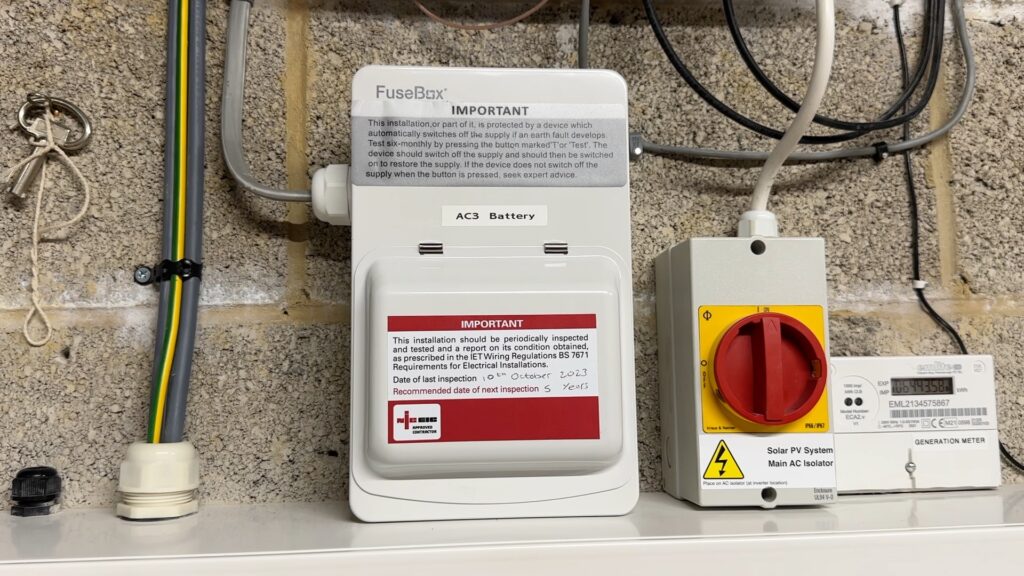
Looking now at the 'after' image, I’ve had an extra circuit run from my consumer unit on its own MCB, so it’s not protected by the existing RCBOs or RCDs. That runs to a new little consumer unit with its own RCD in. Also in there are MCBs for the AC3 and the EM115 energy monitor. The EM115’s CT clamp is placed around the live grid feed going into the gateway and hidden nicely within some trunking. As you can see here the AC3 is actually on the load side of the gateway which means that the All-in-One will see the AC3 as load.
Configuring Home Assistant
Once you have it wired up, you’ll need to set up Home Assistant. Assuming you already have Home Assistant running, you’ll need the GivTCP add-on running on it so as it can communicate with both of your inverters. There are other videos on my channel on how to set up GivTCP.
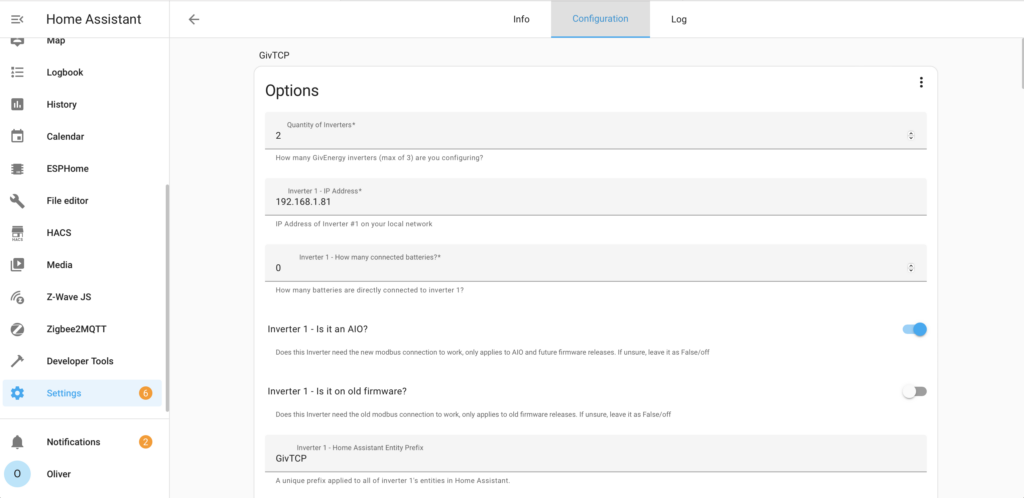
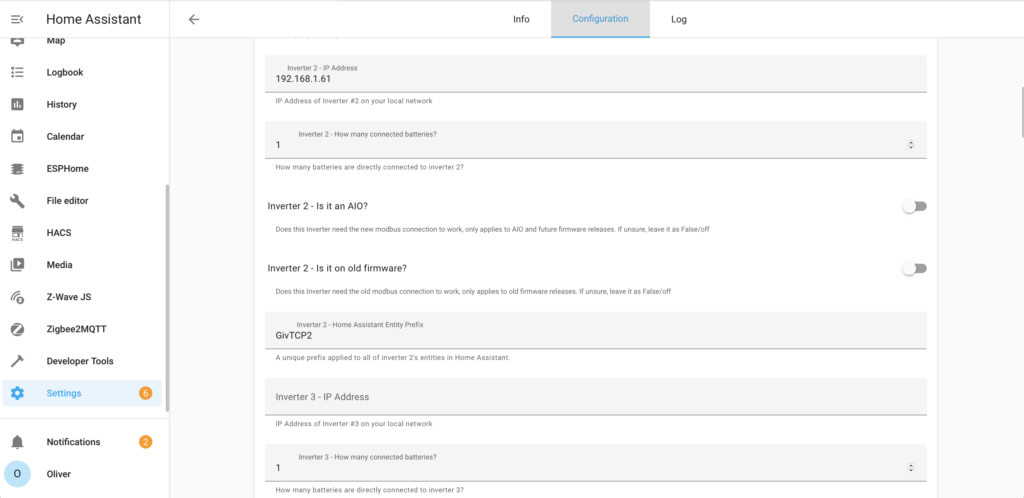
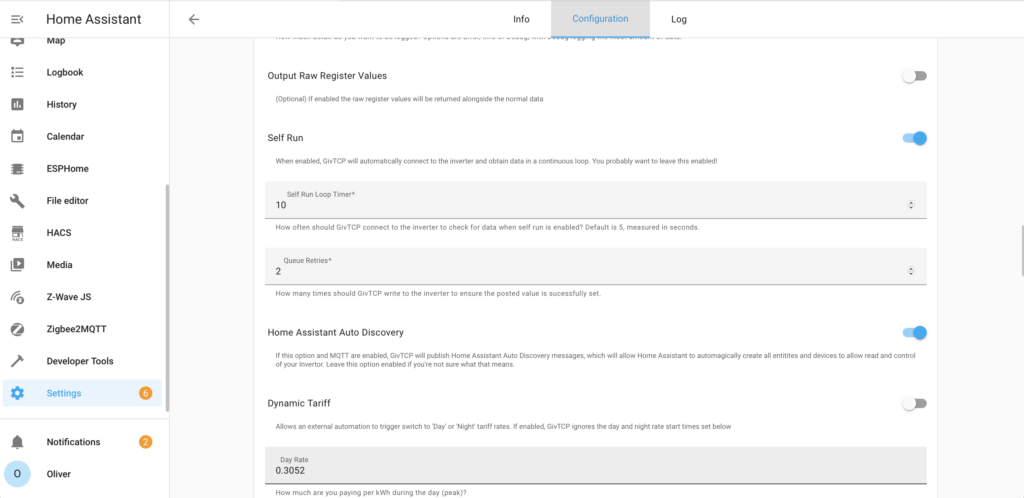
When you’ve got it installed, find the IP addresses for your inverters, and yes there’s another video on my channel to show you how to find those, and configure your All-in-One as inverter 1 and the AC3 as inverter 2. Make sure you tell GivTCP you have two inverters, the All-in-one has zero batteries, and you tell GivTCP that it is an All-in-one too just like in this screenshot. Also make sure that you set the Self Run Loop Timer to 10 seconds. The automation I’m about to show you is expecting data to be updated every 10 seconds.
Before we install the automation, we need to create a toggle helper, which is like a virtual switch, to keep track of whether balancing is running or not. This switch will be turned on and off by the automation and prevents it from running multiple times simultaneously.
Navigate to settings, device & services, and click on the Helpers tab at the top. Click Create Helper in the bottom right and choose Toggle. Give it a name, for example GivEnergy Balancer Running and save.
If you are using the Intelligent Octopus Go tariff to charge your car, the one that gives you extra dynamic hours outside of your fixed off-peak hours, then you will want to install the ha octopus intelligent integration by "megakid" via HACS. I have another video about HACS if you need to know what that is and how to install it. That integration will give you a sensor called "octopus intelligent slot" which will be on when there’s an active Octopus Intelligent slot. If you don’t use an Intelligent Octopus tariff to charge your car then create a dummy toggle helper called "Dummy Octopus Intelligent Slot" or something similar using the same steps from when you created the balancer running toggle, and then turn it off and leave it off.
This automation will also assume that you have an EV charger and that you have a sensor that can read the power of the charger in watts, not kilowatts. If you don’t have an EV charger, or any way to read the power from it, then you’ll need to create a dummy power sensor using the following steps in order to give you a power sensor that always provides a value of zero:
- Navigate to the 'helpers' page under settings > devices & services.
- Click on the "create helper" button.
- Choose a type of 'template'
- Choose to create a 'sensor' (not a binary sensor)
- Call it 'Dummy EV Power'
- Set the state template value to {{ 0 }}
- Set the unit of measurement to W (capital letter, for 'watts')
- Set the device class to 'Power'
- Set the state class to 'Measurement'
Install the Blueprint
Ok, we’re ready to finally install the automation! I’ve tried to make this process as easy as possible so I’ve turned it into a blueprint and placed it on GitHub. The easy way to import the blueprint is to click on this button here:


Or, if you want to manually install it then in Home Assistant go to Settings, Automations & Scenes, Blueprints at the top, and click on the Import Blueprint button. Paste in the following URL to the blueprint’s repository on GitHub and click on Preview, then Import:
https://github.com/sOckhamSter/homeassistant-blueprints/blob/main/givenergy_aio_ac3_balancer.yamlOnce you have it installed, it’s time to create an automation from it. Navigate to:
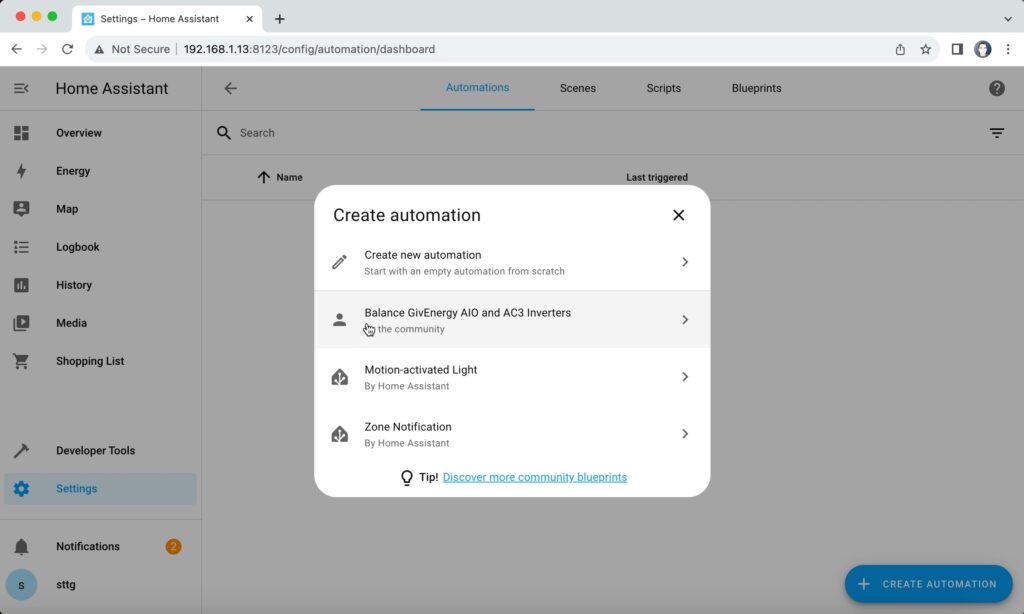
- Settings > Automations & Scenes > Create Automation
- Select “Balance GivEnergy AIO and AC3”
- Choose the two SOC entities for your inverters
- Choose your EV charge power entity, or dummy entity if you don’t have an EV charger
- Select your Balancer Running toggle helper
- Select your Octopus Intelligent Slot Active entity, or the dummy toggle if you don't use Octopus Intelligent.
- Leave the cross-charge thresholds as the default to start with.
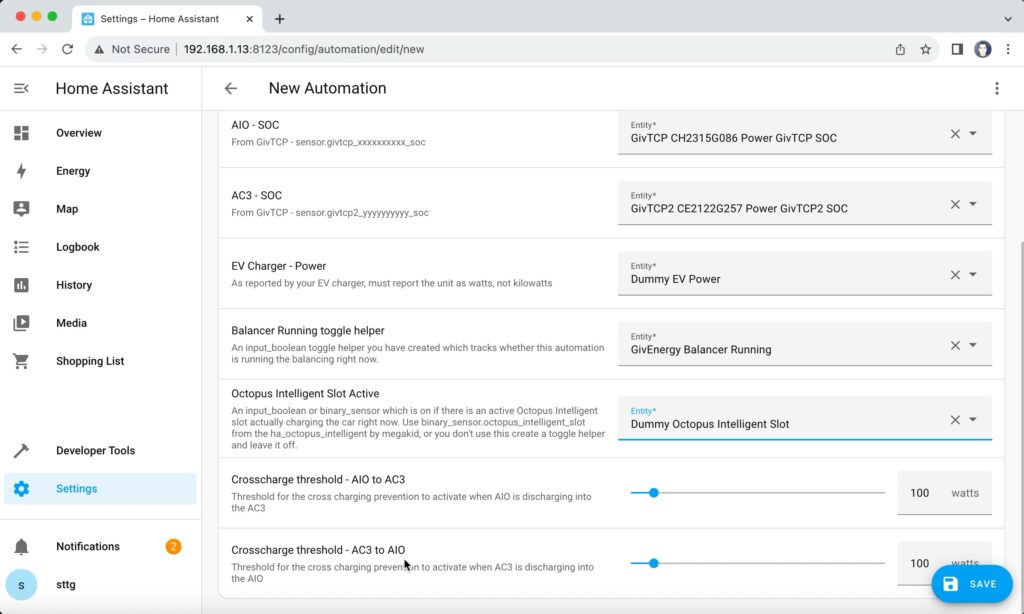
If your inverters tend to prefer to cross charge in one specific direction all of the time then you can tweak these as you see fit, for example I have set AIO to AC3 threshold to 50 watts in my setup because my AC3 is prone to pulling power from the AIO more than in the other direction.
Click on Save and that’s it, it’ll be running in the background checking for cross charging and pausing an inverter briefly in order to shift load to the other inverter, and also checking to make sure that the inverters are keeping in step with each other in terms of their charge level and again pausing one of the inverters temporarily until the other one catches up. But, of course, you want to be able to see what is going on. There are several sensors that you should keep your eyes on. I have an entities card showing several useful entities and you can watch the switches toggle by themselves as balancing kicks in, and see the various power values in real-time, but what I really like to use to keep an eye on things is my gauge card.
Home Assistant Dashboard and Gauge Card
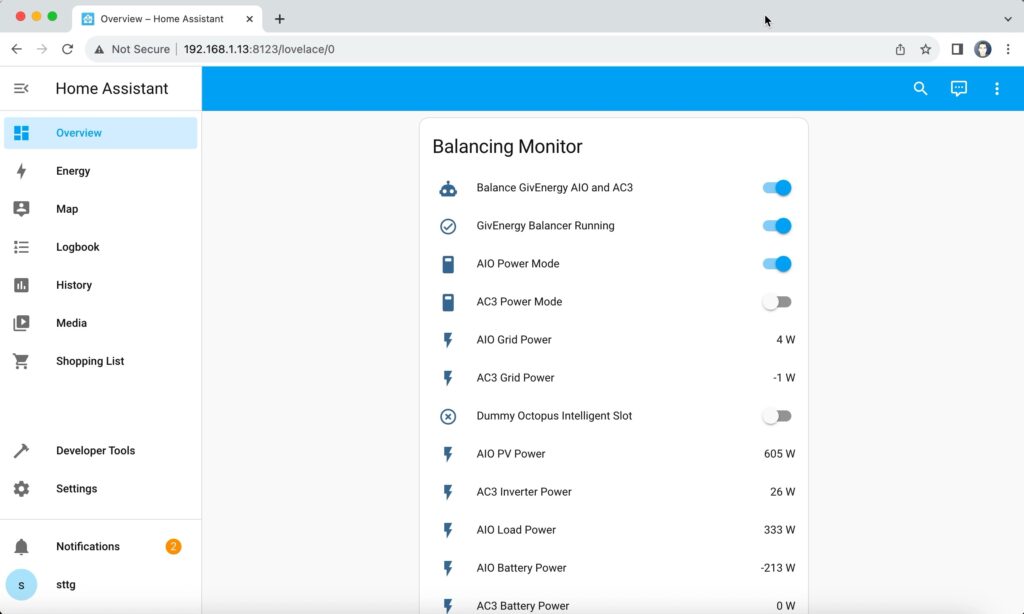

type: entities
entities:
  - entity: automation.balance_givenergy_aio_and_ac3
  - entity: input_boolean.givenergy_balancer_running
  - entity: switch.givtcp_xxxxxxxxxx_battery_power_mode
    name: AIO Power Mode
  - entity: switch.givtcp2_yyyyyyyyyy_battery_power_mode
    name: AC3 Power Mode
  - entity: sensor.givtcp_xxxxxxxxxx_grid_power
    name: AIO Grid Power
  - entity: sensor.givtcp2_yyyyyyyyyy_grid_power
    name: AC3 Grid Power
  - entity: input_boolean.givenergy_dummy_octopus_intelligent_slot_active
  - entity: sensor.givtcp_xxxxxxxxxx_pv_power
    name: AIO PV Power
  - entity: sensor.givtcp2_yyyyyyyyyy_invertor_power
    name: AC3 Inverter Power
  - entity: sensor.givtcp_xxxxxxxxxx_load_power
    name: AIO Load Power
  - entity: sensor.givtcp_xxxxxxxxxx_battery_power
    name: AIO Battery Power
  - entity: sensor.givtcp2_yyyyyyyyyy_battery_power
    name: AC3 Battery Power
show_header_toggle: false
title: Balancing Monitor
The gauge card is a specially created bodge of a few components all merged together to show the power output of both batteries, their state of charge, whether they’ve been paused or not, and whether or not the balancer is running. If you’d like to recreate this yourself, you’ll need to add a few components to HACS first. They’re all front-end components:
Then copy and paste the following gauge card configuration to your clipboard.
square: false
type: grid
cards:
  - type: custom:stack-in-card
    mode: vertical
    keep:
      margin: false
    cards:
      - type: gauge
        entity: sensor.givtcp_xxxxxxxxxx_battery_power
        min: -3600
        max: 3600
        needle: true
        name: AIO Battery Power
        segments:
          - from: -3600
            color: '#44A047'
          - from: -3200
            color: '#58A640'
          - from: -2800
            color: '#6DAC39'
          - from: -2400
            color: '#82B232'
          - from: -2000
            color: '#96B82B'
          - from: -1600
            color: '#ABBE24'
          - from: -1200
            color: '#C0C41D'
          - from: -800
            color: '#D4CA16'
          - from: -400
            color: '#E9D00F'
          - from: 0
            color: '#FED709'
          - from: 400
            color: '#FEC308'
          - from: 800
            color: '#FEAF07'
          - from: 1200
            color: '#FE9C06'
          - from: 1600
            color: '#FE8805'
          - from: 2000
            color: '#FE7404'
          - from: 2400
            color: '#FE6103'
          - from: 2800
            color: '#FE4D02'
          - from: 3200
            color: '#FE3901'
          - from: 3600
            color: '#FF2600'
        style: |
          ha-card {
            border: none;
            margin-bottom: -20px;
          }
      - type: grid
        columns: 3
        square: false
        cards:
          - type: custom:mushroom-entity-card
            entity: sensor.givtcp_xxxxxxxxxx_soc
            name: SOC
            layout: vertical
            icon_type: none
            tap_action:
              action: more-info
            primary_info: name
            secondary_info: state
            style: |
              ha-card {
                border: none;
              }
          - type: custom:mushroom-entity-card
            entity: switch.givtcp_xxxxxxxxxx_battery_power_mode
            name: Eco
            layout: vertical
            icon_type: none
            tap_action:
              action: more-info
            primary_info: name
            secondary_info: state
            icon_color: green
            style: |
              ha-card {
                border: none;
              }
          - type: custom:mushroom-entity-card
            entity: input_boolean.givenergy_balancer_running
            name: Bal.
            layout: vertical
            icon_type: none
            tap_action:
              action: more-info
            primary_info: name
            secondary_info: state
            icon_color: green
            style: |
              ha-card {
                border: none;
              }
  - type: custom:stack-in-card
    mode: vertical
    keep:
      margin: false
    cards:
      - type: gauge
        entity: sensor.givtcp2_yyyyyyyyyy_battery_power
        min: -3600
        max: 3600
        needle: true
        name: AC3 Battery Power
        segments:
          - from: -3600
            color: '#44A047'
          - from: -3200
            color: '#58A640'
          - from: -2800
            color: '#6DAC39'
          - from: -2400
            color: '#82B232'
          - from: -2000
            color: '#96B82B'
          - from: -1600
            color: '#ABBE24'
          - from: -1200
            color: '#C0C41D'
          - from: -800
            color: '#D4CA16'
          - from: -400
            color: '#E9D00F'
          - from: 0
            color: '#FED709'
          - from: 400
            color: '#FEC308'
          - from: 800
            color: '#FEAF07'
          - from: 1200
            color: '#FE9C06'
          - from: 1600
            color: '#FE8805'
          - from: 2000
            color: '#FE7404'
          - from: 2400
            color: '#FE6103'
          - from: 2800
            color: '#FE4D02'
          - from: 3200
            color: '#FE3901'
          - from: 3600
            color: '#FF2600'
        style: |
          ha-card {
            border: none;
            margin-bottom: -20px;
          }
      - type: grid
        columns: 3
        square: false
        cards:
          - type: custom:mushroom-entity-card
            entity: sensor.givtcp2_yyyyyyyyyy_soc
            name: SOC
            layout: vertical
            icon_type: none
            tap_action:
              action: more-info
            primary_info: name
            secondary_info: state
            style: |
              ha-card {
                border: none;
              }
          - type: custom:mushroom-entity-card
            entity: switch.givtcp2_yyyyyyyyyy_battery_power_mode
            name: Eco
            layout: vertical
            icon_type: none
            tap_action:
              action: more-info
            primary_info: name
            secondary_info: state
            icon_color: green
            style: |
              ha-card {
                border: none;
              }
          - type: custom:mushroom-entity-card
            entity: input_boolean.givenergy_balancer_running
            name: Bal.
            layout: vertical
            icon_type: none
            tap_action:
              action: more-info
            primary_info: name
            secondary_info: state
            icon_color: green
            style: |
              ha-card {
                border: none;
              }
columns: 2
Back in Home Assistant, edit your dashboard, create a new card, choose the type of Manual (right down at the bottom of the list) and paste in my configuration over the top of the default text. You will then need to go through the whole thing and replace the placeholder entity IDs with your actual real ones.
Now, if you can tear yourself away from watching the gauges moving on your dashboard, there’s one more thing I want to mention. The two inverters combined will import at 9kW. You will probably want to schedule both inverters to charge at the same time during your off-peak hours and you do that using the GivEnergy portal. You can’t use the GivEnergy app, at least not at the moment, because this isn’t exactly a supported configuration, but you can manage each inverter separately in the portal.
If you’re doing other things during those off-peak hours such as charging your car, heating hot water, running your washing machine, etc. I suggest you lower the charge power on the all-in-one from 6kW just to be safe. I have set mine to 3.5kW because at that speed I can still easily charge the 13.5kWh battery to full during my four hours of off-peak energy. Better to reduce the charge speed where possible than risk overloading your fuse!