
ESPHome Ultrasonic Break-Beam Sensor

In this video I’m going to bring together two of my previous projects into one glorious new solution. I’ve taken the ultrasonic motion sensor that I built using ESPHome, repackaged it, and used it to help solve a problem of how to know when to let the dog out to do her doggy business.
The Problem
Before I go into the technical details, I’m going to give you a bit of background on what the problem is and why I’m doing this. I think it’s important to know that creating sensors and things is great fun, but unless you manage to find an actual real world use for them then they’re probably just going to sit at the back of a cupboard somewhere.
Cast your mind back to my article about how I get alerts when the dog needs to go out. I'd used an Ikea motion sensor paired with a door contact sensor and a couple of automations to alert me when motion at the back door was detected and the door was shut. This solution is still in place and works really well… but there is a problem. That back door is in my conservatory, and given the increasing cost of heating we’d quite like to keep the conservatory closed off from the rest of the house this winter. So now the dog will go to the dining room door which leads to the conservatory… and I won’t get notified.
Now I can’t just stick a PIR motion sensor in that room by the door because its field of view is really wide. It’ll just pick up motion every time anyone goes anywhere near the door, like during mealtimes, that sort of thing. What I need is something far more precise, like one of those laser beams you see in the Mission Impossible movies that points across the doorway and alerts me when the beam is broken.
Well, I don’t have a laser, but what I do have is an ultrasonic sensor so I can use a beam of sound instead of a beam of light. These things are designed to detect how close something. Now if you think about it, if you place one of these sensors pointing across a doorway at the wall on the opposite side, it should always report the same distance value, until something comes in between the sensor and the wall - then the distance value will drop.
Shopping List
- D1 Mini: https://amzn.to/3ToGXPT
- Ultrasonic Sensor HC-SR04: https://amzn.to/39oKzP6
- Project enclosure (58x35x15mm): https://amzn.to/3QWBrBn
The Hardware Build
On to the sensor then! This is almost exactly the same as the ultrasonic motion sensor, only this time I’ve renamed the sensor entities and adjusted a few values. Starting with the hardware, I’ve used a D1 Mini, an HC-SR04 ultrasonic sensor, a few Dupont cables with their connectors snipped off, and a nice slim project enclosure.
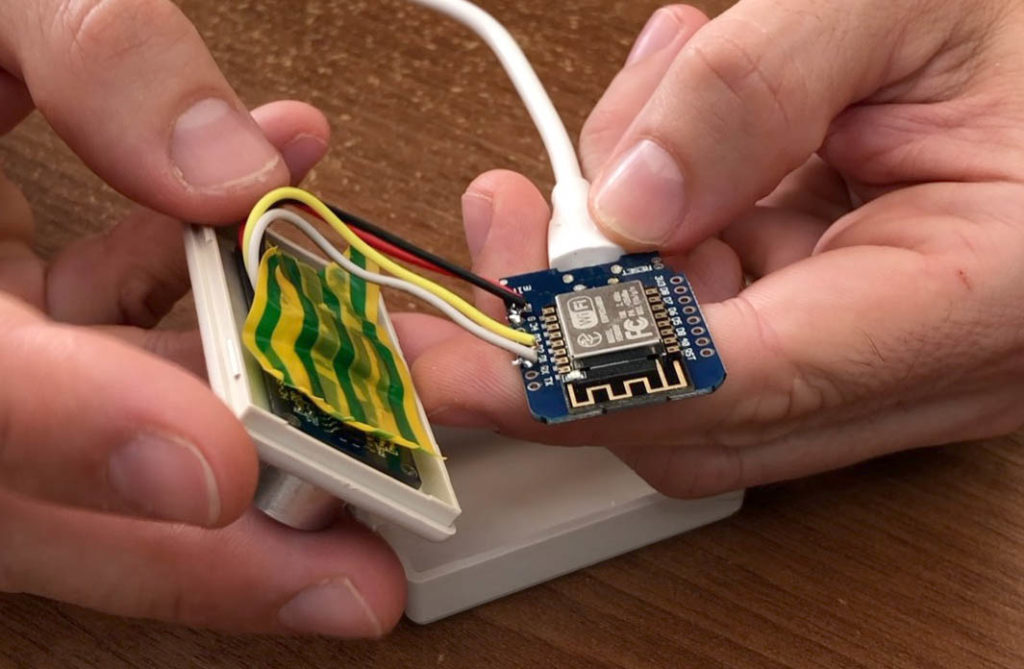
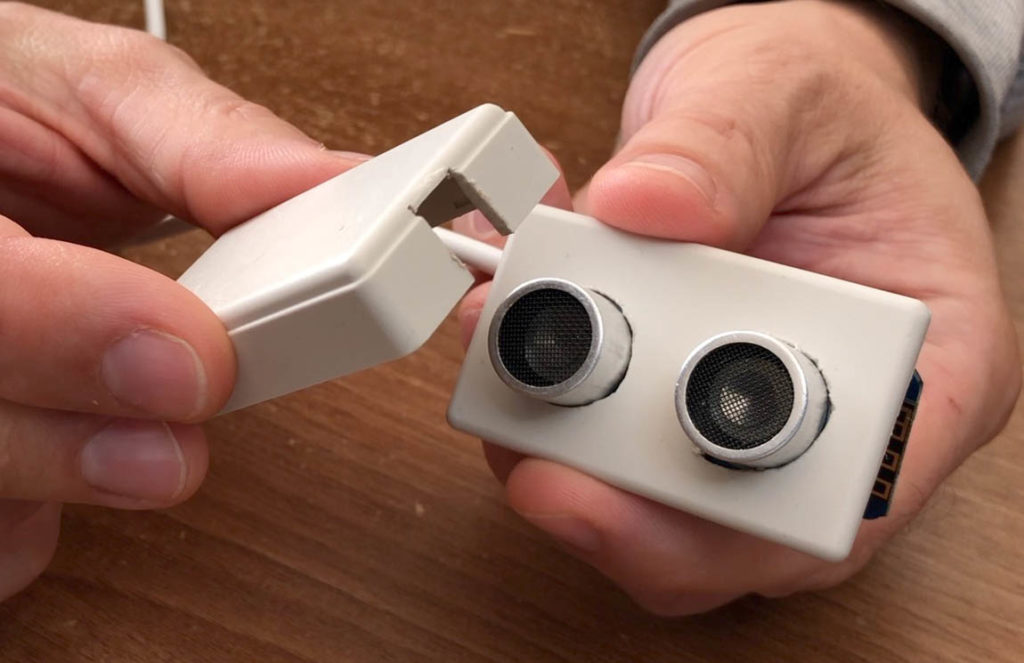
You can see that I’ve cut some holes in the lid of the enclosure for the sensor to stick out of, and another hole at the bottom for the cable.
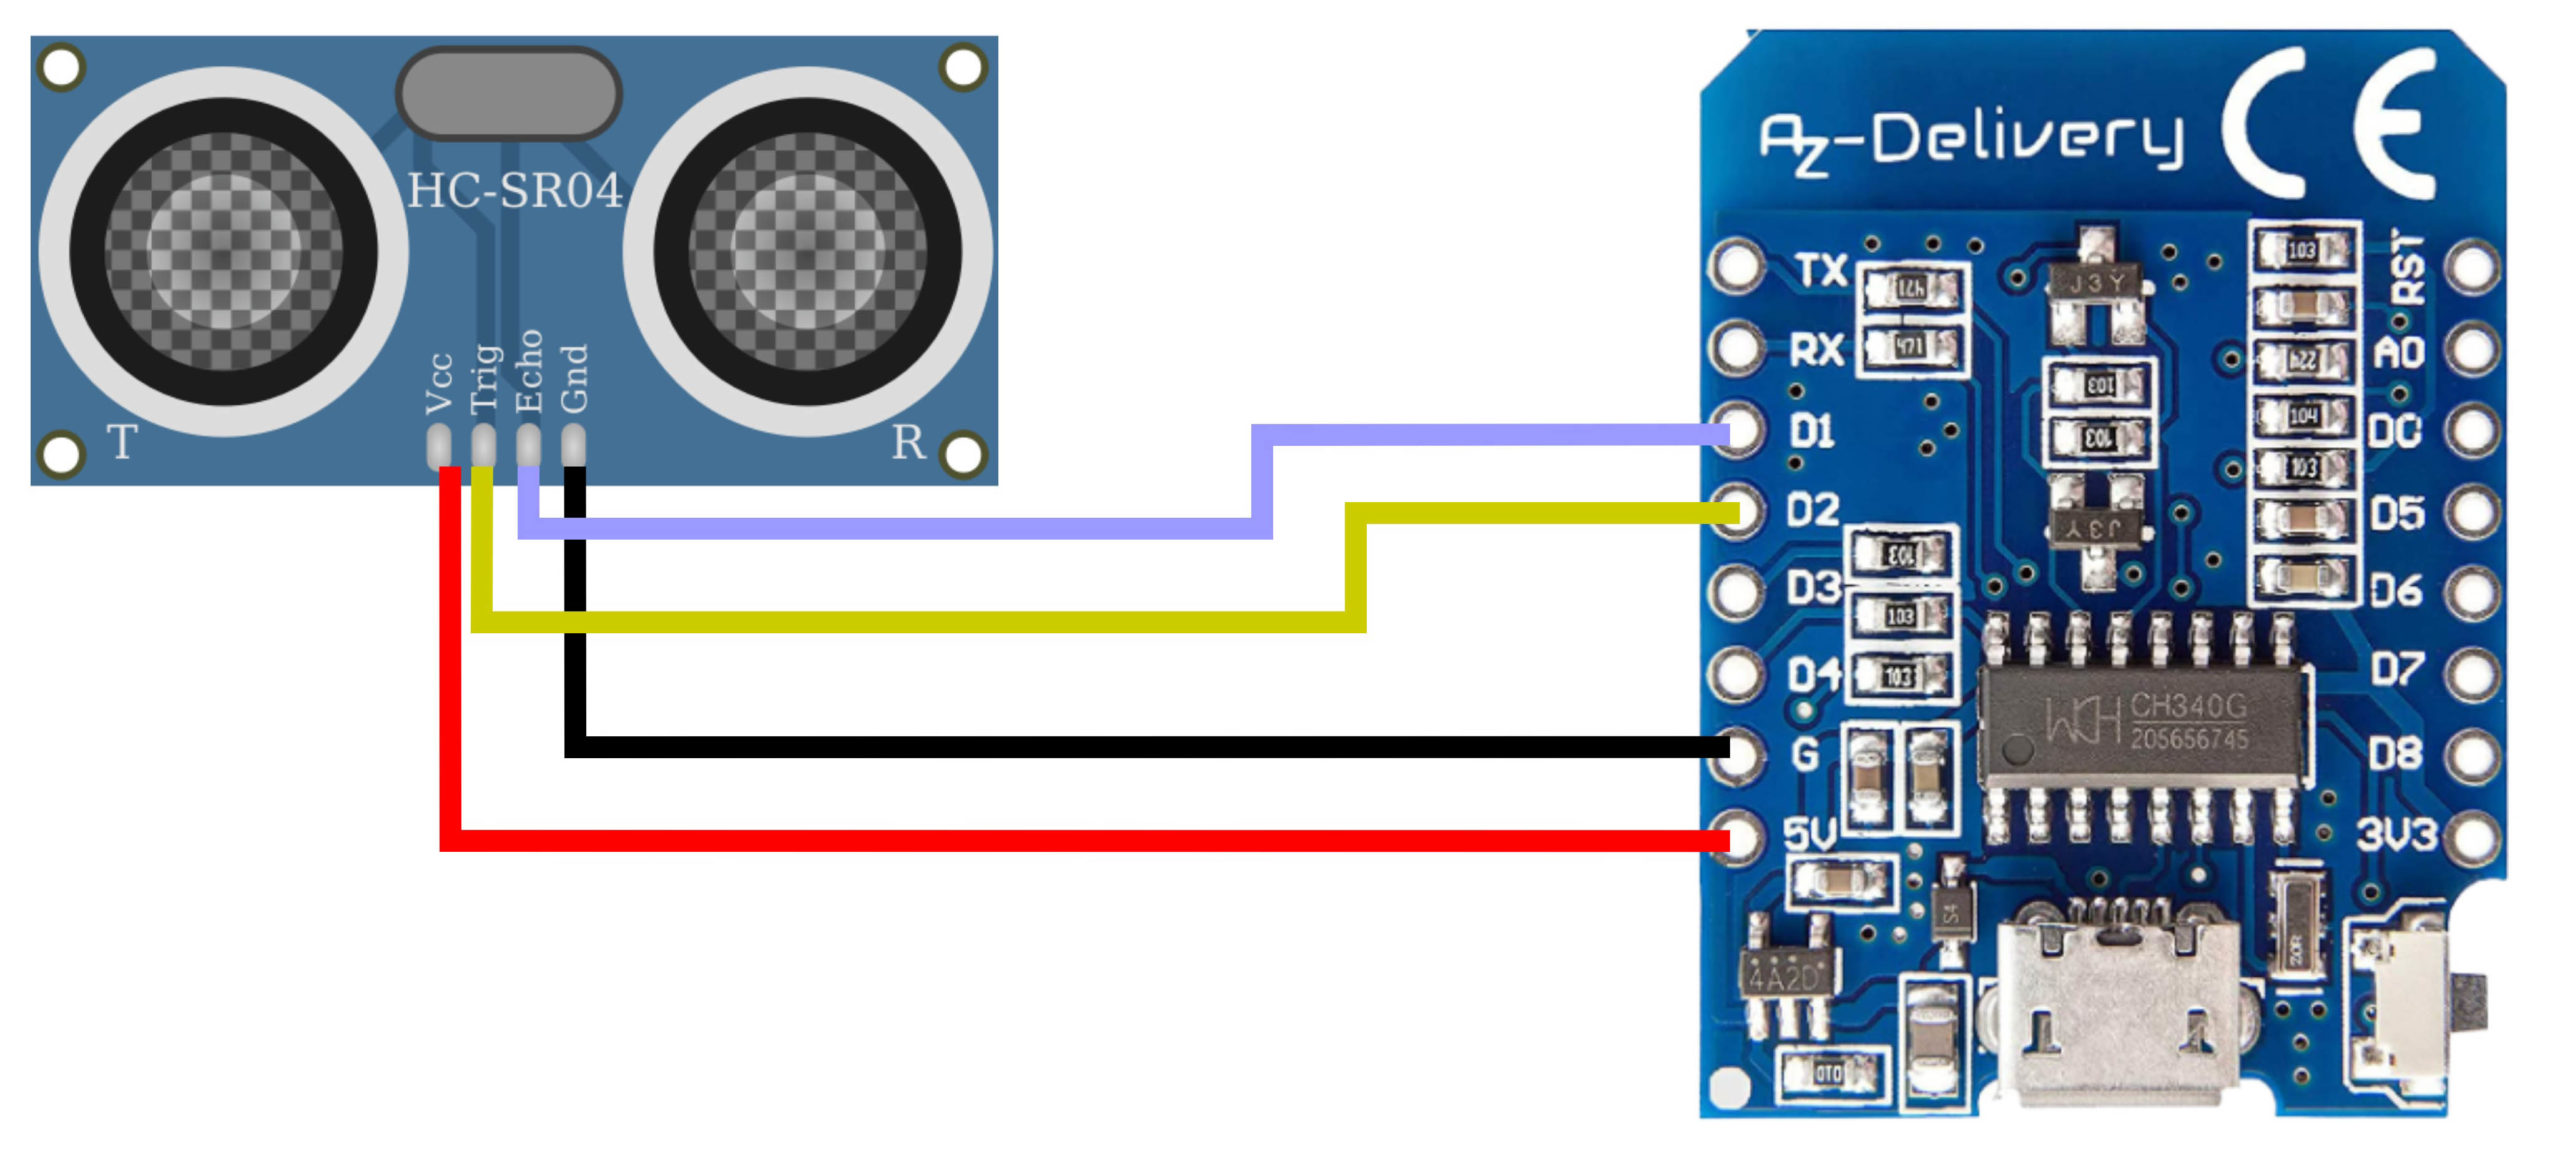
The wiring diagram is also identical to the motion sensor wiring. This time though I’ve directly soldered the wires to the components in order to save space and use the most compact enclosure possible.
The Software
# Current version: v1.2
# Version History
# 1.0 2022-09-13: Initial Version
# 1.1 2022-09-14: Tweak timings to detect distance every 100ms
# 1.2 2022-09-27: Distance sensor now outputs 3 decimal places

substitutions:
  device_name: dining-room-break-beam-sensor
  friendly_name: "dining-room-break-beam-sensor"
  device_description: "Dining Room Break Beam Sensor"

esphome:
  name: '${device_name}'
  comment: '${device_description}'
  platform: ESP8266
  board: d1_mini

# Enable logging
logger:

# Enable Home Assistant API
api:

wifi:
  ssid: !secret wifi_ssid
  password: !secret wifi_password

  # Enable fallback hotspot (captive portal) in case wifi connection fails
  ap:
    ssid: '${device_name}'
    password: !secret fallback_password

captive_portal:

ota:
  - platform: esphome

safe_mode:
  disabled: false
  reboot_timeout: 10min
  num_attempts: 5

globals:
 # Set this to the distance detected by the ultrasonic sensor. Default is 2m.
 - id: maximum_distance
   type: float
   initial_value: '0.78'
 # How many distance readings to detect before reporting value (smooth false positives)
 - id: reporting_interval
   type: int
   initial_value: '8'
 # Do not change the following globals
 - id: detected_readings
   type: int
   restore_value: no
   initial_value: '0'
 - id: previous_reading_nan
   type: boolean
   restore_value: no
   initial_value: 'true'
 - id: previous_reading
   type: float
   restore_value: no
   initial_value: '20.0'


sensor:
  # This is the physical sensor, not published to Home Assistant
  - platform: ultrasonic
    trigger_pin: D2
    echo_pin: D1
    name: "Ultrasonic Distance Raw"
    update_interval: 100ms
    id: ultrasonic_distance_raw
    internal: true
  # This is a virtual sensor to smooth the false positive readings
  - platform: template
    id: ultrasonic_distance
    name: "Dining Room Break Beam Distance"
    update_interval: 100ms
    accuracy_decimals: 3
    lambda: |-
      ESP_LOGD("Ultrasonic", "Got %d readings in a row", id(detected_readings));
      if (id(ultrasonic_distance_raw).state < id(maximum_distance)) {
        // We have a reading... don't use it, just remember that we got one, but not if we're already at the limit of how many we need
        ESP_LOGD("Ultrasonic", "We have a reading... don't use it, just remember that we got one.");
        if(id(previous_reading_nan) == true) {
          id(previous_reading_nan) = false;
          id(detected_readings) = 0;
        }
        if( id(detected_readings) < id(reporting_interval) ) {
          id(detected_readings) += 1;
        }
      }
      else {
        // We got a NAN reading (out of range). Reset the readings counter
        if(id(previous_reading_nan) == false) {
          id(previous_reading_nan) = true;
          id(detected_readings) = 0;
        }
        if( id(detected_readings) < id(reporting_interval) ) {
          id(detected_readings) += 1;
        }
        ESP_LOGD("Ultrasonic", "We got a NAN reading (out of range). Reset the readings counter");
        id(previous_reading_nan) = true;
      }

      if( id(detected_readings) >= id(reporting_interval)) {
        // We have gathered enough readings in a row to report
        if(id(previous_reading_nan) == false) {
          id(previous_reading) = id(ultrasonic_distance_raw).state;
          return id(ultrasonic_distance_raw).state;
        }
        else {
          ESP_LOGD("Ultrasonic", "We have gathered enough readings in a row to report: %f", id(maximum_distance));
          id(previous_reading) = id(maximum_distance);
          return id(maximum_distance);
        }
      }
      return id(previous_reading);


binary_sensor:
  - platform: template
    name: "Dining Room Break Beam"
    lambda: |-
      if (id(ultrasonic_distance).state < id(maximum_distance)) {
        // Presence is detected
        return true;
      } else {
        // No presence detected.
        return false;
      }
    filters:
      - delayed_off: 120s
Here’s the code - I’ve called mine the Dining Room Break Beam Sensor but you can change yours to whatever you like of course. The first thing I'd like to draw your attention to that you may need to change is the maximum_distance value. Now this needs to be set to just slightly under the actual distance between the sensor and the wall opposite it. When the distance reading drops below this value that you’re setting here, the break beam sensor, which used to be the motion sensor, is triggered. To start with it really doesn’t matter what you put in here. Upload the code, get the sensor working, stick it in place, and check the logs. In the logs you’ll see the distance value it’s reporting to two decimal places. Choose a value a few centimetres less than this for your maximum distance because that value will bounce around a bit due to sensor interference and inaccuracies. Once you know the value you need, edit the yaml with the required value and install again.
The second thing I want to point out is right down at the bottom - the delayed_off value. You want your sensor to detect the beam being broken very quickly, but, certainly in my case, I don’t want to keep getting alerted every couple of seconds that the dog is still sniffing around the door. I want to get alerted once, and given chance to actually get up and sort it. This value here sets how long you want the sensor to stay on for after motion has stopped being detected. I’ve found that about 2 minutes is good for me in this situation, but your preferences might vary. Just change this to whatever suits you the best.
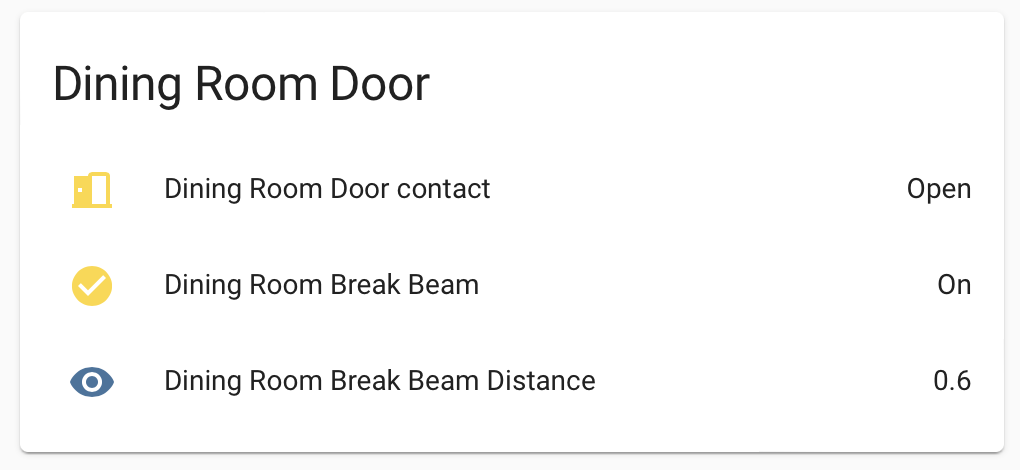
And this is what you’ll be presented with in Home Assistant. You’ll get a sensor entity reporting the distance, and another binary sensor entity that shows and on or off depending on whether the beam has been broken or not.
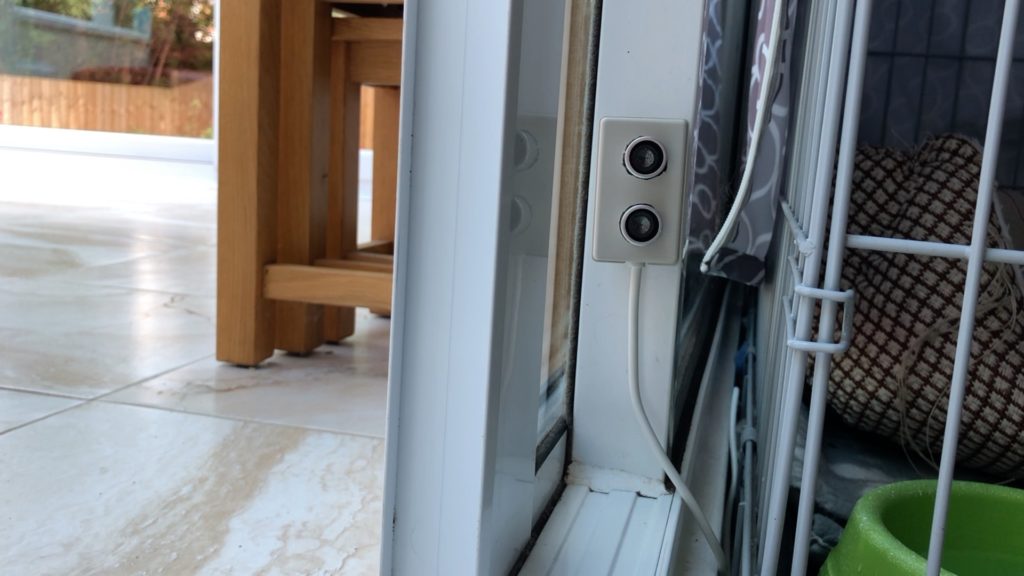
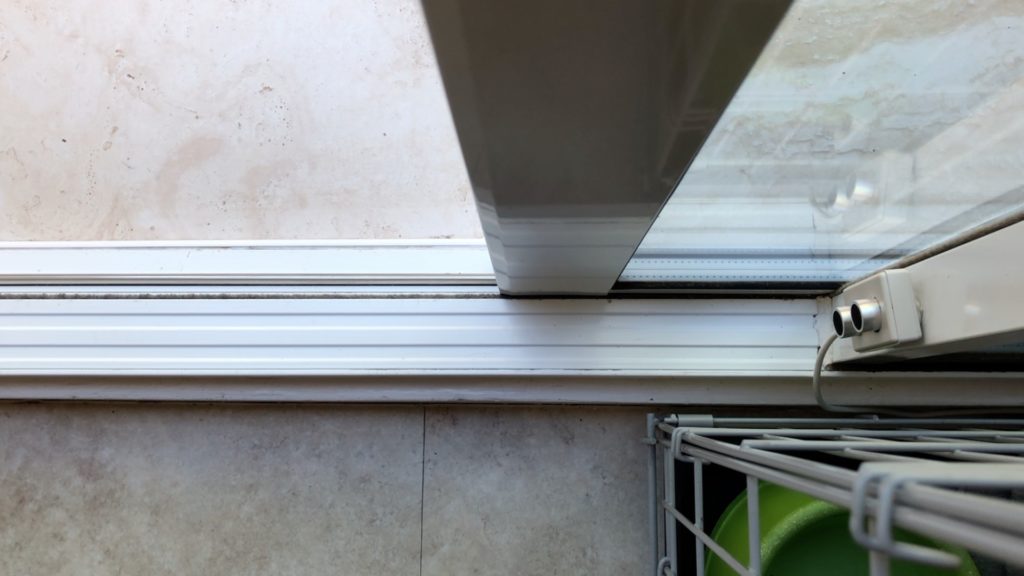
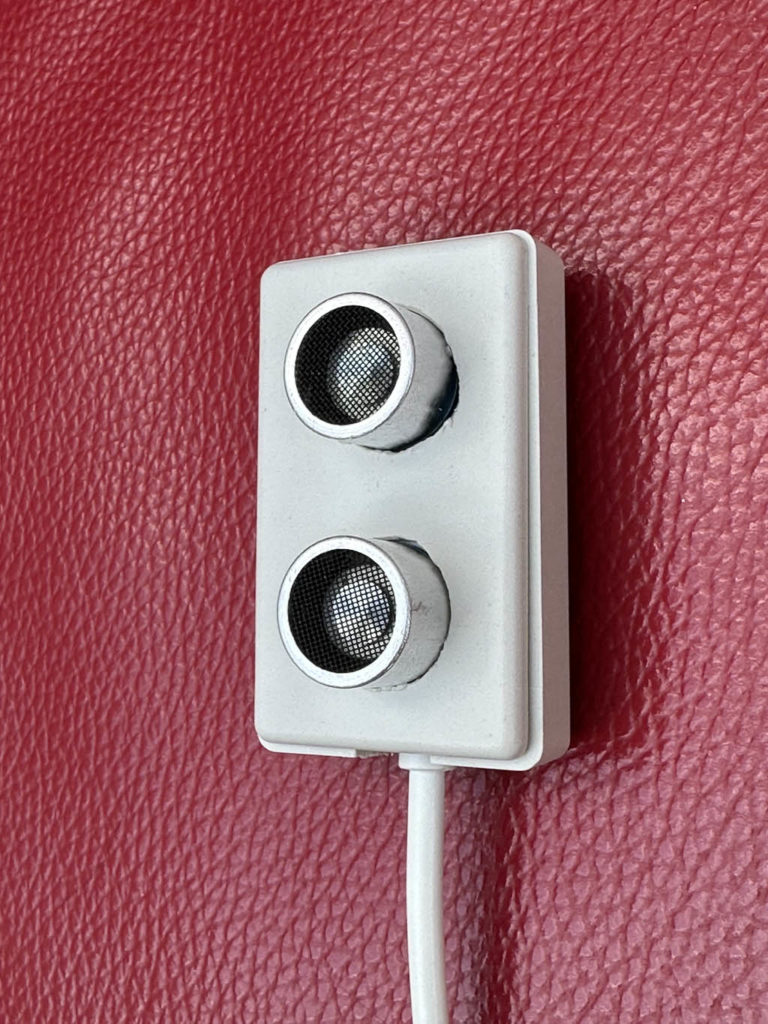
I’ve stuck the sensor to the door frame and run the cable behind the dog’s crate to the nearest power socket. I’m quite fortunate that it’s reasonably easy to hide the cable here and that there was a convenient power outlet nearby. The sensor is pointing at a slight angle to the opposite wall to make sure it captures the dog’s nose more easily.
Home Assistant Automation
Right then, you have your sensor all up and running, but there’s a final piece of the puzzle. You don’t want to be alerted every time anyone walks through that door do you? Well, perhaps you do, in which case you’re all done… but in my scenario I only want this to alert me if the door is shut… because I need to open it! No point getting alerted if it’s already open.
I fitted a little Sonoff zigbee door sensor to the sliding door, and combined that with an automation. The automation is basically exactly the same as the one from my original Let The Dog Out video, so I’m going to point you in the direction of that video and article to see those details.
Anyway, the result is that I can now keep my dining room door shut, stopping all of that heat escaping through the conservatory’s glass roof, but still get alerted whenever the dog needs to be let out. Puddles avoided!