
GivEnergy Giv-AC 3.0 Battery, Home Assistant and Solar Forecast Automation
(Please note that this article and video are now a bit out of date. See this article instead for the latest instructions)
You know that I’ve been waiting for this for ages! My solar panels were installed back in December last year but the battery system didn’t turn up due to stock issues. When it eventually did turn up in April it was missing the inverter! I’ve no idea how that happened because we ordered a full AC-coupled bundle. Even the Wi-Fi dongle turned up, just no inverter. Anyway, it’s all here now, installed and working great. Let me show you to the garage and run you through my installation.
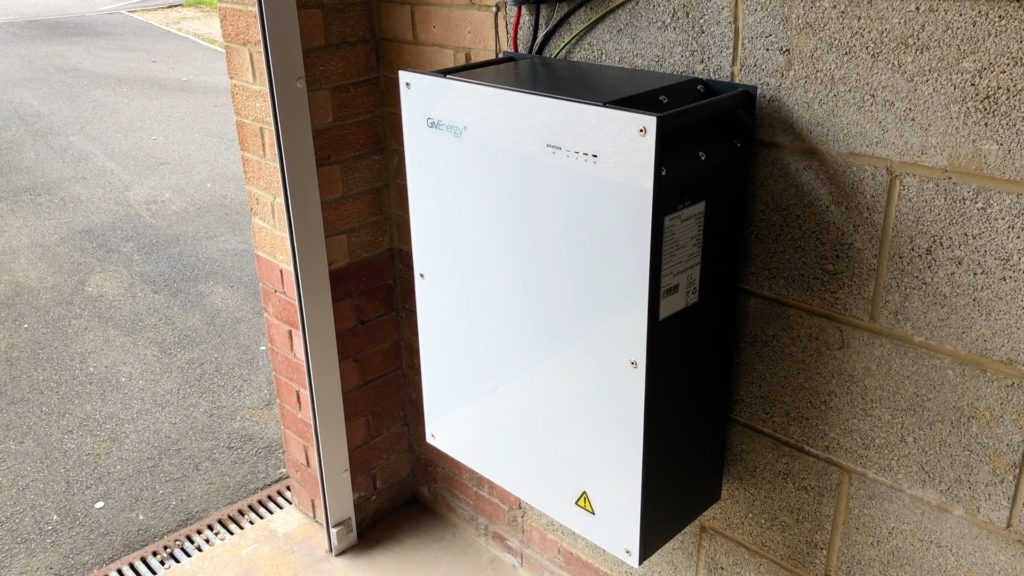
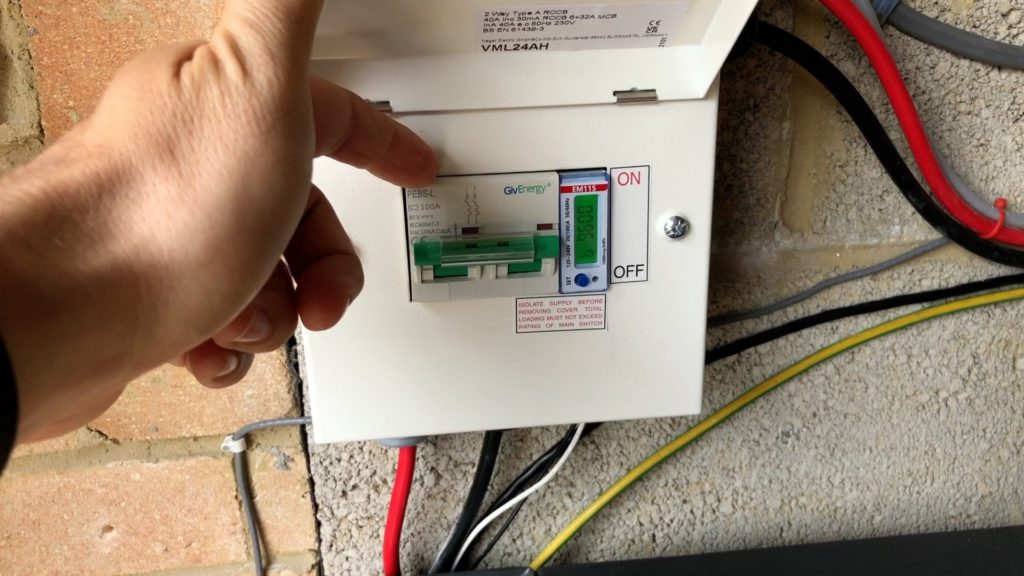
The lithium-ion battery has a capacity of 8.2kWh with a 100% depth-of-discharge - behind the scenes it’s actually a 10kWh battery but with 18% reserved by the battery management system. Just above this battery is the DC breaker which cuts the connection between the battery and the inverter and next to the breaker is an EM115, which is basically a really fancy CT clamp. The clamp itself is outside in my meter box monitoring the main grid feed to my home - you can see in the photo that I have quite a growing collection of CT clamps in there now.
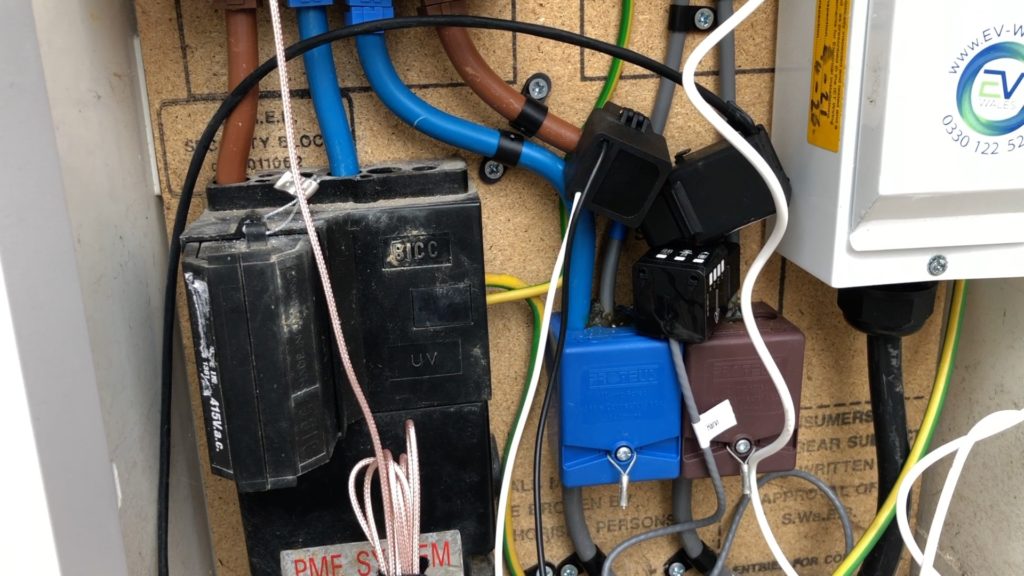
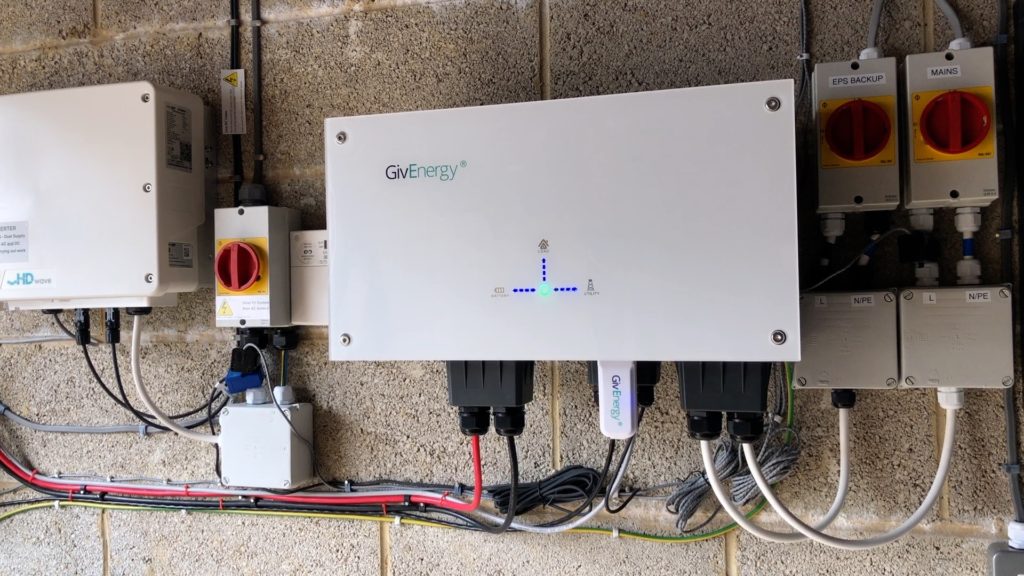
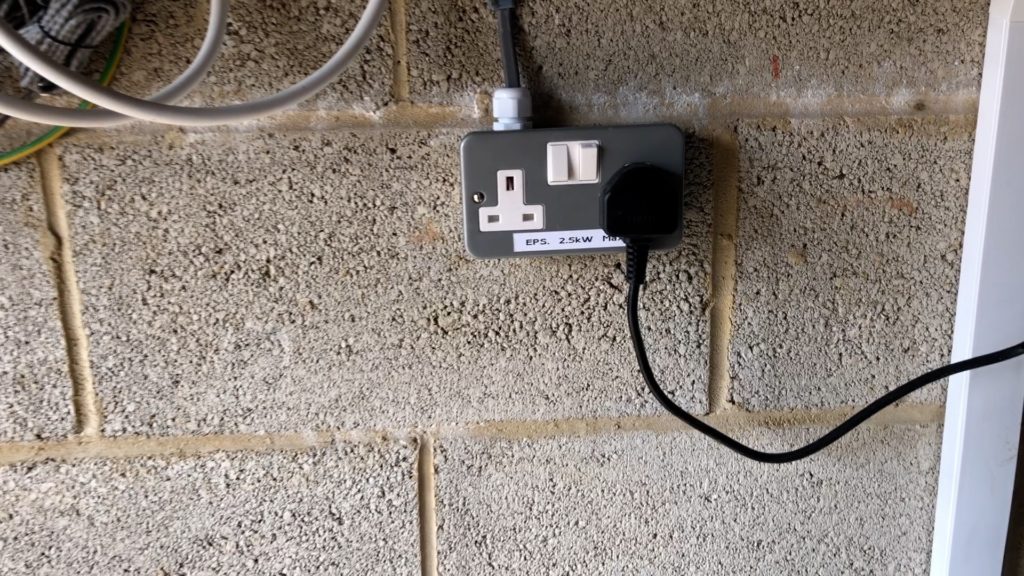
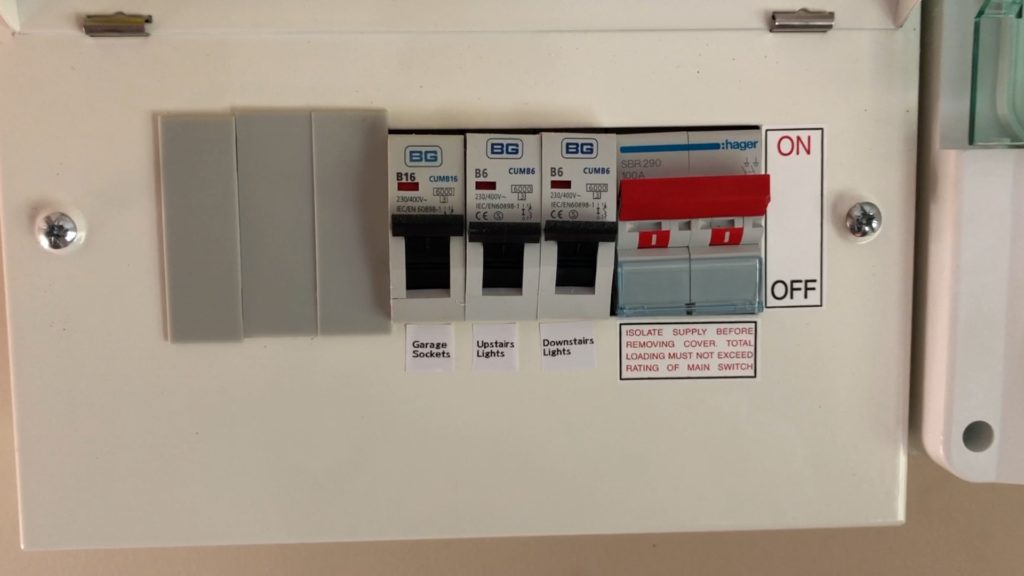
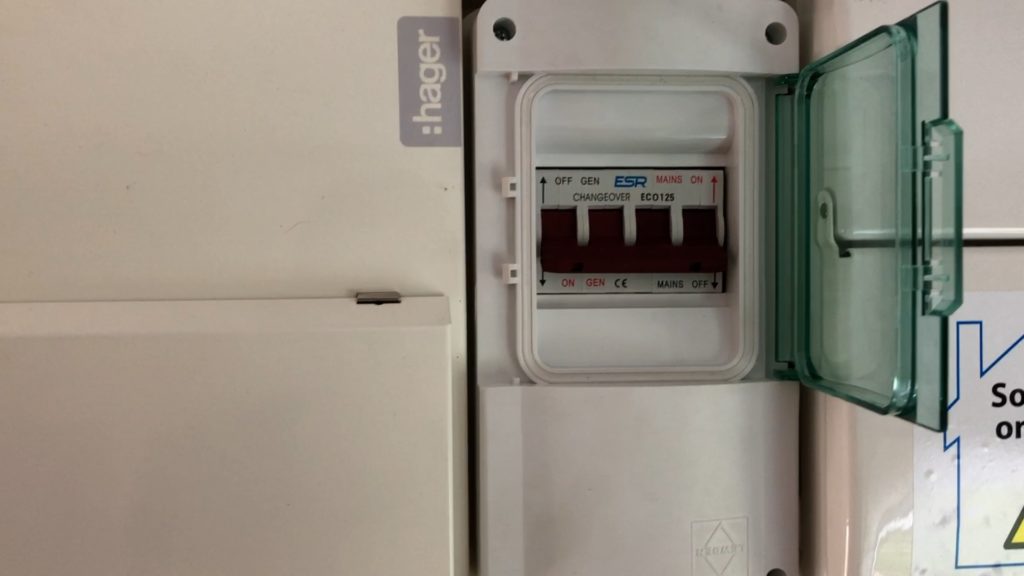
The EM115 is connected to the inverter using a twisted pair from a cat5 cable. The inverter is the AC-coupled version which doesn’t support DC-connected solar panels - it’s purely for providing your home with energy storage. It has another CT clamp wired in directly which is monitoring the solar generation. Underneath you can see a massive WiFi dongle which is basically a full-on computer. This is probably the most annoying part of the inverter for me because it is WiFi only - there’s no Ethernet option which would have been really useful for me especially as the inverter is right next to my main network switch. And then there's the special power socket I've had fitted - this is attached to the EPS output of inverter which provides power straight from the battery during power cuts. I’ve also had my light circuits connected to the EPS in their own dedicated board, and a large switch acting as a manual changeover. In the up position, the EPS board would be running directly off the grid, but I’ve left it in the down position so as the switchover during one of our many power cuts happens automatically.
GivEnergy have actually announced a new second generation inverter which does have an Ethernet port built in, and new batteries with larger capacities and built-in DC isolation, so everything I’ve just shown you is already out of date!
But what I really want to talk to you about is how I’ve integrated this with Home Assistant using local connectivity - so directly over your network without jumping out to the internet.
[Update 2022-07-01: I've put together an updated video here (https://youtu.be/NQ84z_Wa19k) which walks you through installing the Mosquitto add-on and GivTCP as a Home Assistant Add-on. This means you no longer need to use a separate Docker server to run GivTCP. The Github repo is here: https://github.com/sOckhamSter/giv_tcp]
Install Mosquitto
In Home Assistant, click on Settings, Add-ons, the blue Add-on store button in the bottom-right, and look for the Mosquitto Broker add-on. Click on it, click on Install, then wait for it to install.
Then you need to make sure it’s configured as an integration, so click on Settings again, Devices & Services, and hopefully it should be auto-detected. Click on the integration's configure button and follow the prompts to enable it.
Then I really suggest you create a user account just for use by MQTT. You can use your Home Assistant user account if you wanted, but a separate account is a bit more secure. Click on Settings, People, then choose the Users tab at the top. Click on Add User in the bottom right, and fill in some details. I suggest calling the account mqttuser and give it a nice complex password. Toggle the box to say that this user account can only log in from the local network, which prevents this account from being used externally on the internet, and also make it an administrator, then click on create.
Install GivTCP
In Home Assistant, navigate to Settings and Add-ons. Click on the Add-on Store button in the bottom right. In the top-right you’ll see three dots. Click on that to open a menu and choose ‘repositories’. Paste my repository into the Add box, and click on Add, then Close.
https://github.com/britkat1980/giv_tcp
Scroll down the list of available add-ons and you should see GivTCP, so click on that one, and click on ‘install’ which may take a good couple of minutes, especially on a Raspberry Pi.
Next you need to find your GivEnergy inverter's IP address on your local network. Finding this is a tricky thing to walk you through, but perhaps the easiest way to find it is to check your router’s interface. By default it has a hostname that starts with the letters HF, mine for example was HF-A21.
Then go to the add-on's configuration tab and fill in your Inverter IP address, and your MQTT username and password (as created earlier). Save, go back to the Info tab, and click on Start.
Before we start properly, you’re going to need to make sure you have a couple of things up and running in advance. Firstly you’ll need some way to run a Docker container which will act as a link between your inverter and Home Assistant. Hopefully at some point soon the developers will adapt this into an actual Home Assistant add-on which will really simplify this whole process. I’m using my Synology NAS to run Docker because I already use it for a number of other things. Secondly, you need an MQTT broker running.
If you don’t have this already and you’re not sure what you’re doing then head on over to the Home Assistant Add-on store and search for “Mosquitto broker”. Use all of the default options to get it up and running, and then head over to its Configuration. You’ll need to make sure that Mosquitto is accessible securely outside of Home Assistant - start by making sure that a username and password is configured in the Logins section as you can see in my example image. Make a note of the username and password because you’ll need it shortly. Then scroll down to the Network section and make sure that ports 1883, 1884, 8883 and 8884 are all forwarded externally. Once you save the configuration it’ll ask you to restart the add-on. Home Assistant should then auto-detect a new MQTT integration - just make sure that it’s there before continuing.
Over on your Docker server, in my case that’s Synology DSM, the container we’re going to be installing is called GivTCP (https://github.com/britkat1980/giv_tcp). Open Docker, click on Registry and search for one called ‘britkat/giv_tcp-ma’. Double-click on that to kick off the download and get the latest version. Once it’s downloaded, click on the Container tab and then the Create button, choose the giv_tcp image and click on next. For the network type, choose the same network as Docker host and click on next. Now you need to open up the Advanced Settings. There are four crucial items you need to configure. The first is the INVERTER_IP. This is the IP address that your GivEnergy inverter has on your network. Now finding out your inverter’s IP address is a tricky thing to walk you through, but perhaps the easiest way to find it is to check your router’s interface. By default it has a hostname that starts with the letters HF, mine for example was HF-A21.
Now find the MQTT_USERNAME and MQTT_PASSWORD variables - remember those values I asked you to remember earlier?? Well type them in here respectively. Under MQTT_ADDRESS you need to type the IP address of your Home Assistant server or MQTT Broker. Save, run.. and hopefully it’ll detect your inverter.
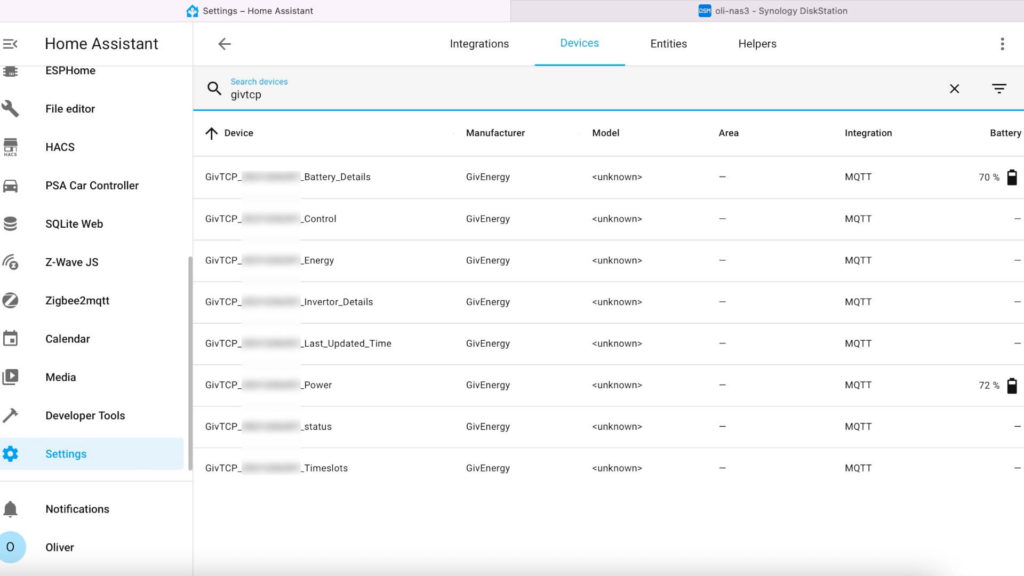
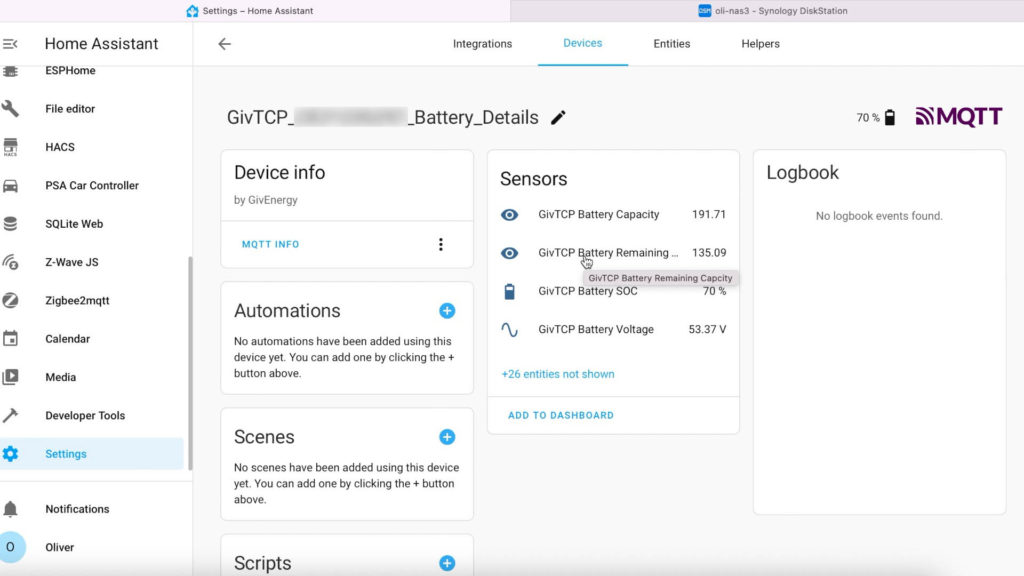
Check your devices list in Home Assistant and if you filter by givtcp you should see several devices. Each device will have a whole bunch of entities.
Now, how have I made use of this? GivEnergy are actually in the process of adding a feature to their app that lets you charge your battery based on the solar forecast, but unfortunately that’s been coming soon for quite a while. I wanted to try and make sure that if the day is forecast to be quite dull and not much solar energy will be generated, then I fully charge the battery. On the flip side if it’s going to be really sunny then I only need to make sure there’s enough charge in the battery to get me through until generation starts. There’s obviously a sliding scale in between those two scenarios and with a bit of trial and error I came up with an automation.
[UPDATE August 2022: Since v1.1.4 of GivTCP, things have changed a bit. I recorded the video before these changes so if you've watched that then come to read the article afterwards, there are a few differences here that you should be aware of. All GivTCP entity names in Home Assistant have changed - they now include the serial number of the inverter or battery. So where you had number.givtcp_target_soc before, it has become number.givtcp_INVERTERID_target_soc where INVERTERID is the actual serial number of your inverter. You'll see these entities once you have it up and running, but just remember that when creating the automation that follows...]
alias: "Battery: Set charge limit from solar forecast v4"
description: ""
trigger:
  - platform: time
    at: "23:45:00"
condition: []
action:
  - variables:
      target_soc: >-
        {% set solar_forecast = states(entity_solar_forecast)|float %} {% if
        solar_forecast > 21.0 %} 40 {% elif solar_forecast > 18.0 %} 45 {% elif
        solar_forecast > 15.0 %} 65 {% elif solar_forecast > 13.0 %} 80 {% elif
        solar_forecast > 10.0 %} 90 {% else %} 100 {% endif %}
  - service: number.set_value
    data:
      value: "{{ target_soc | float }} "
    target:
      entity_id: "{{ entity_inverter_target_soc }}"
  - delay:
      hours: 0
      minutes: 1
      seconds: 0
      milliseconds: 0
  - if:
      - condition: template
        value_template: "{{ states(entity_inverter_target_soc)|float != target_soc|float }}"
    then:
      - service: notify.persistent_notification
        data:
          message: "Battery: Failed to set SOC... trying again."
      - service: number.set_value
        data:
          value: "{{ target_soc | float }} "
        target:
          entity_id: "{{ entity_inverter_target_soc }}"
      - delay:
          hours: 0
          minutes: 1
          seconds: 0
          milliseconds: 0
  - service: input_text.set_value
    data:
      value: >-
        ({{now().strftime("%Y-%m-%d %H:%M:%S")}}) Forecast: {{
        states(entity_solar_forecast) }}kWh | Limit: {{ target_soc }}%
    target:
      entity_id: "{{ entity_helper_logging }}"
  - wait_for_trigger:
      - platform: time
        at: "05:00:00"
  - service: number.set_value
    data:
      value: 100
    target:
      entity_id: "{{ entity_inverter_target_soc }}"
  - delay:
      hours: 0
      minutes: 1
      seconds: 0
      milliseconds: 0
variables:
  entity_solar_forecast: sensor.energy_production_tomorrow
  entity_inverter_target_soc: number.givtcp_INVERTERID_target_soc
  entity_helper_logging: input_text.battery_charge_limit_log
mode: restart
My off-peak energy tariff starts at half-past midnight for four hours so I set this automation to trigger at quarter to midnight. The Forecast.Solar integration provides me with an energy forecast for the following day and stores this in the entity called 'sensor.energy_production_tomorrow', so my first action is to create a variable for use in this automation that estimates a target SOC (or state of charge) percentage based on that solar energy forecast. These are my values - yours may differ based on your expected baseline energy use.
In the second action I set the number.givtcp_INVERTERID_target_soc entity’s state to the calculated variable from the previous step, and then I wait one minute for it to take effect.
Now I had a few issues with it not always applying, so I then added in a check to see if it had worked. This ‘If’ statement compares the entity against the variable and if they don’t match, we try again. I could improve on this by looping around until it works, but to be honest trying twice appears to work fine.
I then output a text string into a text helper (input_text.battery_charge_limit_log) to help with debugging, wait until 5am and set the SOC back to 100%. I do this as a failsafe just in case Home Assistant fails during the day I don’t want the SOC value getting stuck on a low one for days at a time.
If you copy and paste the automation, take a look at the 'variables' section at the end - this is where you replace my entity values with your actual entities, making sure you replace INVERTERID with the actual ID of your GivEnergy inverter.
Energy Dashboard Workaround
Are you having issues using the GivTCP energy sensors in Home Assistant's dashboard? The problem is probably caused by the occasional zero-value readings (check your energy history graph for the sensors to confirm that). My workaround for this is to create template sensors that filter out the zeroes. You can then use these filtered sensors in your energy dashboard instead, replacing INVERTERID with your inverter's serial number where appropriate:
template:
  - sensor:
  # ===============================================================
  # GivTCP Filtered
    - name: "GivTCP Battery Charge Energy Total kWh FILTERED"
      unit_of_measurement: 'kWh'
      device_class: 'energy'
      state_class: 'total_increasing'
      state: >-
         {% if states('sensor.givtcp_INVERTERID_battery_charge_energy_total_kwh') | float == 0 %}
           {{ states('sensor.givtcp_battery_charge_energy_total_kwh_filtered') }}
         {% else %}
           {{ states('sensor.givtcp_INVERTERID_battery_charge_energy_total_kwh') }}
         {% endif %}

    - name: "GivTCP Battery Discharge Energy Total kWh FILTERED"
      unit_of_measurement: 'kWh'
      device_class: 'energy'
      state_class: 'total_increasing'
      state: >-
         {% if states('sensor.givtcp_INVERTERID_battery_discharge_energy_total_kwh') | float == 0 %}
           {{ states('sensor.givtcp_battery_discharge_energy_total_kwh_filtered') }}
         {% else %}
           {{ states('sensor.givtcp_INVERTERID_battery_discharge_energy_total_kwh') }}
         {% endif %}