
GivTCP v2: GivEnergy and Home Assistant with Solar Forecast Automation
UPDATE 2025! This article is now out of date. The current version of GivTCP at the time of writing is v3 and makes use of a different and simpler setup process. Please see this video for the latest instructions: https://youtu.be/d06Mqeplvns
Since I published my original videos and articles on how to set up Home Assistant to talk to your GivEnergy Inverter using the GivTCP add-on, that add-on has moved on massively. I’m going to go over a few of those new features and if you’re new to this I’ll also show you how to set it up from scratch.
What's New?
So what’s new then? Well, for starters it now supports up to three inverters - each with multiple batteries connected. That’s going to come in handy for the wealthy ones amongst you… sadly I’ve not been able to test this out because I only have one of each, but my brother-in-law has two batteries attached to a single inverter and I can confirm it works well for him.
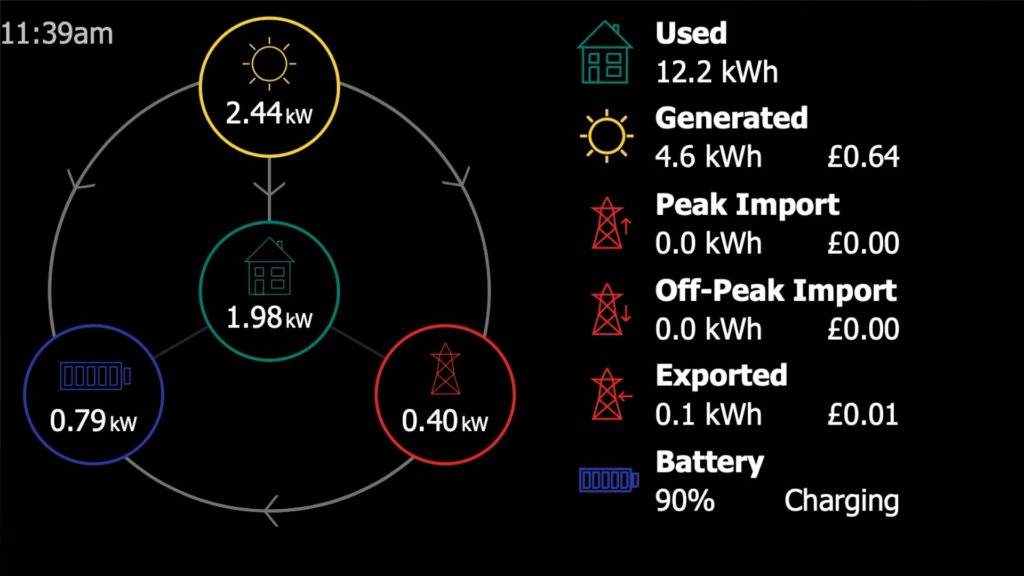
What else? There’s a handy little web interface that displays all sorts of useful power flows and stats. The design mimics the GivEnergy app itself and is quite addictive to watch. I think it’s intended to be shown on a custom-built in-home-display to replace your smart meter one. You can tell GivTCP your tariff details and this web interface will keep track of how much you’re spending too.
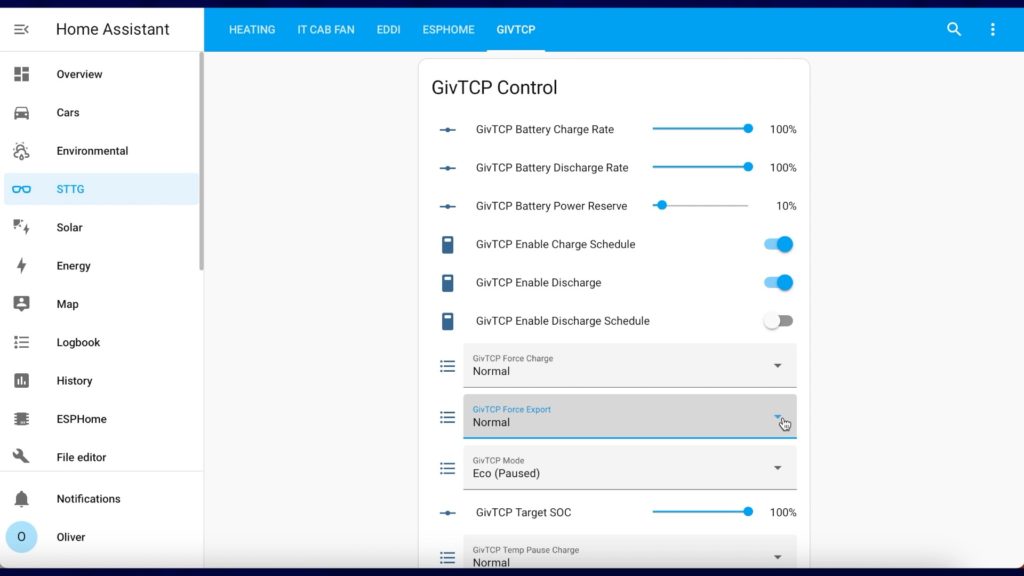
There are some new controls available too, you can force a charge immediately, force an export, pause charging and discharging, all for specific periods of time.
And finally there’s the ability to automatically calculate and set the state of charge level based on the solar forecast. I’ll go over configuring the solar forecast automation feature towards the end of the article.
Octopus Energy using my referral link:
speaktothegeek.co.uk/energy

Existing customer? Find out how you can benefit too. T&Cs apply (only one switching offer per household)
Installation Overview
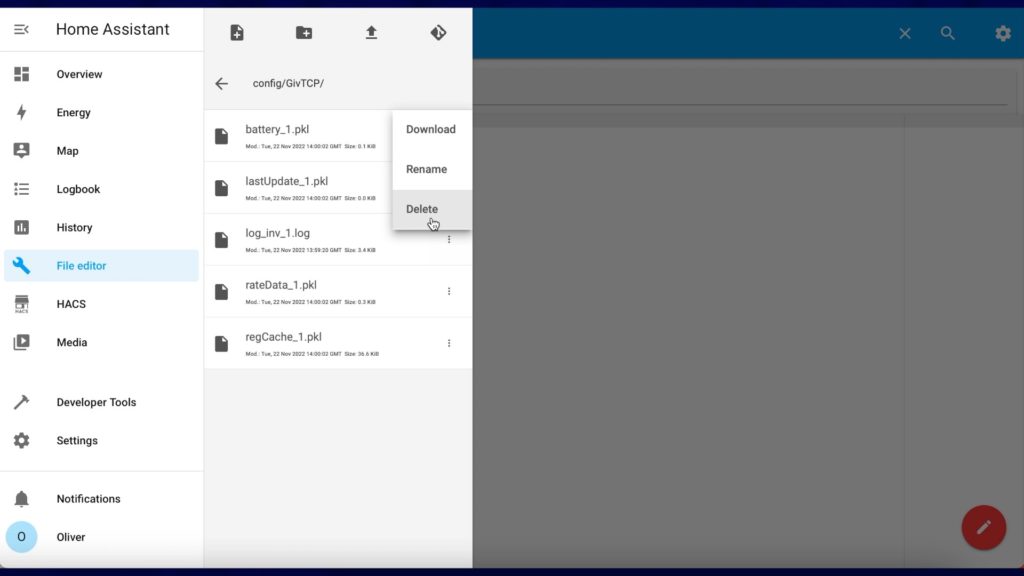
If you’ve already installed an older version of GivTCP as an add-on then uninstall that version first! Once uninstalled, make sure you also remove all of the files in the GivTCP folder that’s inside your config directory. I hit a bit of an issue when upgrading which caused the inverter data to only update once every three to four minutes. Issues like that should have been resolved now, but I suggest you delete the files anyway to play on the safe side.
This is a two step process. Step 1 is to install the Mosquitto Broker add-on. Mosquitto is an MQTT broker that lets lots of smart home solutions talk to each other. GivTCP will send and receive messages with Mosquitto and Mosquitto will relay those with Home Assistant. I’ve had a number of people ask me why I include this extra step of installing the Mosquitto Broker add-on when the GivTCP add-on already has it built-in. So yes, it might seem a bit of an unnecessary step at first, but Home Assistant doesn’t like talking to more than one MQTT broker. Let’s say you wanted Home Assistant to also talk to Zigbee2MQTT, or even a web-based MQTT service such as Glow, if you used the one built-in to GivTCP then you’re limiting your future options a bit.
Step 2 will be to install the GivTCP add-on and configure it to talk to Mosquitto.
Install Mosquitto
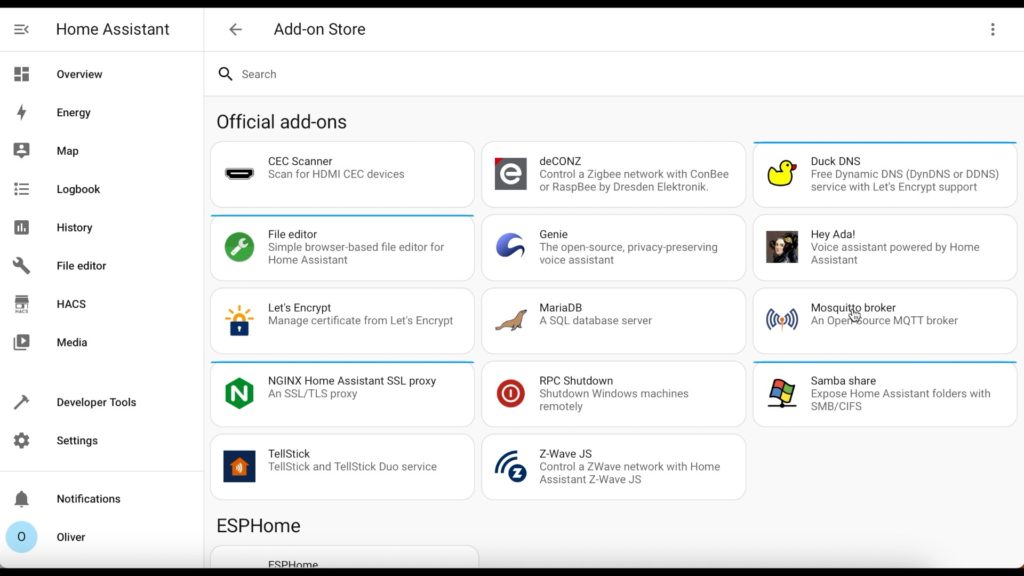
Within Home Assistant, click on Settings, Add-ons, and click on the blue Add-on Store button in the bottom-right hand corner. Look for Mosquitto Broker and click on install.
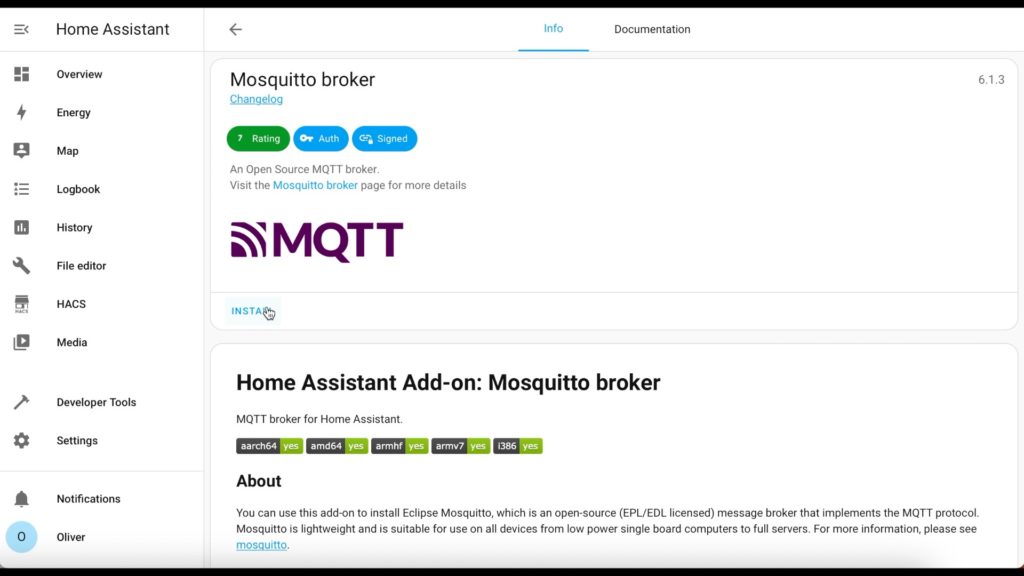
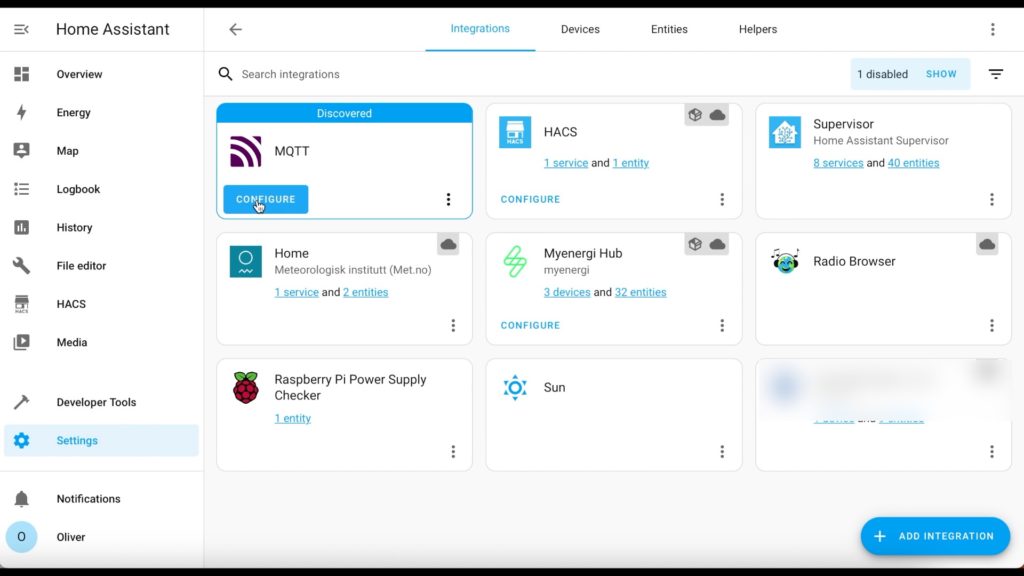
Once that’s installed you just click on ‘Start’ and it should boot up with no additional configuration required. Home Assistant should auto-detect that it’s been installed and you can double-check that by going to Settings, Devices and Services, and it should show as discovered. Click on the blue Configure button, click on Submit, then Finish and it’s all ready to go.
It’s best practise to create a user account just for MQTT. You can use your Home Assistant username and password if you’d like, but a dedicated MQTT account can be limited to just run locally, limiting the attack points on your Home Assistant server.
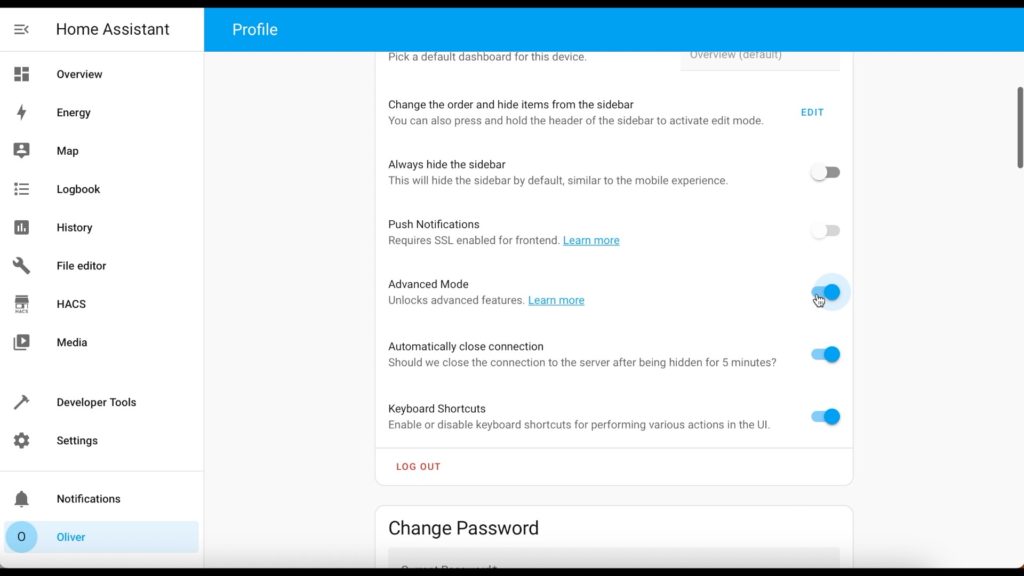
You need to enable Advanced Mode first so click on your username in the menu then scroll down your profile options and toggle Advanced Mode.
Next click on Settings, People, and choose the Users tab up at the top, then the blue Add User button in the bottom-right. Fill in whatever details you prefer, but in this demo I’m going to use mqttuser, and a simple password of password. Please please please use a better password than that in your installation! Tick the box that says “can only log in from the local network” and Administrator. Finally click on Create and your new user account is ready to use.

Install GivTCP
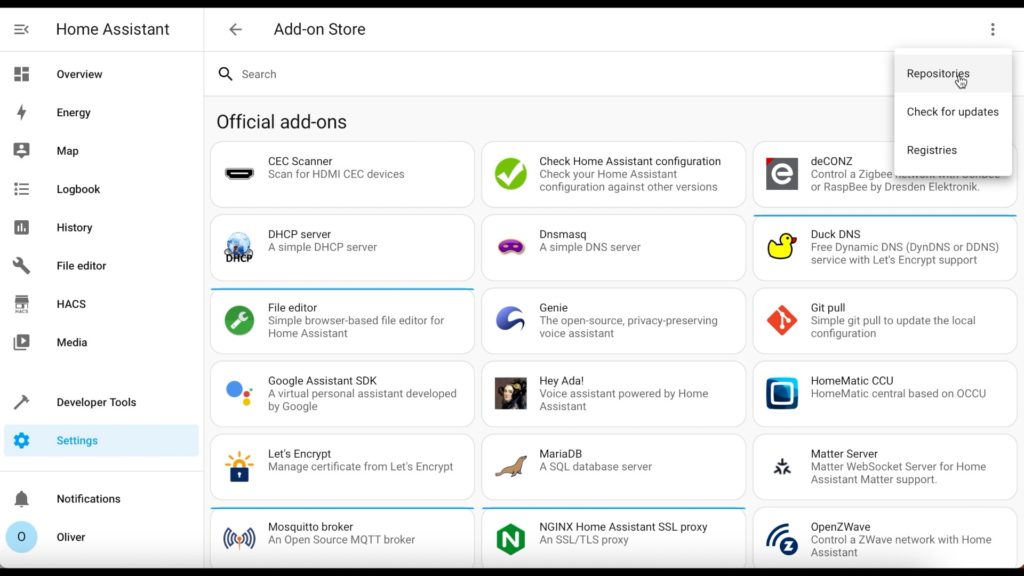
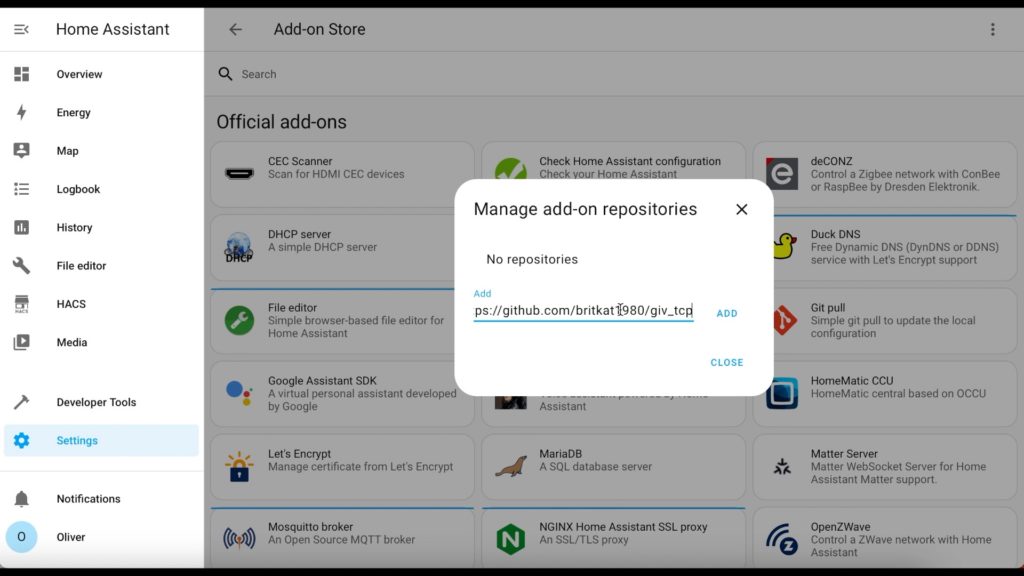
To install the GivTCP add-on in Home Assistant, click on Settings, Add-ons, and then the blue add-on store button in the bottom-right again. We now need to tell the add-on store about the GivTCP repository and we do this by clicking on the three-dots in the top-right and selecting ‘repositories’. In the add box paste the URL of the GivTCP repository:
https://github.com/britkat1980/giv_tcp
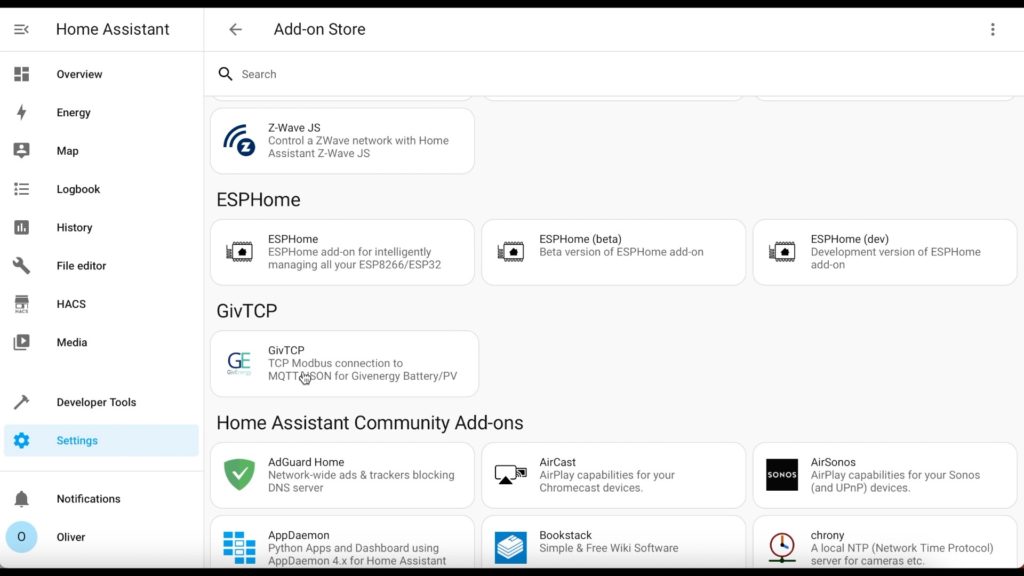
Click on ‘Add’, then ‘close’. You may need to refresh your browser before continuing so as GivTCP will appear in the list. Once you've done that then scroll down until you see GivTCP. Click on GivTCP, then click on Install, and then wait a couple of minutes for that to finish installing.
Once installed you must configure it first, so click on the Configuration tab at the top to get started.
If you only have one inverter, then leave the NUMINVERTERS value as 1 and type in the IP address of your inverter in the INVERTER_IP field. Make sure that the correct number of batteries connected to this inverter is specified in the NUMBATTERIES_1 field.
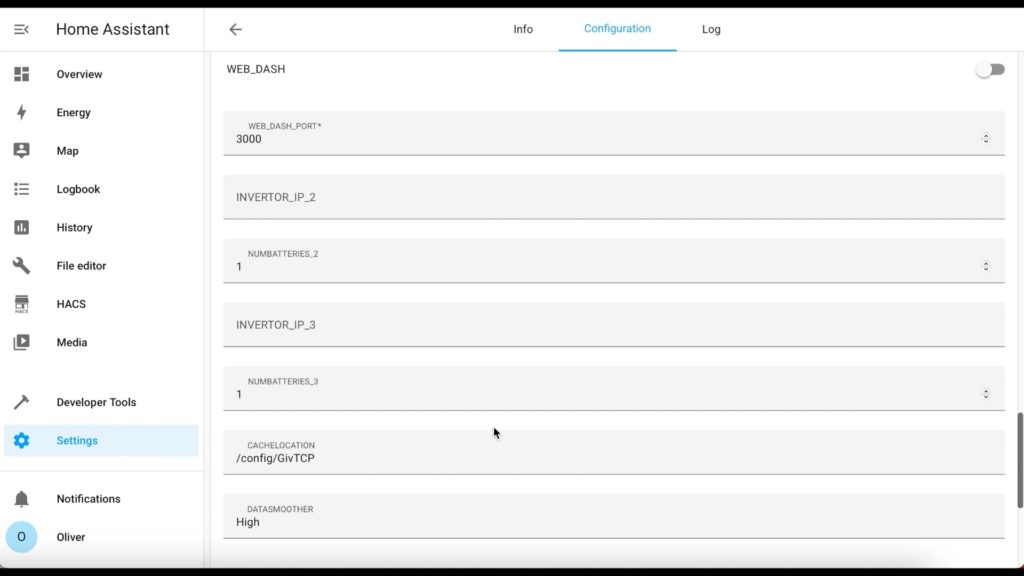
If you have more than one inverter then make sure that the correct NUMINVERTERS value is set for you, scroll down and find the INVERTER_IP_2 and the INVERTER_IP_3 fields. You need to add the IP addresses of any additional inverters in these fields, and the number of batteries connected to each one in the relevant fields too.
Finding out your inverter’s IP address is a bit tricky. I suggest you log on to your router’s admin interface and look for connected devices starting with the name ‘HF’. For example, mine was HF-A21. I’ve asked GivEnergy if they can include the IP address on the My Inverter page of the web portal, and if they get back to me I’ll update this article because that would make life much easier! If you were to also ask them to add this feature then maybe they’ll start listening…
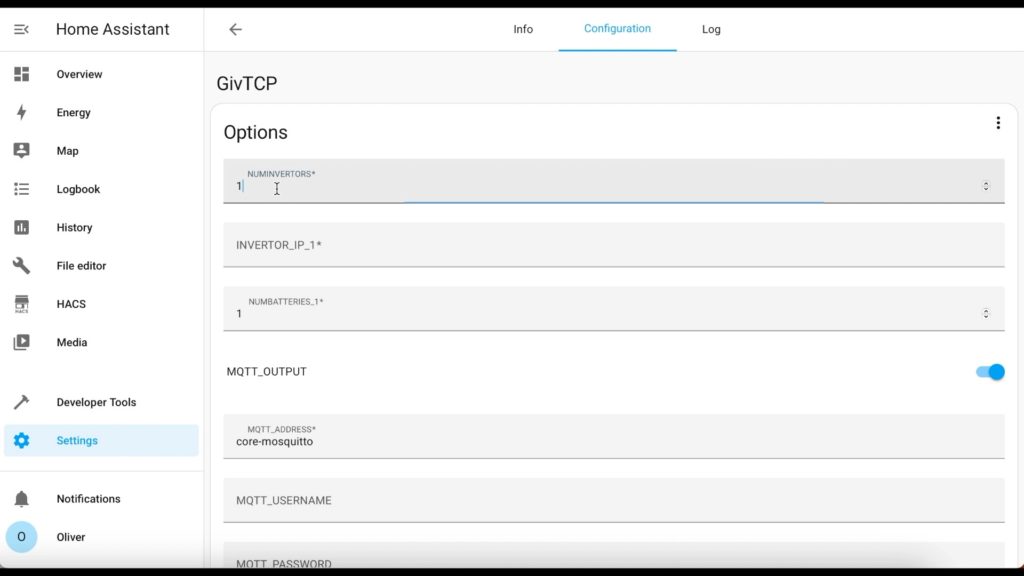
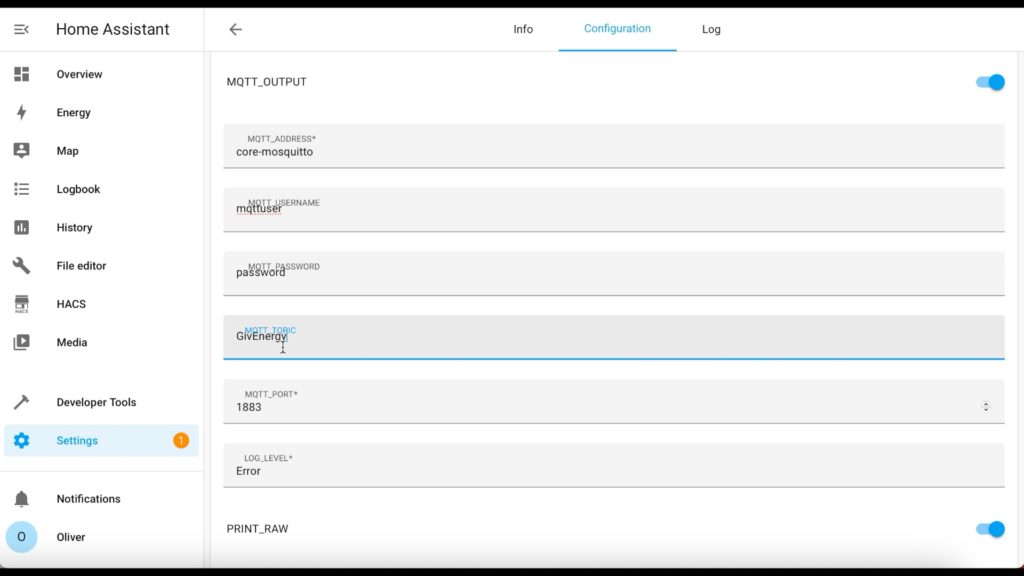
Scroll back up to the MQTT section and if you’re using the Mosquitto Broker add-on that I talked you through installing then all you need to to is fill in the username and password for that dedicated MQTT user account that you created. For the MQTT topic, I think you can leave this blank and it’ll use GivEnergy as the default value, but I suggest you fill in something 'GivEnergy' here just to avoid any potential issues in the future.

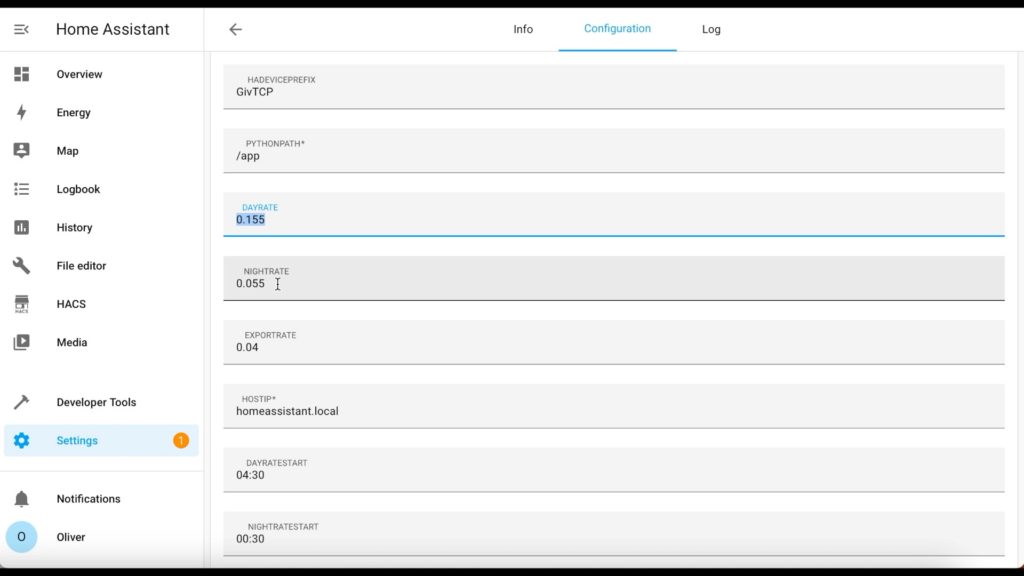
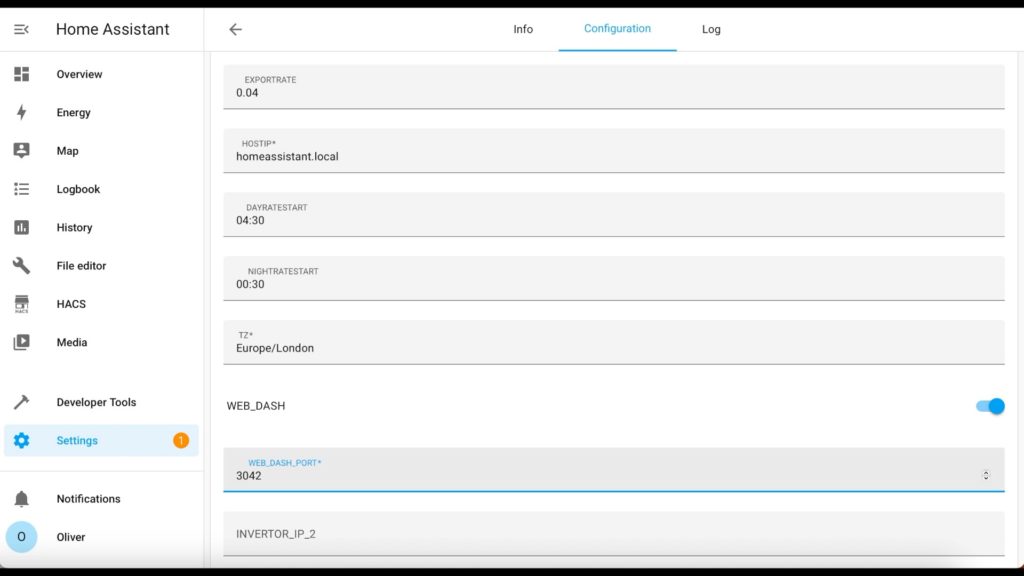
If you'd like to use the fancy new web dashboard then scroll down and find the DAYRATE field. If you’re on Economy 7 or a smart tariff like Octopus Go, you need to fill in your peak rate in the DAYRATE field, your off-peak rate in the NIGHTRATE, and your export rate in the EXPORTRATE field if applicable. You should also set the start time for your off-peak rate in the NIGHTRATESTART field and the end of off-peak time in the DAYRATESTART field. Turn on the WEB-DASH toggle and set the port - you can leave it at 3000 if you want, but be aware that this port conflicts with a lot of other add-ons… I suggest you change it. I changed mine to 3042.
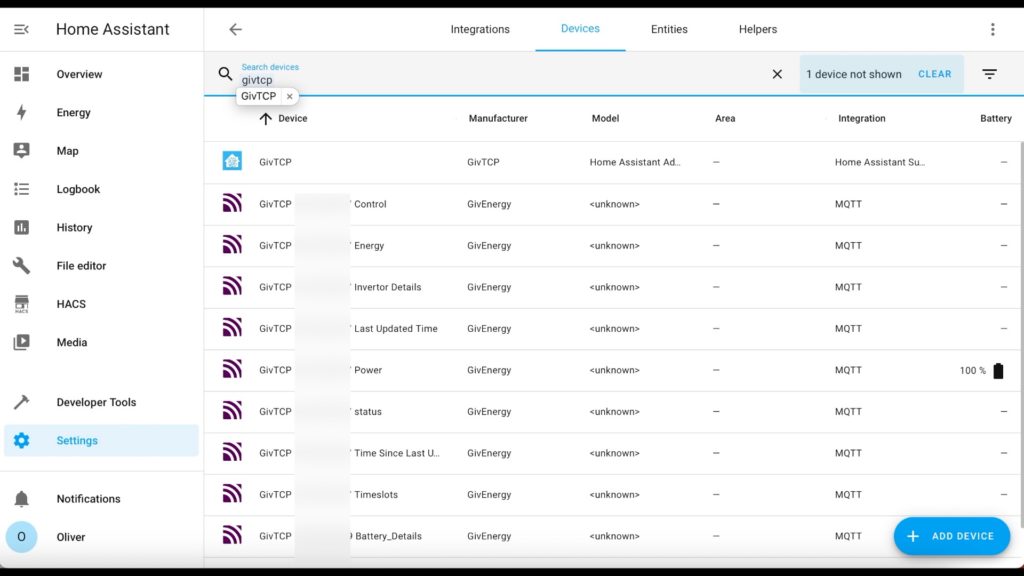
Once you've finished configuring it, scroll all the way to the bottom, click on save, then navigate to the info tab and click on 'start' to start the add-on. It can take about two minutes for it to get going and populate Home Assistant with auto-detected devices and entities. You can find these by clicking on Settings, Devices and Services, choosing Devices at the top, and then filtering by GivTCP. All of the various entities are organised into convenient devices
Solar Forecast Automation
If you’d like to have a play with the solar forecast automation then there’s a bit more setup work required. One thing to keep in mind is that I think it’s only supposed to work during the summer months, there are some hard coded values in the script which appear to disable it from October to March so bear that in mind if you’re hoping to see it in action over Winter.
You’ll need two things before we begin - a Solcast API key and a GivEnergy API key. Let’s start with the Solcast one, you need to sign up for a free home solar Solcast account at www.solcast.com and once in there you must define your solar setup. There are a few restrictions here with the free account offering and it works best with a single aspect, single array setup. If you have multiple aspects like an east-west array then this will unfortunately be a lot less accurate for you.
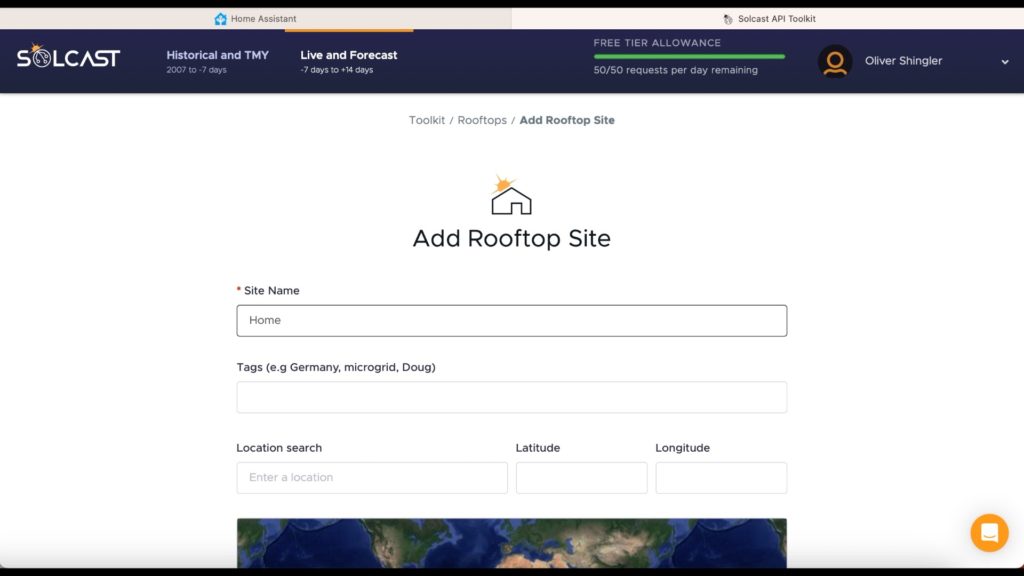
Once signed up with Solcast, you need to add a site by clicking on the Add Site button.
Give the site a name, such as ‘Home’, and then search for a location. This location must be your home location and it will be verified by the Solcast team to make sure you’re not using it for commercial purposes, unless of course you are paying for their commercial account.
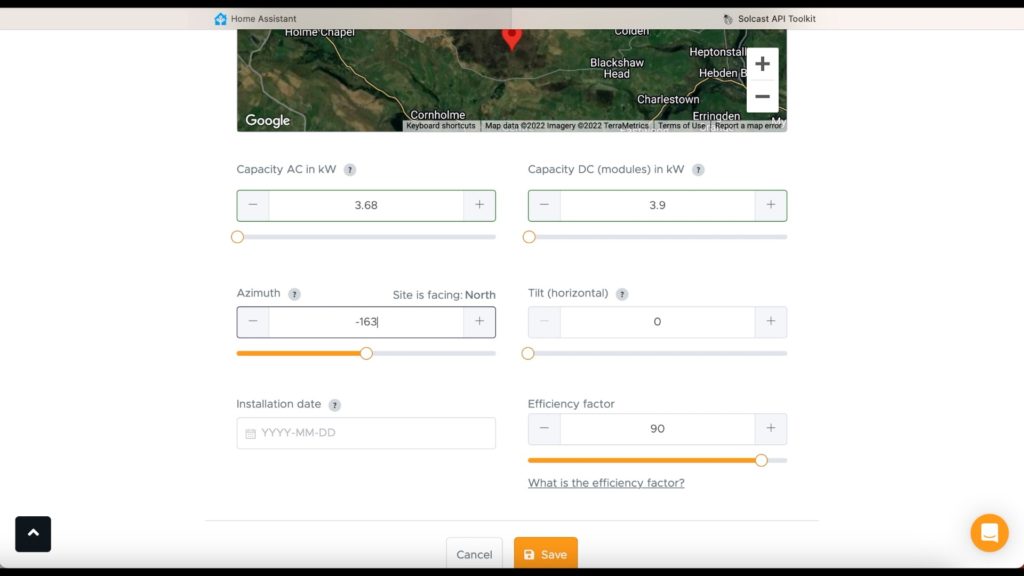
You’ll now need to fill in the rated power capacity of your AC inverter, so for example mine is 3.68 kW, and then the peak capacity of all of your panels. Mine is 3.9kW.
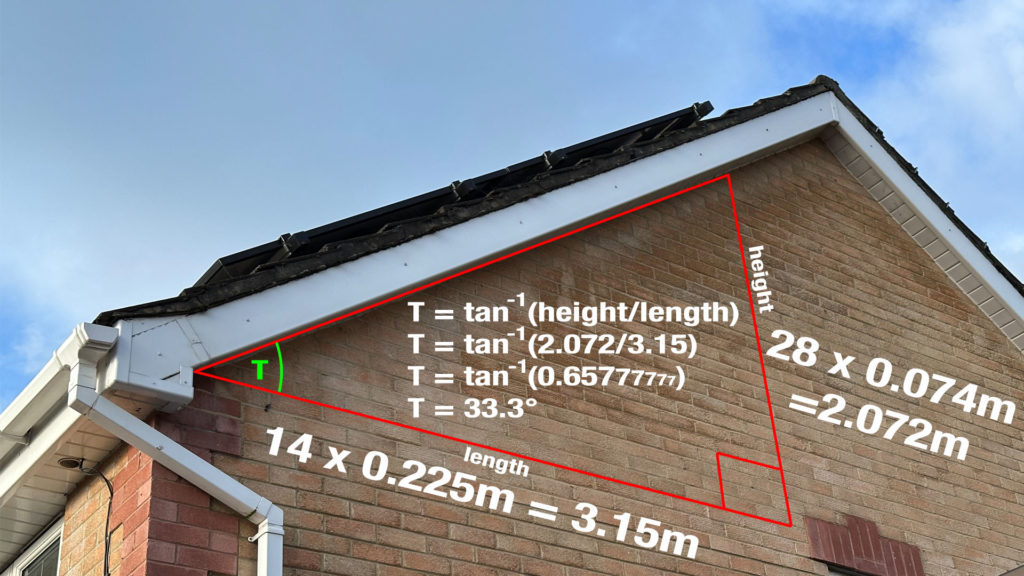
Then go and grab a compass because you need to know which way your panels are facing. So North facing would be 0 degrees, East would be -90 degrees. My panels are south-south-east which is about 163 degrees, or -163 on the Azimuth slider.
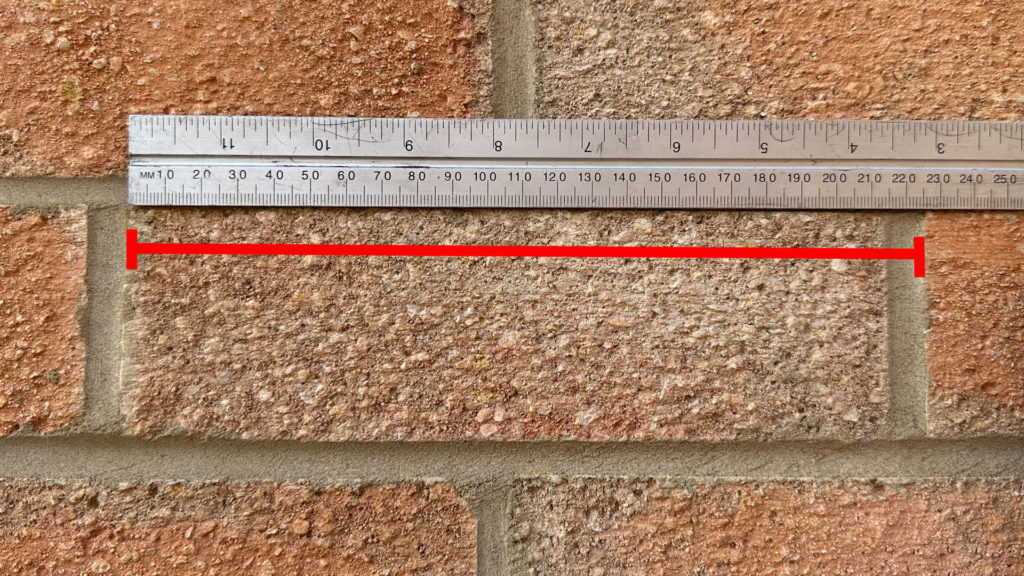
And the last tricky bit of information you need is the tilt or pitch of your roof. In order to do this you need to do some measuring. I started by measuring the width of one brick, including the mortar one side only. Then I measured the height of the brick, also including one layer of mortar. When you’ve done that, find a convenient point where you can count along for a whole number of bricks. I counted along 14 bricks exactly and calculated the length. Then take a right-angle upwards to the roof and calculate the height in the same way.
That gives us a nice right-angled triangle, and we need to calculate the angle between the horizontal side of the triangle and the hypotenuse (I’ve marked as T in the images). We do this using a bit of trigonometry. Because we know the height and the length of the triangle, we need to calculate the inverse tangent of the height divided by the length. For my roof, this calculates to a tilt of about 33 degrees.

Back on the Solcast new site page, fill in the tilt and the date of installation which is used to estimate panel degradation, and save.
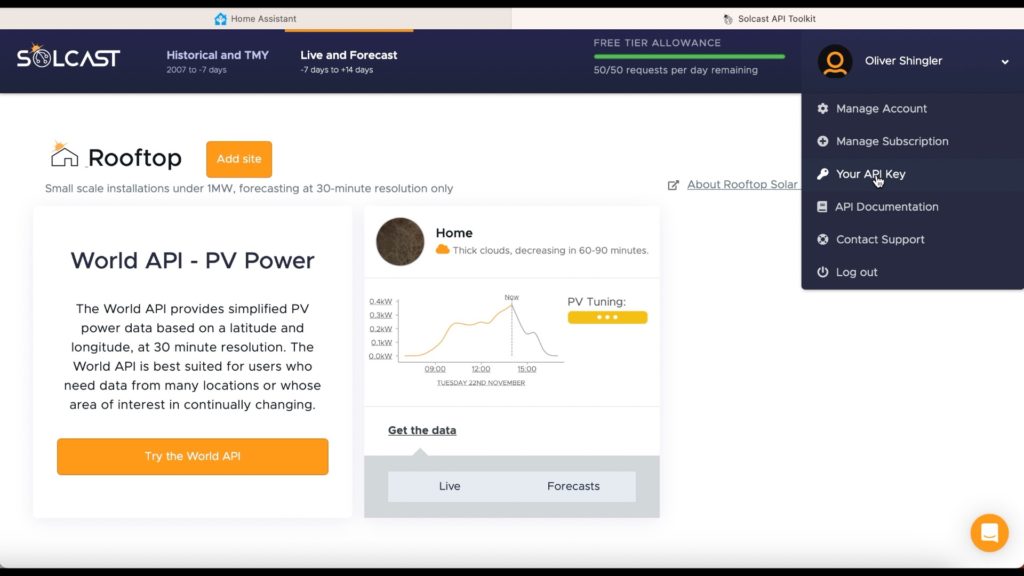
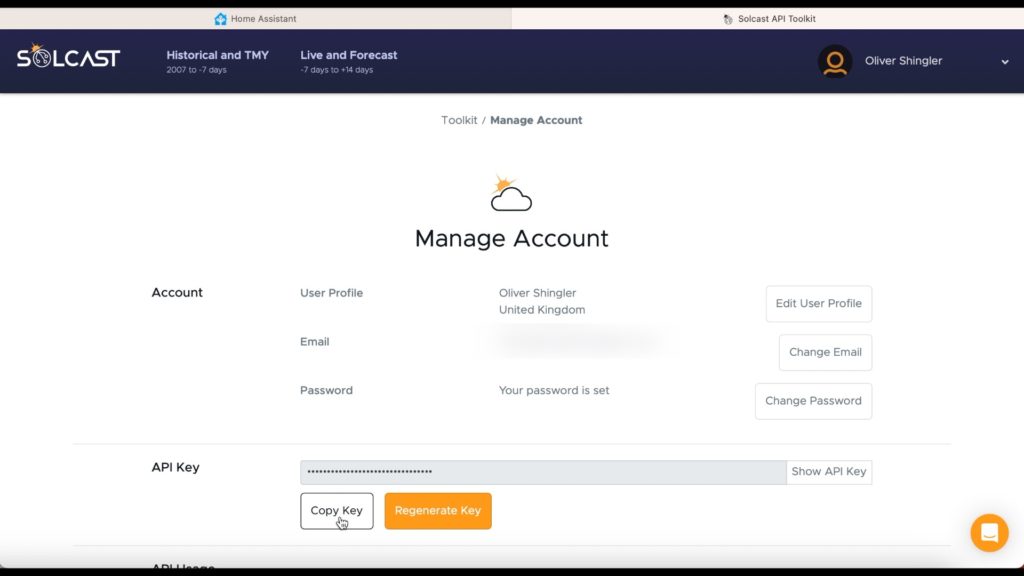
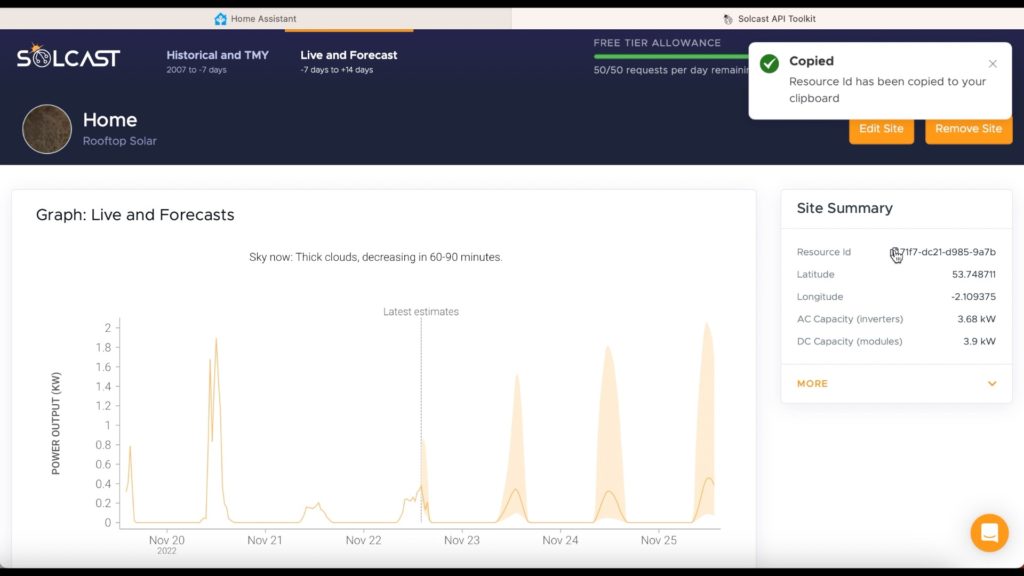
To get the API key click on your name in the top-right to expand the menu and choose 'Your API Key'. Copy and paste it into the SOLCASTAPI field on the GivTCP configuration page. You'll also need to grab the site ID, also called the site resource ID by clicking on the Solcast logo top-left, clicking on the name of the site you created on the Solcast dashboard, and copying the resource ID value from the Site Summary panel. Paste that into the SOLCASTSITEID field in the GivTCP configuration page.

Lastly we need your GivEnergy API key. Log in to https://portal.givenergy.cloud, click on Account Settings from the left-hand menu, click on the 'Manage Account Security' button in the top-right corner of that page, and generate a key. Please note that this process is slightly different to that shown in the video because the key generation location has been moved to this new page. Once you’ve generated it, copy and paste it somewhere safe because it’ll never be displayed again and the only way to get it back is to reset and generate a new one. Paste the API key into the GEAPI field on the GivTCP configuration page, save and restart the add-on. Hopefully your target SOC will be set automatically based on the Solcast solar forecast and your usage profile from GivEnergy.