
SwitchBot API v1.1 and Home Assistant

SwitchBot make a lot of very interesting and often unique gadgets, like the SwitchBot Curtain and my personal favourite the Blind Tilt. They also make a number of other devices and sensors, such as the temperature meter and hygrometer. Now, what if you didn’t want to use a direct Bluetooth connection to Home Assistant, maybe because of range issues or you want to access a sensor on a remote broadband connection? Well, SwitchBot have a cloud API that lets you do just that. Recently though they’ve updated that API and changed the way authentication works, which means it’s a bit trickier to get working. But, I’ve sorted that problem so keep reading and I’ll show you how!
SwitchBot sent me their new Hub 2 to have a play with. This is quite an upgrade on the older Hub Mini because for starters it’s got a display showing you the current temperature and humidity, and that got me thinking, how can I view the temperature and humidity data from this hub in Home Assistant? Well, there is a really easy way and that’s using Matter because the Hub 2 supports Matter. If you enable the Matter integration in Home Assistant and then pair the Hub 2 with Home Assistant using Matter, then those two sensors just appear straight away. It’s ridiculously easy, but for this article what I want to show you is how to get SwitchBot sensor data and even control a SwitchBot device from Home Assistant using their web-based API.
API Token and Secret Key
In order to use the SwitchBot API, you must send a special authentication signature in the header of the request. The API documentation provides a few examples of how to create this signature by taking a combination of your SwitchBot API token, a timestamp, and your API secret and passing them through an HMAC function. But how can you do that easily in Home Assistant? Well, I managed it by creating a command line sensor which calculates the required values and sticks them in as the sensor’s state for you to use in other rest-based sensors and switches.
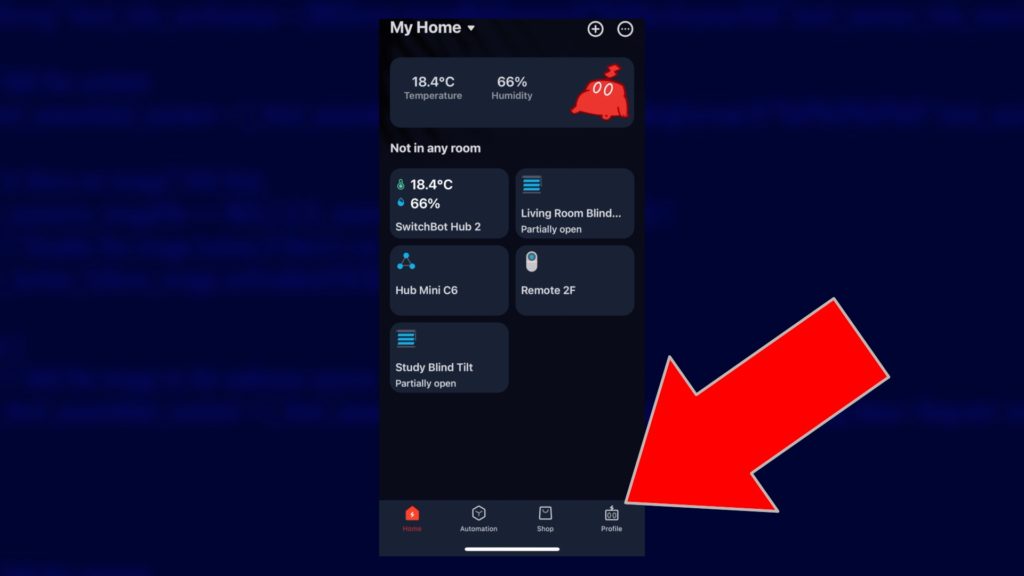
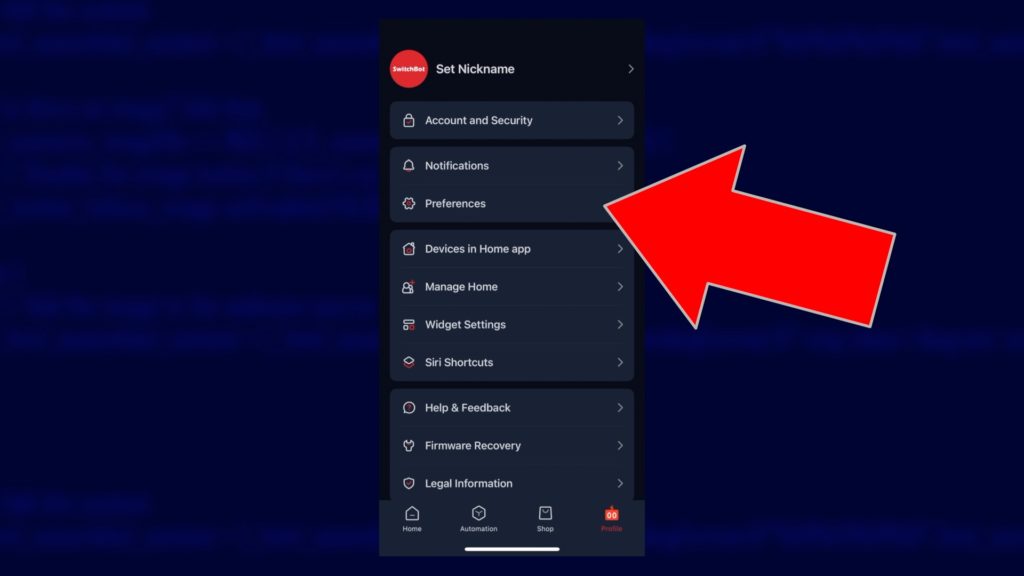
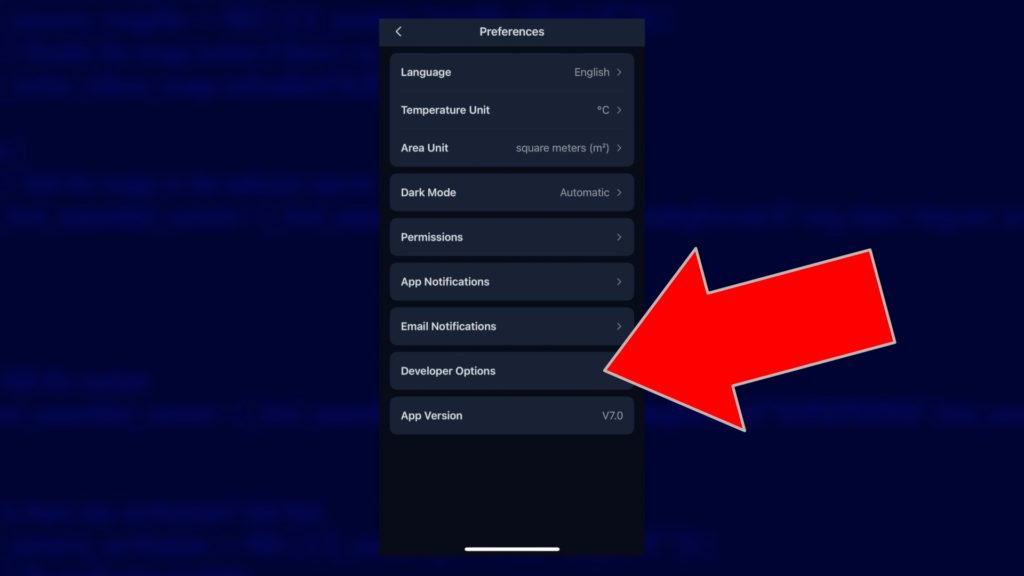
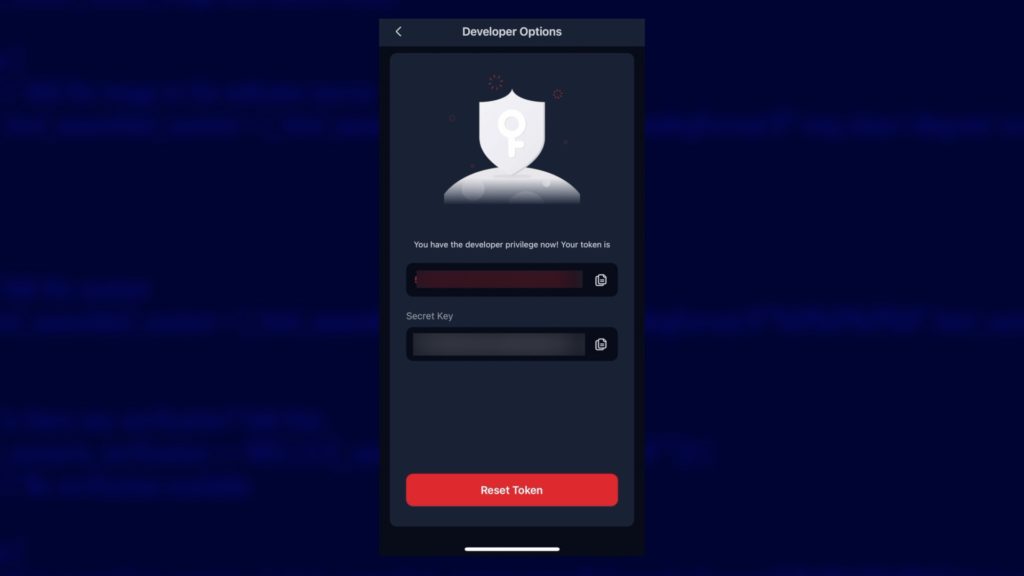
You’ll need to get your SwitchBot API token and secret first so open up the SwitchBot app, tap on the Profile icon in the bottom right, go to Preferences, tap on About and finally open the Developer Options page. You’ll be shown your token and secret key. Copy and paste those somewhere safe because you’ll need them in the next step.

Text Helpers
We’re going to need to create a couple of text helpers to store the token and key. Navigate in Home Assistant to:
Settings > Devices & Services > Helpers (tab) > Create Helper (button in bottom-right)
Choose the type of 'Text' and give it the name 'switchbot_token'. It’s crucial that you name these entities exactly as I’ve written here for use later on in this process. Once you've created the entity, open it up from the Helpers list and paste your API token into the helper's value field. Close the helper information window to save it.
Repeat the process to create a helper named 'switchbot_secret' and paste your secret key string into this helper.
Calculate 'Sign' String
Now we need to edit the configuration.yaml file. I prefer to use the File editor add-on as it’s nice and easy to install from the Add-on store.
Paste in the following command line sensor:
command_line:
  - sensor:
      name: switchbot_sign
      command: >
          python3 -c 'import hashlib;import base64;import hmac;import time;nonce = "";token = "{{ states('input_text.switchbot_token') }}";secret = "{{ states('input_text.switchbot_secret') }}";t = int(round(time.time() * 1000));string_to_sign = "{}{}".format(token, t);string_to_sign = bytes(string_to_sign, "utf-8");secret = bytes(secret, "utf-8");sign = base64.b64encode(hmac.new(secret, msg=string_to_sign, digestmod=hashlib.sha256).digest());print("{\"sign\":\"" + format(str(sign, "utf-8")) + "\",\"t\":\"" + format(t) + "\"}")'
      json_attributes:
        - 't'
      value_template: "{{ value_json.sign }}"
      scan_interval: 60
All this does is read the API token and secret key from those helper entities, which is why naming them exactly as I said is important, and creates a sensor which has the value of the signature you need to authenticate against the API and an attribute called ’t’ containing the timestamp used. This is refreshed every 60 seconds so as it’s always valid.
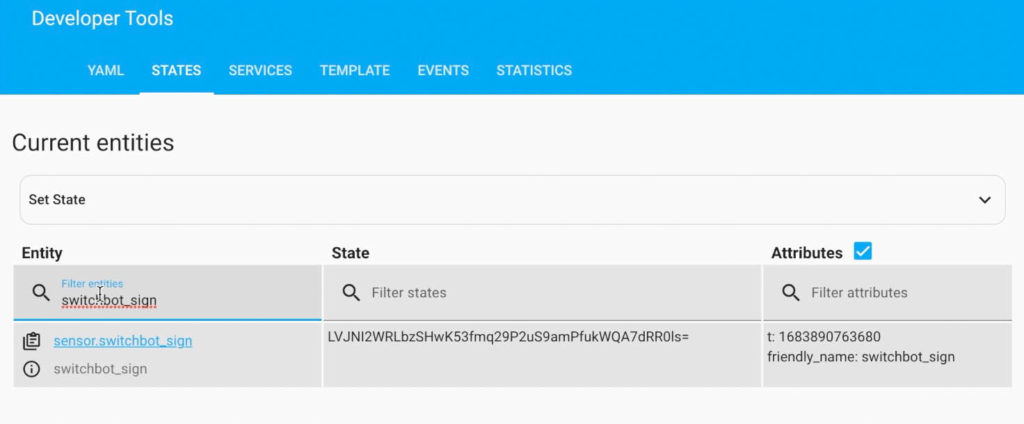
Reboot Home Assistant and once it’s back running, you can go to Developer Tools > States and filter by switchbot_sign. You’ll see one entity with a string as its value, and the timestamp attribute in the last column.
Rest Sensors
Now we need to make use of this, and the first thing I suggest you do is create a sensor which grabs a list of all of your SwitchBot devices. Not only is this a good test to see if the API is working, but it’s also very handy to help you get the device IDs for everything in order to help you set up other sensors. Paste in the following configuration:
rest:
  - resource: https://api.switch-bot.com/v1.1/devices
    scan_interval: 3600
    headers:
      Authorization: "{{ states('input_text.switchbot_token') }}"
      sign: "{{ states('sensor.switchbot_sign') }}"
      t: "{{ state_attr('sensor.switchbot_sign','t') }}"
      Content-Type: "application/json"
      nonce: ""
    sensor:
      - name: "SwitchBot All Devices"
        unique_id: switchbot_all_devices
        value_template: 'OK'
        json_attributes:
          - body
  - resource: https://api.switch-bot.com/v1.1/devices/HUBDEVICEID/status
    scan_interval: 300
    headers:
      Authorization: "{{ states('input_text.switchbot_token') }}"
      sign: "{{ states('sensor.switchbot_sign') }}"
      t: "{{ state_attr('sensor.switchbot_sign','t') }}"
      Content-Type: "application/json"
      nonce: ""
    sensor:
      - name: "SwitchBot Hub 2 Temperature"
        unique_id: switchbot_hub_2_temperature
        value_template: "{{ value_json.body.temperature }}"
        unit_of_measurement: "°C"
        device_class: temperature
      - name: "SwitchBot Hub 2 Humidity"
        unique_id: switchbot_hub_2_humidity
        value_template: "{{ value_json.body.humidity }}"
        unit_of_measurement: "%"
        device_class: humidity
This configuration provides you with three sensors. The first one is the 'all devices' sensor. It’s set to update every 3600 seconds, which is every hour. The SwitchBot API has a daily limit of 10,000 requests so unless you really need to be updating very frequently, I suggest you be careful with the refresh values. It’s calling the all devices API URL and passing in headers of your Token as the Authorisation parameter, the latest calculated signature value, and the timestamp associated with that signature.
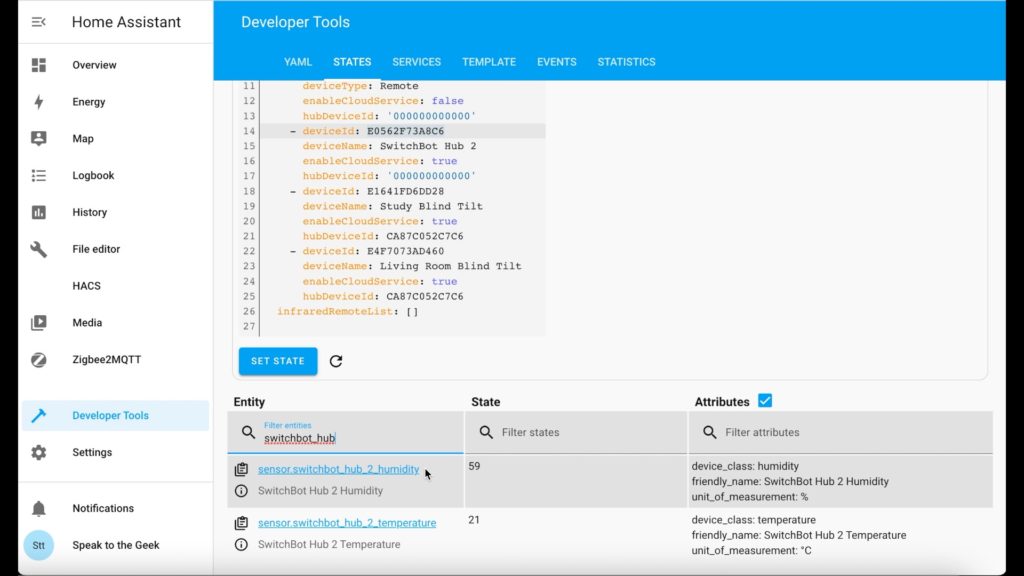
The second and third sensors require you to replace the value HUBDEVICEID with the actual device ID of you Hub 2 or Meter temp/humidity sensor. If you save this configuration and restart Home Assistant, then those last two sensors won't work until you do actually change HUBDEVICEID with a value you can find in new 'switchbot_all_devices' sensor. Bit of a chicken and egg situation here I know! You might want to paste that second part of the configuration in once you have those device IDs!
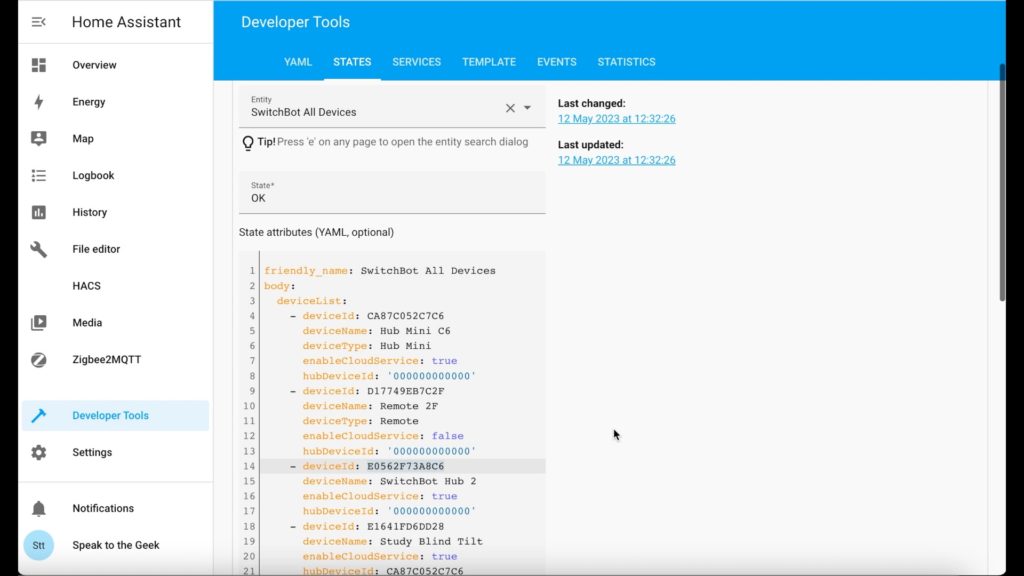
Anyway, restart Home Assistant and use Developer Tools > States, filter by switchbot_all_devices and view the attributes of that sensor to see a list of all of the devices associated with your SwitchBot account including their device IDs that you can use in the configuration of the second and third sensors.
Control Devices
So we’ve got authentication working, and we’ve managed to read data from devices using the API. But what if we wanted to control a SwitchBot device? Well it involves creating several more items in the configuration. The example I’m going to show you is how to control a SwitchBot Blind Tilt, because that’s what I have to hand, but because the Hub 2 and the Hub Mini both have IR blasters built in to them, you could use the same principle to send IR commands from Home Assistant and control your TV or air conditioner.
We start by creating a rest_command entity for each specific action that we want to carry out. So for my blinds I need a command to open them and a separate command to close them. If you look at the configuration below you can see the device ID in both commands, and in the payload section there’s a command for fullyOpen in the open one and closeDown in the close one.
rest_command:
  switchbotapi_studytilt_open:
    url: https://api.switch-bot.com/v1.1/devices/E1641FD6DD28/commands
    method: POST
    headers:
      Authorization: "{{ states('input_text.switchbot_token') }}"
      sign: "{{ states('sensor.switchbot_sign') }}"
      t: "{{ state_attr('sensor.switchbot_sign','t') }}"
      Content-Type: "application/json"
      nonce: ""
    payload: '{"commandType": "command","command": "fullyOpen"}'
    content_type:  'application/json; charset=utf-8'
  switchbotapi_studytilt_close:
    url: https://api.switch-bot.com/v1.1/devices/E1641FD6DD28/commands
    method: POST
    headers:
      Authorization: "{{ states('input_text.switchbot_token') }}"
      sign: "{{ states('sensor.switchbot_sign') }}"
      t: "{{ state_attr('sensor.switchbot_sign','t') }}"
      Content-Type: "application/json"
      nonce: ""
    payload: '{"commandType": "command","command": "closeDown"}'
    content_type:  'application/json; charset=utf-8'

cover:
  - platform: template
    covers:
      switchbot_studyblinds:
        device_class: blind
        friendly_name: "Study Blinds (SwitchBot API)"
        open_cover:
          service: rest_command.switchbotapi_studytilt_open
        close_cover:
          service: rest_command.switchbotapi_studytilt_close
I got these values of fullyOpen and closeDown by reading the API documentation. If you scroll down to the ‘send device control commands’ section and find "Blind Tilt" under there, it tells you the command type you need is ‘command’ and "fullyOpen" is the actual command in order to open the blinds. These are the values used in the payload data components of the rest commands. If you’re controlling a different device then you’ll need to look up in the API documentation which payload commands are required, and format it in JSON like I have here.
There’s one final touch and that is to encapsulate those two rest commands in a cover entity. If you look at this configuration then you'll see it’s quite basic: the open_cover action calls the rest command to open the blind, and the close_cover action calls the rest command to close the blind.
Save, reboot and you should see under Settings > Devices & Services > Entities (tab) a new cover entity that you can toggle on and off to open and close the blinds.
Unfortunately the state of that cover will not update if you control it from somewhere else, such as manually, or via the SwitchBot. The API does support the use of webhooks, which means that it can send messages straight to Home Assistant when the status of things change but unfortunately the Blind Tilt doesn’t support that at the moment. It does work for things like the curtain bot and motion sensors, but just not the Blind Tilt right now.