
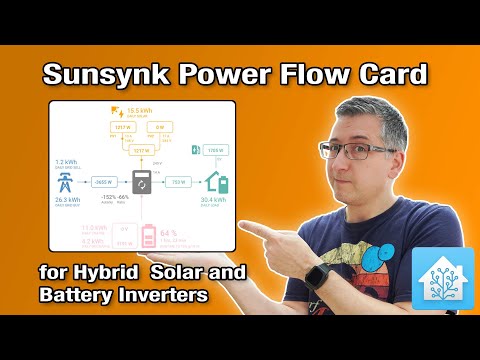
Sunsynk Power Flow Card for Hybrid Inverters
You might have seen my other Home Assistant power flow card articles and videos, I seem to be making this a bit of a thing now. So what those other cards all did was take a lot of power data and attempt to display it in a nice, clear way so as it’s obvious what’s happening. But what if instead of the clean look you wanted something a lot busier? Well that’s what the Sunsynk Power Flow Card is all about!
First of all I want to say thank you to Michael for pointing this card out to me, and to Greg for helping me test the configuration. This card is basically suitable for hybrid inverters, that’s where you have a single inverter that deals with both your solar panels and your battery. If you’ve got an AC-coupled system then this probably won’t work well for you. You can bodge it to work using template sensors but I’m not going to cover that in this video.
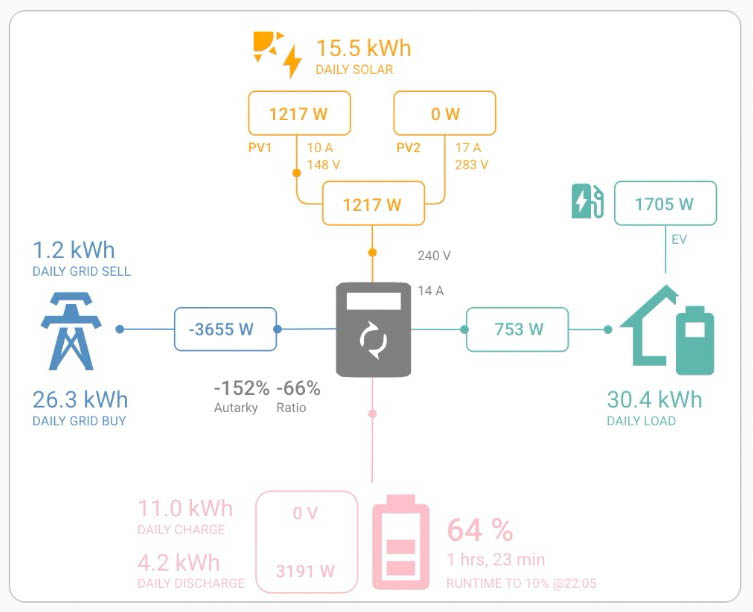
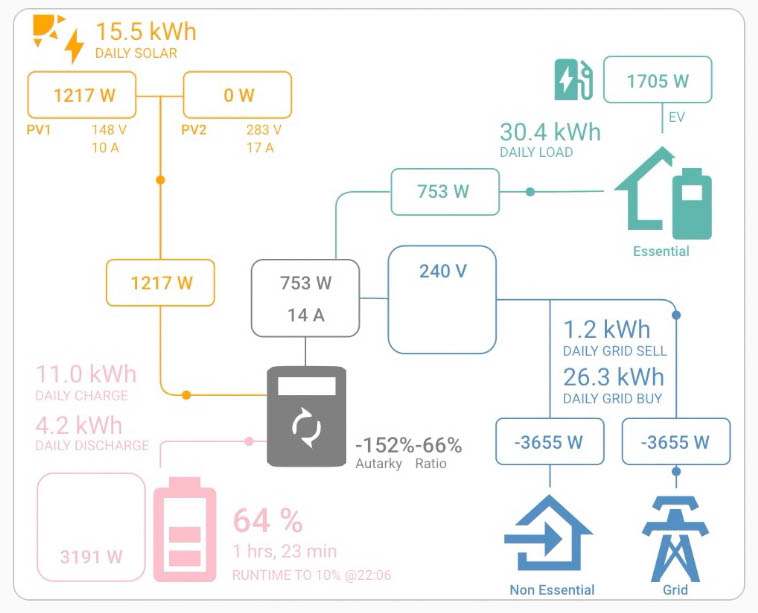
Shown in the screenshots is the card itself in action with a lot of simulated data in it. There are two modes, a lite mode which shows quite a bit of detail, and a full mode which goes full on bonkers with data.
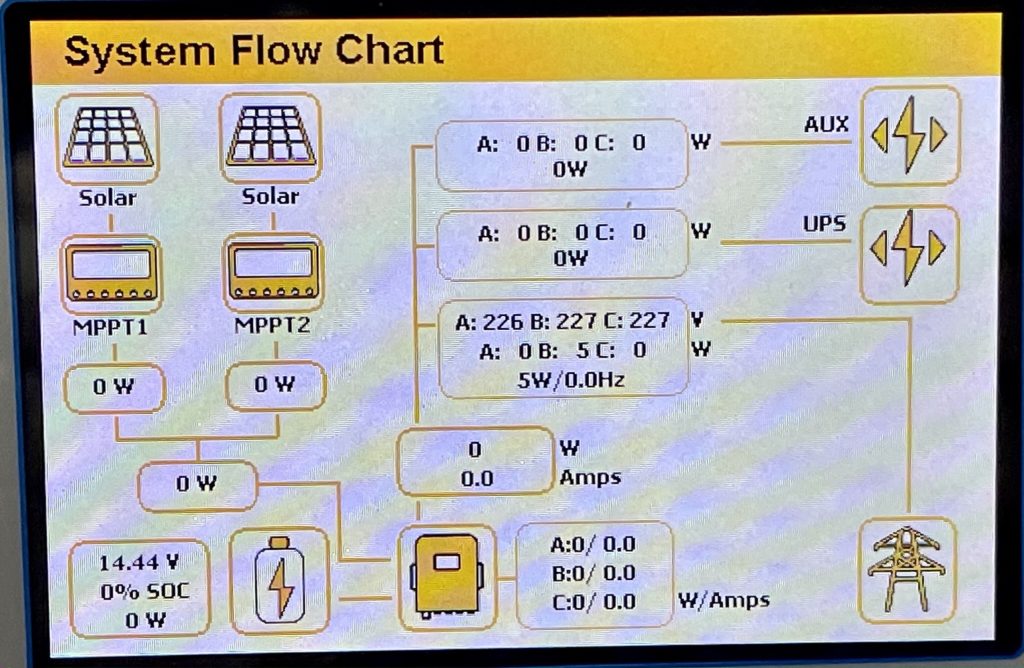
This card is designed to emulate the system power flow diagram that is shown on the LCD displays of Sunsynk hybrid inverters. It’s clearly aimed at Sunsynk customers because all of the various entity names correspond with entities created by the Sunsynk integration. But, if you stick around until later in this article I’ll show you an example of how you can configure this to work with a GivEnergy hybrid inverter.
So installation of this card is via HACS, go check out my "How to Install HACS" video if you don’t know how to do that.
Then you’ll need to open the HACS interface, go to the front-end section, click the three-dots in the top right and choose Custom Repositories. Paste in the following repository URL into the Repository field:
https://github.com/slipx06/sunsynk-power-flow-cardSelect the category of 'Lovelace', click on Add and the card should appear as a new one for you to use. Click on it to open the download page, click the download button and the download again from the pop-up. Click on Reload once it has installed.
Now to put the card on the dashboard. The hardest part of this whole process is going to be working out which sensors are mandatory or not, and which ones you need to get this working. So I’m going to start by showing you a minimal configuration and then we’ll add on some extra fancy features. I have created a whole bunch of simulated sensors but as long as your inverter’s integration gives you the right types of entities then you can just use those instead. One of the great things about this card is that if you just don’t have a suitable entity available for something that is specified as required by the card, you can just use the value of ‘none’ and it’ll carry on and ignore that.
type: custom:sunsynk-power-flow-card
cardstyle: lite
show_solar: 'yes'
battery:
  energy: 15960
  shutdown_soc: 4
  show_daily: 'yes'
solar:
  show_daily: 'yes'
  mppts: one
load:
  show_daily: 'yes'
grid:
  show_daily_buy: 'yes'
  show_daily_sell: 'yes'
  show_nonessential: 'yes'
entities:
  inverter_voltage_154: sensor.sim_voltage_inverter
  load_frequency_192: none
  inverter_current_164: sensor.sim_current_inverter
  inverter_power_175: sensor.sim_power_home
  grid_connected_status_194: none
  inverter_status_59: none
  day_battery_charge_70: sensor.sim_energy_battery_import
  day_battery_discharge_71: sensor.sim_energy_battery_export
  battery_voltage_183: none
  battery_soc_184: sensor.sim_battery_soc
  battery_power_190: sensor.sim_power_battery
  battery_current_191: none
  grid_power_169: none
  day_grid_import_76: sensor.sim_energy_grid_import
  day_grid_export_77: sensor.sim_energy_grid_export
  grid_ct_power_172: sensor.sim_power_grid
  day_load_energy_84: sensor.sim_energy_home_consumption
  essential_power: none
  nonessential_power: none
  day_pv_energy_108: sensor.sim_energy_solar
  pv1_power_186: sensor.sim_power_solar
  pv1_voltage_109: sensor.sim_voltage_solar_1
  pv1_current_110: sensor.sim_current_solar_1
Edit your dashboard and add a new card of type "Custom: Sunsynk Power Flow Card". You can use my suggested configuration above as a starting point, but the main things I'd like to highlight are:
- The 'energy:' parameter near the top must be added manually - this is the capacity of your batteries, in Wh. For example, if you have an 8.2kWh battery, set this value to 8200.
- Underneath 'energy' is 'shutdown_soc'. This is the percentage value at which your battery will stop discharging. By default this is 4% (and to my knowledge that's the same for a lot of battery systems), but if yours is set to something different then change that value here.
- Almost all of the entities in my example configuration are mandatory, with the exception of the PV entities. If for some reason you don't have a sensor providing the data requested by this card, just use the word 'none' and it'll ignore it. For example, inverter_load_freq_192 is requesting a sensor entity that's monitoring my grid frequency. I don't have one, so I've set that to 'none'.
- If you want to see even more crazy detail, change the cardstyle parameter from 'lite' to 'full'.
- Make sure you check out the card's GitHub page to view full descriptions of each sensor required if you're unsure. Hopefully the names of my simulated sensors in the example will clear up most queries.

It's also possible to add in extra components such as up to four PV array, or even hot water heaters and EV chargers. Here is a more in depth example configuration showing two PV arrays and an EV charger:
type: custom:sunsynk-power-flow-card
cardstyle: lite
show_solar: 'yes'
battery:
  energy: 15960
  shutdown_soc: 4
  show_daily: 'yes'
solar:
  show_daily: 'yes'
  mppts: one
load:
  show_daily: 'yes'
  additional_loads: one
  load1_name: EV
  load1_icon: mdi:ev-station
grid:
  show_daily_buy: 'yes'
  show_daily_sell: 'yes'
  show_nonessential: 'yes'
entities:
  inverter_voltage_154: sensor.sim_voltage_inverter
  load_frequency_192: none
  inverter_current_164: sensor.sim_current_inverter
  inverter_power_175: sensor.sim_power_home
  grid_connected_status_194: none
  inverter_status_59: none
  day_battery_charge_70: sensor.sim_energy_battery_import
  day_battery_discharge_71: sensor.sim_energy_battery_export
  battery_voltage_183: none
  battery_soc_184: sensor.sim_battery_soc
  battery_power_190: sensor.sim_power_battery
  battery_current_191: none
  grid_power_169: none
  day_grid_import_76: sensor.sim_energy_grid_import
  day_grid_export_77: sensor.sim_energy_grid_export
  grid_ct_power_172: sensor.sim_power_grid
  day_load_energy_84: sensor.sim_energy_home_consumption
  essential_power: none
  nonessential_power: none
  day_pv_energy_108: sensor.sim_energy_solar
  pv1_power_186: sensor.sim_power_solar
  pv1_voltage_109: sensor.sim_voltage_solar_1
  pv1_current_110: sensor.sim_current_solar_1
  pv2_power_187: sensor.sim_power_solar2
  pv2_voltage_111: sensor.sim_voltage_solar_2
  pv2_current_112: sensor.sim_current_solar_2
  essential_load1: sensor.sim_power_car
So you can see that this card can be crazy busy and quite complicated to set up especially working out which entities are needed. If you have a GivEnergy hybrid inverter then I’ve figured out which GivTCP entities you need to use. You’ll need GivTCP running first so go and check out my latest GivTCP video for instructions on how to do that. Now I don’t have a hybrid inverter myself so I needed a bit of help and luckily Greg from the GivTCP Facebook group was very cooperative! It took a bit of trial and error but we think we’ve got there:
type: custom:sunsynk-power-flow-card
cardstyle: lite
show_solar: 'yes'
battery:
  energy: 5200
  shutdown_soc: 4
  show_daily: 'yes'
solar:
  show_daily: 'yes'
  mppts: one
load:
  show_daily: 'yes'
grid:
  show_daily_buy: 'yes'
  show_daily_sell: 'yes'
  show_nonessential: 'yes'
  invert_grid: 'yes'
entities:
  inverter_voltage_154: sensor.givtcp_xxxxxxxxxx_grid_voltage
  load_frequency_192: none
  inverter_current_164: sensor.givtcp_xxxxxxxxxx_grid_current
  inverter_power_175: sensor.givtcp_xxxxxxxxxx_load_power
  grid_connected_status_194: none
  inverter_status_59: none
  day_battery_charge_70: sensor.givtcp_xxxxxxxxxx_battery_charge_energy_today_kwh
  day_battery_discharge_71: sensor.givtcp_xxxxxxxxxx_battery_discharge_energy_today_kwh
  battery_voltage_183: sensor.givtcp_yyyyyyyyyy_battery_voltage
  battery_soc_184: sensor.givtcp_xxxxxxxxxx_soc
  battery_power_190: sensor.givtcp_xxxxxxxxxx_battery_power
  battery_current_191: none
  grid_power_169: none
  day_grid_import_76: sensor.givtcp_xxxxxxxxxx_import_energy_today_kwh
  day_grid_export_77: sensor.givtcp_xxxxxxxxxx_export_energy_today_kwh
  grid_ct_power_172: sensor.givtcp_xxxxxxxxxx_grid_power
  day_load_energy_84: sensor.givtcp_xxxxxxxxxx_load_energy_today_kwh
  essential_power: none
  nonessential_power: none
  day_pv_energy_108: sensor.givtcp_xxxxxxxxxx_pv_energy_today_kwh
  pv1_power_186: sensor.givtcp_xxxxxxxxxx_pv_power_string_1
  pv1_voltage_109: sensor.givtcp_xxxxxxxxxx_pv_voltage_string_1
  pv1_current_110: sensor.givtcp_xxxxxxxxxx_pv_current_string_1
Make sure that you change the Xs to your actual inverter serial number and Ys with your battery serial number if you use that. It might actually be a good idea to go and check your GivTCP entities are in this same format - they should be by default but some people like to fiddle and change the defaults. Don’t forget to change the battery capacity too on the 'energy' parameter.
This configuration will actually produce a very minimal working card. I’ve only included one solar array in this, but you can add a second one too if you like, and you can add an EV charger or other monitored load too just like in the earlier examples. I haven’t included the battery voltages in this card, but GivTCP also provides that data if you want to add it in too - I’m just trying to keep things simple here.
There we go, another power flow card! I think for hybrid inverter owners this particular card would look quite good on a wall mounted dashboard or something similar. If you do make use of this then please let me know in the comments of the associated video, I always like to hear how these things are being used in the real world.