Using Home Assistant to Control Your Vauxhall, Peugeot or Citroen Car

A few weeks ago I sat outside on my drive in my Vauxhall Corsa-e and had a bit of a moan about it (see that here). Well, I did also talk about the good things too, but one of the things I wasn’t too happy with was its on-line connectivity. In this article I’m going to show you how to connect your Vauxhall, Peugeot, or Citroen car to Home Assistant so as you can monitor and even control some aspects of it. It also gives you a number of new features that you just don’t get with the official car manufacturer's app. Warning... this is a mega-long article so I've divided it into sections to help you find your way around it!
- Overview
- Install the Add-ons
- Configure the Sensors
- Track the Vehicle's Position
- Control the Car
- Home Assistant Dashboard: Overview
- Dashboard: Custom Components
- Dashboard: Final Configuration
Overview
PSA Group includes Peugeot, Citroen, Vauxhall or Opel if you’re not in the UK, and DS if you’re in France. Back in 2021 PSA Group actually merged into Stellantis so technically doesn’t exist anymore. So what’s the reason for this little history lesson on global car companies? Well because there’s an add-on in Home Assistant called PSA Car Controller which enables Home Assistant to talk to your Stellantis car, provided it is fairly modern and was one of those brands previously under the PSA Group.
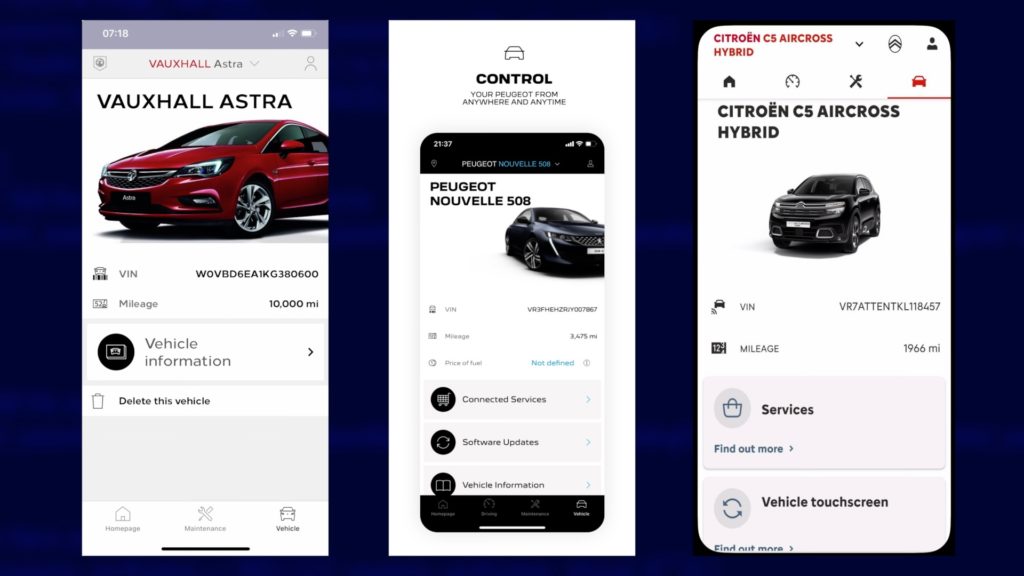
You’ll know if your car is supported because you’ll be able to use the My Vauxhall, or My Peugeot, or My Citroen apps to look at your car’s data. So before you even attempt to get the PSA Car Controller add-on working, you absolutely must get the official app connected and working with your car first!

Once you have it working, you can craft yourself a nice looking Home Assistant dashboard for your car with plenty of at-a glance information and controls on. This is mine shown here in the screenshot and it took a lot of work to put together. You can go for a more basic one, and there are examples online for that, or if you stick around until later in the article I’ll show you how I put mine together.
Install the Add-ons
Let’s dive into the configuration then. I’m starting with an almost totally fresh installation of Home Assistant here. The very first thing you’ll need is a way to edit your configuration files. If you know what you’re doing with that then skip ahead, but otherwise I suggest you install the File Editor add-on as I’m about to do.
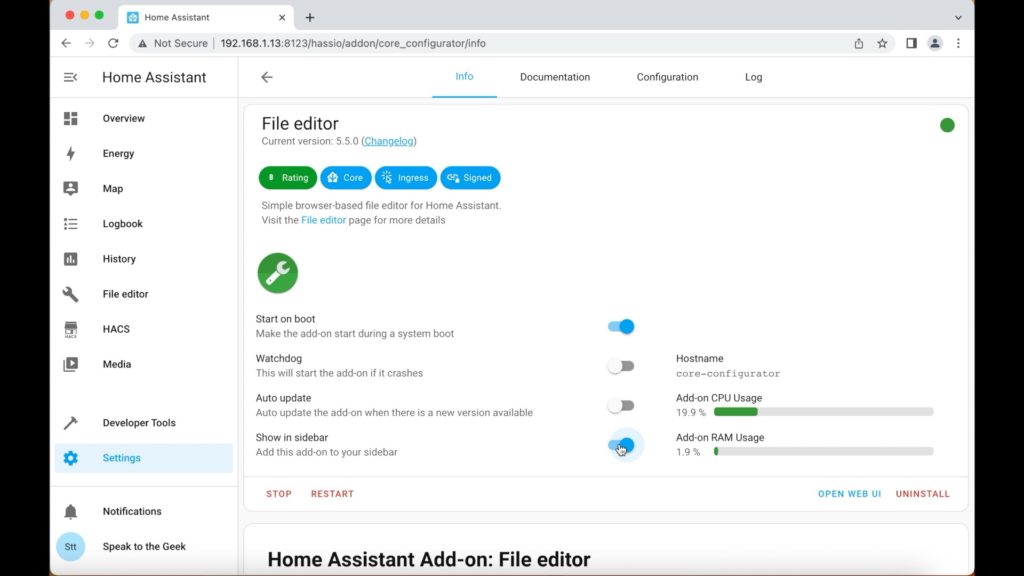
From the Home Assistant dashboard, click on Settings > Add-on Store. Locate 'File editor' and select it, click in 'Install' ... wait a short while ... and once installed, click on the 'Start' button. I also suggest you toggle the 'Show in sidebar' option so as the File Editor icon appears in the menu bar on the left for quick access.
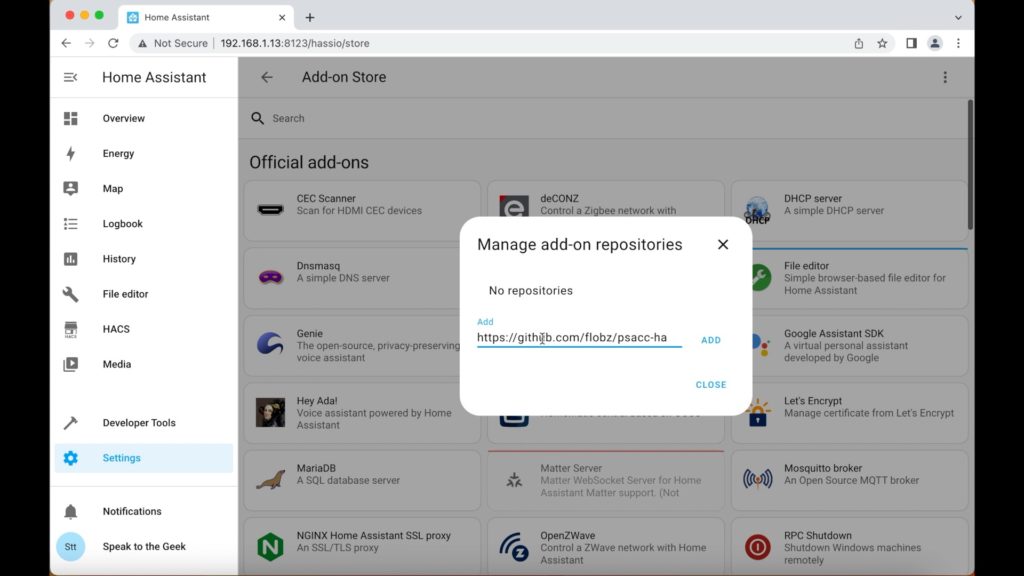
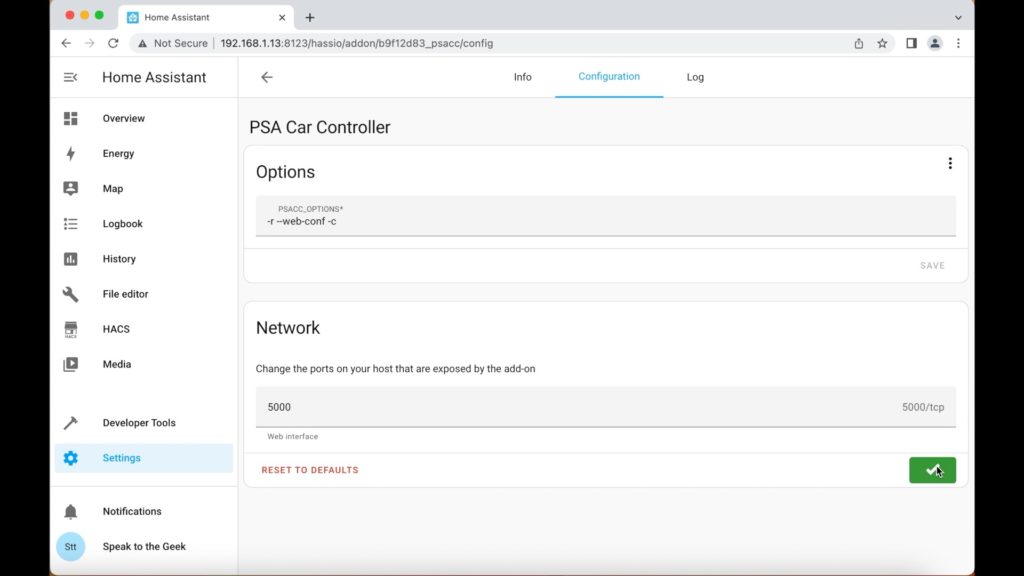
Now we need to install the PSA Car Controller add-on which is similar to the File editor process but we’ll need to tell the add-on store where to find it so: from the Home Assistant dashboard, click on Settings > Add-on Store. Select the 3-dots icon in the top-right corner and choose 'Repositories' from the drop-down menu. Paste in the following URL to the 'Add' box, click on Add which should add the item to the repositories list, and then 'close':
https://github.com/flobz/psacc-ha
You'll likely need to refresh your browser before the add-on appears in the list, so once you've done that scroll down to find 'PSA Car Controller' and select it. Click on Install and wait a while (this part takes a good couple of minutes on my Raspberry Pi 4). Once installed, don't start it just yet. Instead, click on the Configuration tab at the top and under the Network section enable the 'show disabled items' option and in the Web Interface field set the value to 5000 and click on Save. Select the Info tab at the top and start the add-on. Again I suggest you toggle the 'show on sidebar' option again, and after about 30 seconds the add-on should be ready to use. Clicking on the PSA Car Controller icon on the menu should open up the add-on's configuration interface.
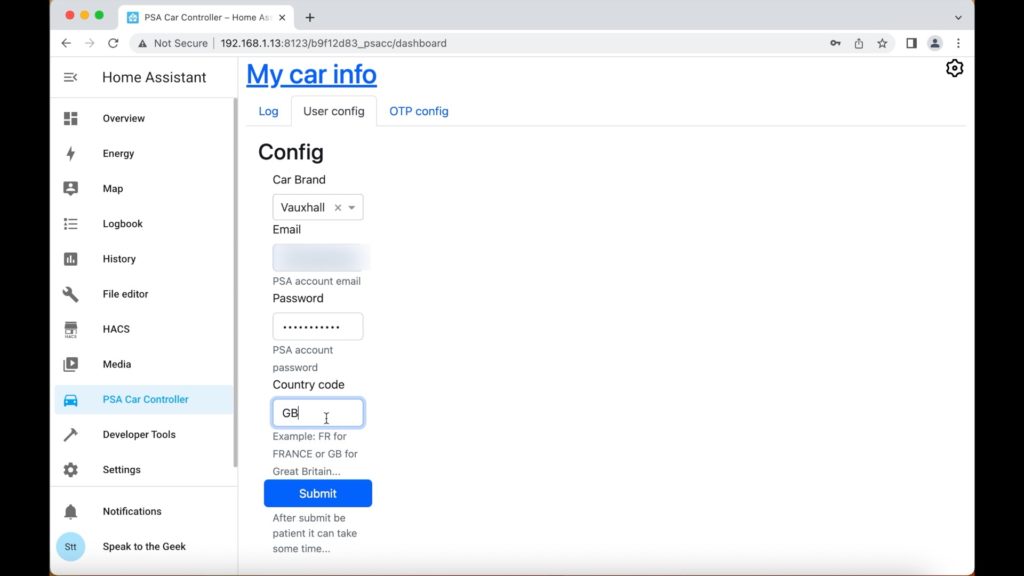
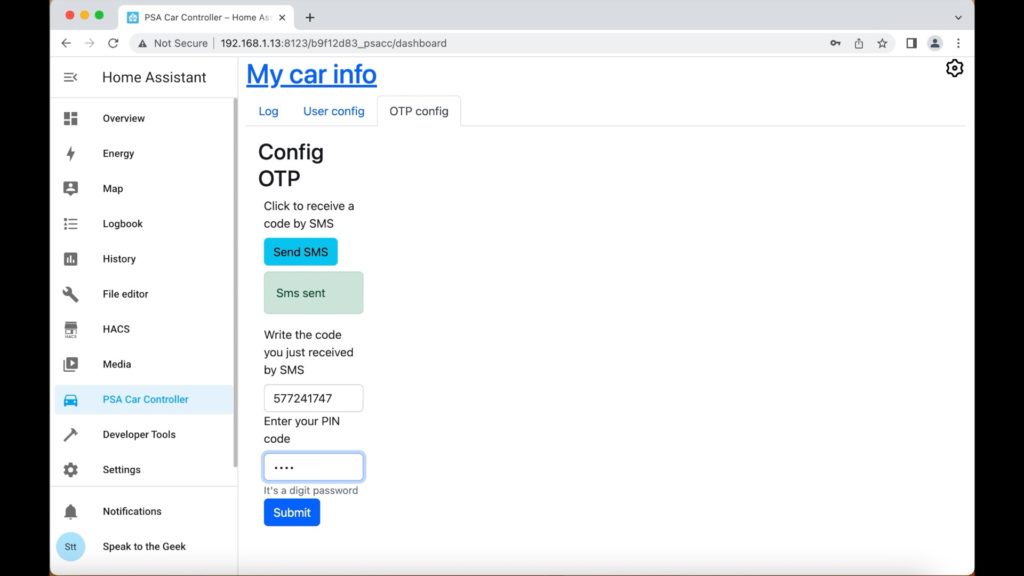
Choose your car brand from the drop-down list and sign in with the same credentials that you use to log into the official app. If accepted it will show you a success message and give you a link to move to the OTP config page. Click on that and press the 'Send SMS' button. You should be sent a one-time password code via SMS to your phone so enter that in the 'Enter code' box, and the PIN you secured the official app with into the 'Enter codepin' box. Click on Submit and hopefully after a short wait you'll see a 'OTP config finish' success message.
Configure the Sensors
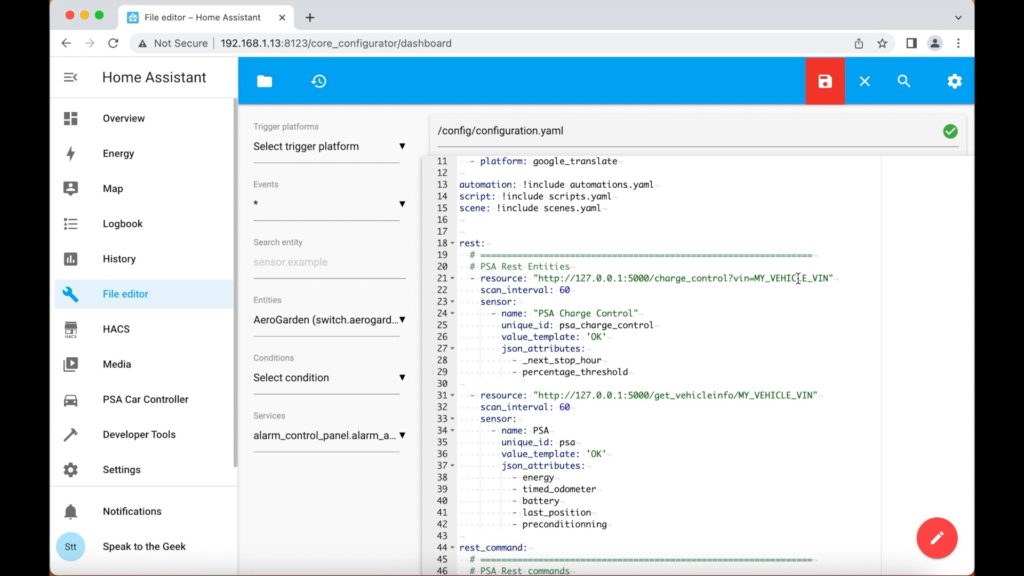
The next step is to tell Home Assistant how to talk to PSA Car Controller, retrieve data to store in entities that you can use in Home Assistant, and how to send commands back to the add-on. We do this by adding a lot of configuration manually to Home Assistant's configuration.yaml file. I have put together a configuration that retrieves what I think is likely to be the most useful set of data to the majority of people. There is an enormous amount of additional data you can obtain if needed too (once configured, just go take a look at the sensor.psa entity you are creating!). Remember installing File editor previously? Well, open that add-on up by selecting the File editor icon in the menu bar on the left-hand side of Home Assistant. You'll need to locate the configuration.yaml file by clicking on the 'Browse Filesystem' icon at the top of the screen, looking in the /config folder (which is the default location) and clicking on 'configuration.yaml'. Paste my configuration from below at the end of the existing content in that file. If you have already edited this file before and created template, rest or rest_command entities then you will need to manually figure out which parts of my code fit in with your existing configuration - hopefully if that is the case, you'll already know what you are doing! For most people though, I'm guessing you will never have touched this file before so pasting this as-is should be fine:
rest:
  # ===============================================================
  # PSA Rest Entities
  - resource: "http://127.0.0.1:5000/charge_control?vin=MY_VEHICLE_VIN"
    scan_interval: 60
    sensor:
      - name: "PSA Charge Control"
        unique_id: psa_charge_control
        value_template: 'OK'
        json_attributes:
          - _next_stop_hour
          - percentage_threshold

  - resource: "http://127.0.0.1:5000/get_vehicleinfo/MY_VEHICLE_VIN"
    scan_interval: 60
    sensor:
      - name: PSA
        unique_id: psa
        value_template: 'OK'
        json_attributes:
          - energy
          - timed_odometer
          - battery
          - last_position
          - preconditionning

rest_command:
  # ===============================================================
  # PSA Rest commands
  psa_wakeup:
    url: "http://127.0.0.1:5000/wakeup/MY_VEHICLE_VIN"
  psa_climate_on:
    url: "http://127.0.0.1:5000/preconditioning/MY_VEHICLE_VIN/1"
  psa_climate_off:
    url: "http://127.0.0.1:5000/preconditioning/MY_VEHICLE_VIN/0"
  psa_change_charge_threshold:
    url: "http://127.0.0.1:5000/charge_control?vin=MY_VEHICLE_VIN&percentage={{ states('input_number.psa_charging_threshold') | int }}"
    method: GET

template:
  - sensor:
    # ===============================================================
    # PSA Sensors

    - name: PSA Charging Status
      unique_id: psa_charging_status
      state: >-
        {{ states.sensor.psa.attributes["energy"][0]["charging"]["status"] }}

    - name: PSA Battery Level
      unique_id: psa_battery_level
      state: >-
        {{ state_attr('sensor.psa', 'energy')[0].level }}
      unit_of_measurement: "%"
      device_class: battery

    - name: PSA Mileage
      unique_id: psa_mileage
      state: '{{ (states.sensor.psa.attributes["timed_odometer"]["mileage"] * 0.621371) | round(0,"floor") }}'
      unit_of_measurement: "miles"
      icon: 'mdi:road-variant'
      device_class: distance
      state_class: total_increasing

    - name: PSA Range
      unique_id: psa_range
      state: '{{ (states.sensor.psa.attributes["energy"][0]["autonomy"] * 0.621371) | round(0,"floor") }}'
      unit_of_measurement: "miles"
      icon: 'mdi:map-marker-distance'
      device_class: distance
      state_class: measurement

    - name: PSA Preconditioning Status
      unique_id: psa_preconditioning_status
      state: >-
        {{ state_attr('sensor.psa', 'preconditionning').air_conditioning.status }}

    - name: PSA Charging Mode
      unique_id: psa_charging_mode
      state: >-
        {{ state_attr('sensor.psa', 'energy')[0].charging.charging_mode }}
      icon: mdi:lightning-bolt

    - name: PSA Charge Rate
      unique_id: psa_charge_rate
      state: >-
        {{ state_attr('sensor.psa', 'energy')[0].charging.charging_rate }}
      unit_of_measurement: "mph"
      icon: mdi:speedometer
      device_class: speed
      state_class: measurement

    - name: "PSA Next Stop Time"
      unique_id: psa_stop_hour
      state: >-
        {{ state_attr('sensor.psa_charge_control','_next_stop_hour') }}

    - name: "PSA Charge Threshold"
      unique_id: psa_charge_threshold
      state: >-
        {{ state_attr('sensor.psa_charge_control','percentage_threshold') }}
      unit_of_measurement: "%"
      state_class: measurement

  - binary_sensor:
    # ===============================================================
    # PSA Binary Sensors

    - name: PSA Plugged In
      unique_id: psa_plugged_in
      state: >-
        {{ state_attr('sensor.psa', 'energy')[0].charging.plugged }}
      device_class: connectivity

    - name: PSA Position
      unique_id: psa_position
      state: >-
        {{ state_attr('sensor.psa', 'kinetic').moving }}
      device_class: moving
      attributes:
        latitude: "{{ state_attr('sensor.psa', 'last_position').geometry.coordinates[1] }}"
        longitude: "{{ state_attr('sensor.psa', 'last_position').geometry.coordinates[0] }}"
rest:
  # ===============================================================
  # PSA Rest Entities
  - resource: "http://127.0.0.1:5000/charge_control?vin=MY_VEHICLE_VIN"
    scan_interval: 60
    sensor:
      - name: "PSA Charge Control"
        unique_id: psa_charge_control
        value_template: 'OK'
        json_attributes:
          - _next_stop_hour
          - percentage_threshold

  - resource: "http://127.0.0.1:5000/get_vehicleinfo/MY_VEHICLE_VIN"
    scan_interval: 60
    sensor:
      - name: PSA
        unique_id: psa
        value_template: 'OK'
        json_attributes:
          - energy
          - timed_odometer
          - battery
          - last_position
          - preconditionning

rest_command:
  # ===============================================================
  # PSA Rest commands
  psa_wakeup:
    url: "http://127.0.0.1:5000/wakeup/MY_VEHICLE_VIN"
  psa_climate_on:
    url: "http://127.0.0.1:5000/preconditioning/MY_VEHICLE_VIN/1"
  psa_climate_off:
    url: "http://127.0.0.1:5000/preconditioning/MY_VEHICLE_VIN/0"
  psa_change_charge_threshold:
    url: "http://127.0.0.1:5000/charge_control?vin=MY_VEHICLE_VIN&percentage={{ states('input_number.psa_charging_threshold') | int }}"
    method: GET

template:
  - sensor:
    # ===============================================================
    # PSA Sensors

    - name: PSA Charging Status
      unique_id: psa_charging_status
      state: >-
        {{ states.sensor.psa.attributes["energy"][0]["charging"]["status"] }}

    - name: PSA Battery Level
      unique_id: psa_battery_level
      state: >-
        {{ state_attr('sensor.psa', 'energy')[0].level }}
      unit_of_measurement: "%"
      device_class: battery

    - name: PSA Mileage
      unique_id: psa_mileage
      state: '{{ states.sensor.psa.attributes["timed_odometer"]["mileage"] }}'
      unit_of_measurement: "km"
      icon: 'mdi:road-variant'
      device_class: distance
      state_class: total_increasing

    - name: PSA Range
      unique_id: psa_range
      state: '{{ states.sensor.psa.attributes["energy"][0]["autonomy"] }}'
      unit_of_measurement: "km"
      icon: 'mdi:map-marker-distance'
      device_class: distance
      state_class: measurement

    - name: PSA Preconditioning Status
      unique_id: psa_preconditioning_status
      state: >-
        {{ state_attr('sensor.psa', 'preconditionning').air_conditioning.status }}

    - name: PSA Charging Mode
      unique_id: psa_charging_mode
      state: >-
        {{ state_attr('sensor.psa', 'energy')[0].charging.charging_mode }}
      icon: mdi:lightning-bolt

    - name: PSA Charge Rate
      unique_id: psa_charge_rate
      state: >-
        {{ state_attr('sensor.psa', 'energy')[0].charging.charging_rate }}
      unit_of_measurement: "mph"
      icon: mdi:speedometer
      device_class: speed
      state_class: measurement

    - name: "PSA Next Stop Time"
      unique_id: psa_stop_hour
      state: >-
        {{ state_attr('sensor.psa_charge_control','_next_stop_hour') }}

    - name: "PSA Charge Threshold"
      unique_id: psa_charge_threshold
      state: >-
        {{ state_attr('sensor.psa_charge_control','percentage_threshold') }}
      unit_of_measurement: "%"
      state_class: measurement

  - binary_sensor:
    # ===============================================================
    # PSA Binary Sensors

    - name: PSA Plugged In
      unique_id: psa_plugged_in
      state: >-
        {{ state_attr('sensor.psa', 'energy')[0].charging.plugged }}
      device_class: connectivity

    - name: PSA Position
      unique_id: psa_position
      state: >-
        {{ state_attr('sensor.psa', 'kinetic').moving }}
      device_class: moving
      attributes:
        latitude: "{{ state_attr('sensor.psa', 'last_position').geometry.coordinates[1] }}"
        longitude: "{{ state_attr('sensor.psa', 'last_position').geometry.coordinates[0] }}"
Do you see those 6 locations with the word MY_VEHICLE_VIN in? You need to replace MY_VEHICLE_VIN with the actual VIN number of your car. This will be in your vehicle's service book, and also on the Vehicle tab of the official vehicle app.
Now scroll up to the top of configuration.yaml and look for the line saying 'default_config'. You'll need to add a bit of configuration under that section too as follows:
default_config:
  whitelist_external_dirs:
    - '/config/www'
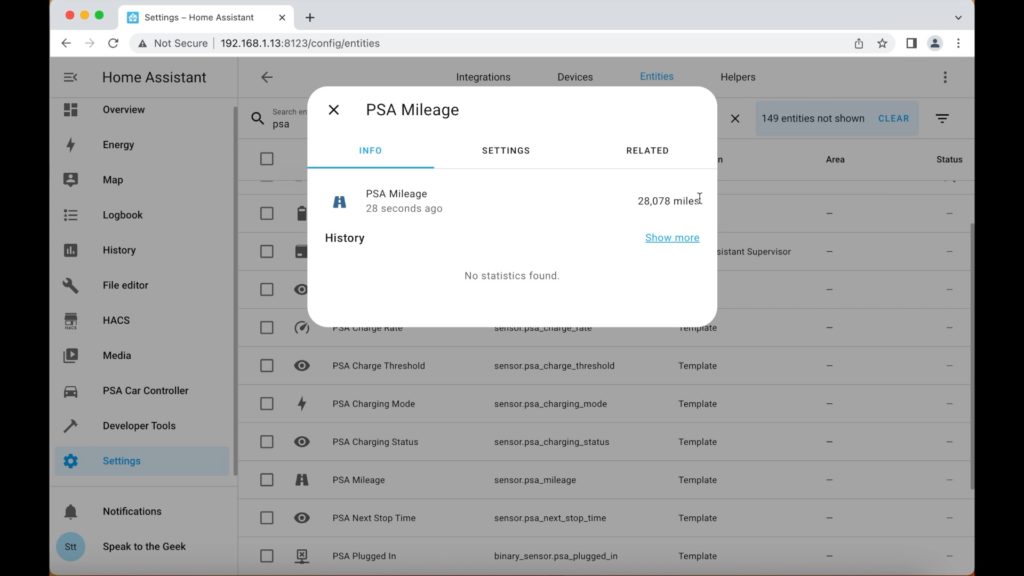
Save the file (click on the old-school floppy disk icon), choose Developer Tools from the menu on the left-hand side of Home Assistant, click on 'Check configuration' to make sure that there are no reported errors, and if all is clean, go ahead and click on Restart. Once restarted, confirm that the new entities have all been created and are receiving data: Navigate to Settings > Devices & Services > Entities (tab at the top), and filter by 'psa'. You should, for example, see an entity named 'PSA Mileage' that shows the current odometer reading of your vehicle when you inspect its value.
Track the Vehicle's Position
You should also be able to track the position of your car. It doesn’t work great for me, but it seems to update most of the time when the car has been stopped, so you don’t get live instant tracking. But still, you’ll need to set up an automation to take the data from the position sensor and put it in a device tracker entity. Navigate to Settings > Automations & Scenes, click on the Create Automation button, choose to start with an empty automation, then click on the three dots in the top-right corner to open the drop-down menu, and switch to YAML mode. Overwrite the default YAML with the following:
alias: "Car: Track PSA"
description: ""
trigger:
  - platform: state
    entity_id: binary_sensor.psa_position
    attribute: latitude
  - platform: state
    entity_id: binary_sensor.psa_position
    attribute: longitude
condition: []
action:
  - service: device_tracker.see
    data:
      dev_id: psa
      battery: "{{ states('sensor.psa_battery_level')|int }}"
      host_name: PSA
      gps:
        - "{{ state_attr('binary_sensor.psa_position','latitude') }}"
        - "{{ state_attr('binary_sensor.psa_position','longitude') }}"
mode: queued
max: 10
Click on Save and the automation should now run every time your car's position changes, and an entity named device_tracker.psa created and updated.
Control the Car
The final part of the configuration allows you to control things like cabin preconditioning and restricting the maximum charge level of the car. We'll start off by creating a helper, so navigate to:
Settings > Devices & Services > Helpers (tab at the top) > Create Helper (button at the bottom).
- Select the helper type of 'number'
- Name it 'PSA Charging Threshold'
- Option icon: mdi:battery-arrow-up-outline
- Min value: 50
- Max value: 100
- Display mode: slider
- Step: 1
- Unit: %
Click on save and the new helper should appear in your list of helpers. Now we're going to create an automation to make use of this helper. Navigate to:
Settings > Automations & Scenes > Create Automation (button at the bottom) > Start with empty automation.
Once again, switch to edit in YAML mode by clicking on the three-dots icon in the top-right and choosing the option in the menu. Overwrite the contents of the automation with the following:
alias: "Car: PSA Adjust Charge Threshold"
description: ""
trigger:
  - platform: state
    entity_id:
      - input_number.psa_charging_threshold
condition: []
action:
  - delay:
      hours: 0
      minutes: 0
      seconds: 5
      milliseconds: 0
  - service: rest_command.psa_change_charge_threshold
    data: {}
mode: restart
All that we’ve done here is create a nice slider that you can use to adjust the maximum percentage that your car will charge to. So if you only want to charge your car to 80% and then stop, set the helper slider to 80% and PSA Car Controller will keep an eye on it for you and stop the charge when it reaches that value.
Next we need to create a script. Navigate to Settings > Automations & Scenes > Scripts (tab at the top) > Add Script (button at the bottom). Switch to Edit in YAML mode (usual routine, you must have got this by now... three dots in the top-right, choose the right option from the menu). Overwrite the default contents with the following:
alias: "PSA: Toggle Climate"
sequence:
  - if:
      - condition: state
        entity_id: sensor.psa_preconditioning_status
        state: Disabled
    then:
      - service: rest_command.psa_climate_on
        data: {}
    else:
      - service: rest_command.psa_climate_off
        data: {}
mode: single
icon: mdi:car
Important! Switch back to edit with Visual Editor and take a look at the entity_id field. It's probably got a default value of new_script right now, so it's very important that this is changed to psa_toggle_climate. Once you've changed that, save it! When you call this script, either manually or as an action in another automation / dashboard component, it'll check the current state of preconditioning. If preconditioning is not currently running, it'll attempt to turn it on. Likewise if it is currently running then it'll try to turn it off.
Home Assistant Dashboard: Overview
Right then, with all of that configuration out of the way, you’ll probably want to add the various new entities and controls to your dashboard. The easy way is to just create an entities card that lists all of your PSA entities. There are examples of layouts on the PSA Car Controller web site if you want to go down that route, but I’m going to show you here how I created my dashboard.
I’ve selected the information that I’m mostly interested in and arranged the data in what I think is a logical fashion. The battery icon changes status and colour depending on the actual state of charge of the vehicle. The charging status icon has a little charger badge which turns green when the car is plugged in, or grey if it’s not, and it shows the speed of the charge in miles-per-hour as secondary data.
The Preconditioning icon is actually a button that will call the preconditioning script when tapped to toggle its status, and the icon will update with the current state once that happens.
Wake-up calls the wake-up rest command that should in theory update the data for your car if your car has gone into a power-saving deep sleep.
And then we have the Charge Limit icon. The value next to the icon shows the actual reported limit that PSA Car Controller is working to, whereas the slider to the right is how you tell Home Assistant to go and change that value. In theory both of these should be the same, but I have them separate at the moment so as you can visually confirm that the change you make to the slider gets reflected in the sensor value.
Underneath I have a little map card that shows the current position of the car and also the last known locations over the previous 24 hours. This whole thing is glued together using many different custom components and a fair bit of bodged CSS.
Dashboard: Custom Components
To get my design working you are going to need to install HACS. I have a video specifically on how to do that so if you need to know how to do that go and watch it now and follow the instructions there, then come back here once HACS is all ready to go.
HACS Video is here https://youtu.be/jzpm89956Pw
Official HACS instructions here: https://hacs.xyz
You'll now need to install a number of Frontend Custom Components via HACS:
- Stack In Card
- Card-tools
- card-mod
- slider-entity-row
- Mushroom
Open HACS by clicking on the HACS item in the Home Assistant menu. Choose 'Frontend' from the main menu, click the 'Explore & Download Repositories' button, and search for the first component in my list above. Select it from the list and click on the 'Download' button in the bottom-right of the component's description page. Repeat the same process for all of the other Frontend Components.
Dashboard: Final Configuration
We're near the end now... we just need to create a new card on your dashboard which puts all of this together for display. Edit your dashboard (from the Overview page click the three dots in the top right, select Edit Dashboard), click on the 'Add Card' button in the bottom right, and for the card type you need to scroll all the way to the bottom of the list and look for one named 'Manual'. Select this and delete any existing lines of configuration, replacing with the following:
type: custom:stack-in-card
mode: vertical
title: PSA
keep:
  margin: false
style: |
  ha-card {
    background: url('/local/psa.jpg');
    background-size: aspect;
    overflow: hidden;
  }
cards:
  - type: custom:stack-in-card
    mode: horizontal
    cards:
      - type: custom:mushroom-template-card
        entity: sensor.psa_battery_level
        primary: Battery
        icon: >-
          {% if states(entity)|int > 95 %}mdi:battery-high {% elif
          states(entity)|int > 55 %}mdi:battery-medium {% else %}mdi:battery-low
          {% endif %}
        icon_color: >-
          {% if states(entity)|int > 85 %}#4CAF50 {% elif states(entity)|int >
          55 %}#ff9800{% else %}#F44336{% endif %}
        secondary: '{{ states(entity)|int }}%'
        tap_action:
          action: more-info
        style: |
          ha-card {
            border: none;
          }
          .type-custom-mushroom-template-card {
            padding-top: 0px;
            padding-bottom: 0px;
          }
      - type: custom:mushroom-entity-card
        entity: sensor.psa_range
        name: Range
        icon_color: '#44739E'
        tap_action:
          action: more-info
        style: |
          ha-card {
            border: none;
          }
          .type-custom-mushroom-entity-card {
            padding-top: 0px;
            padding-bottom: 0px;
          }
    style: |
      ha-card {
        border: none;
        background: rgba(0,0,0,0.0);
      }
  - type: custom:stack-in-card
    mode: horizontal
    cards:
      - type: custom:mushroom-template-card
        entity: sensor.psa_charging_status
        primary: Charging Status
        secondary: '{{ states(''sensor.psa_charge_rate'') }} mph'
        icon: |-
          {% set value = states(entity) %} {% if value == 'Failure' %}
            mdi:alert
          {% elif value == 'InProgress' %}
            mdi:play
          {% elif value == 'Stopped' %}
            mdi:pause
          {% elif value == 'Finished' %}
            mdi:stop
          {% else %}
            mdi:power-plug-off-outline
          {% endif %}
        icon_color: |-
          {% set value = states(entity) %} {% if value == 'Failure' %}
            #F44336
          {% elif value == 'InProgress' %}
            #ff9800
          {% elif value == 'Stopped' %}
            #4CAF50
          {% elif value == 'Finished' %}
            #4CAF50
          {% else %}
            #44739E
          {% endif %}
        badge_icon: mdi:ev-plug-type2
        badge_color: >-
          {% if is_state('binary_sensor.psa_plugged_in','on') %}#4CAF50 {%
          else %}#cccccc{% endif %}
        tap_action:
          action: more-info
        style: |
          ha-card {
            border: none;
          }
          .type-custom-mushroom-template-card {
            padding-top: 4px;
            padding-bottom: 0px;
          }
      - type: custom:mushroom-entity-card
        entity: sensor.psa_mileage
        name: Mileage
        icon_color: '#44739E'
        tap_action:
          action: more-info
        style: |
          ha-card {
            border: none;
          }
          .type-custom-mushroom-entity-card {
            padding-top: 4px;
            padding-bottom: 0px;
          }
    style: |
      ha-card {
        border: none;
        background: rgba(0,0,0,0.0);
      }
  - type: custom:stack-in-card
    mode: horizontal
    cards:
      - type: custom:mushroom-template-card
        entity: sensor.psa_preconditioning_status
        primary: Preconditioning
        secondary: >-
          {% if is_state(entity,'Enabled') %}On {% elif
          is_state(entity,'Finished') %}Finished {% else %}Off {% endif %}
        icon: >-
          {% if is_state(entity,'Enabled') %}mdi:fan {% elif
          is_state(entity,'Finished') %}mdi:fan-alert {% else %}mdi:fan-off {%
          endif %}
        icon_color: >-
          {% if is_state(entity,'Enabled') %}#ff9800 {% elif
          is_state(entity,'Finished') %}#4CAF50{% else %}#44739E{% endif %}
        tap_action:
          action: call-service
          service: script.psa_toggle_climate
        style: |
          ha-card {
            border: none;
          }
          .type-custom-mushroom-template-card {
            padding-top: 4px;
            padding-bottom: 0px;
          }
      - type: custom:mushroom-template-card
        primary: Wake Up
        icon: mdi:sleep
        icon_color: '#44739E'
        tap_action:
          action: call-service
          service: rest_command.psa_wakeup
        style: |
          ha-card {
            border: none;
          }
          .type-custom-mushroom-template-card {
            padding-top: 4px;
            padding-bottom: 0px;
          }
    style: |
      ha-card {
        border: none;
        background: rgba(0,0,0,0.0);
      }
  - type: custom:stack-in-card
    mode: horizontal
    cards:
      - type: custom:mushroom-template-card
        entity: input_number.psa_charging_threshold
        primary: Charge Limit
        secondary: '{{ states(''sensor.psa_charge_threshold'') }}%'
        icon: '{{ state_attr(entity,''icon'') }}'
        icon_color: >-
          {% if states('sensor.psa_charge_threshold')|int < 100 %}#F44336 {%
          else %}#44739E {% endif %}
        tap_action:
          action: more-info
        style: |
          ha-card {
            border: none;
          }
          .type-custom-mushroom-template-card {
            padding-top: 4px;
            padding-bottom: 0px;
          }
      - type: entities
        entities:
          - type: custom:slider-entity-row
            entity: input_number.psa_charging_threshold
            full_row: true
        style: |
          ha-card {
            border: none;
          }
          .card-content {
            padding-top: 4px;
            padding-bottom: 0px;
          }
    style: |
      ha-card {
        border: none;
        background: rgba(0,0,0,0.0);
      }
  - type: map
    entities:
      - device_tracker.psa
    hours_to_show: 24
    aspect_ratio: 16x9
    auto_fit: true
    style: |
      ha-card {
        border: none;
      }
Save that and click on 'Done' in the top-right of your dashboard to save the whole dashboard.
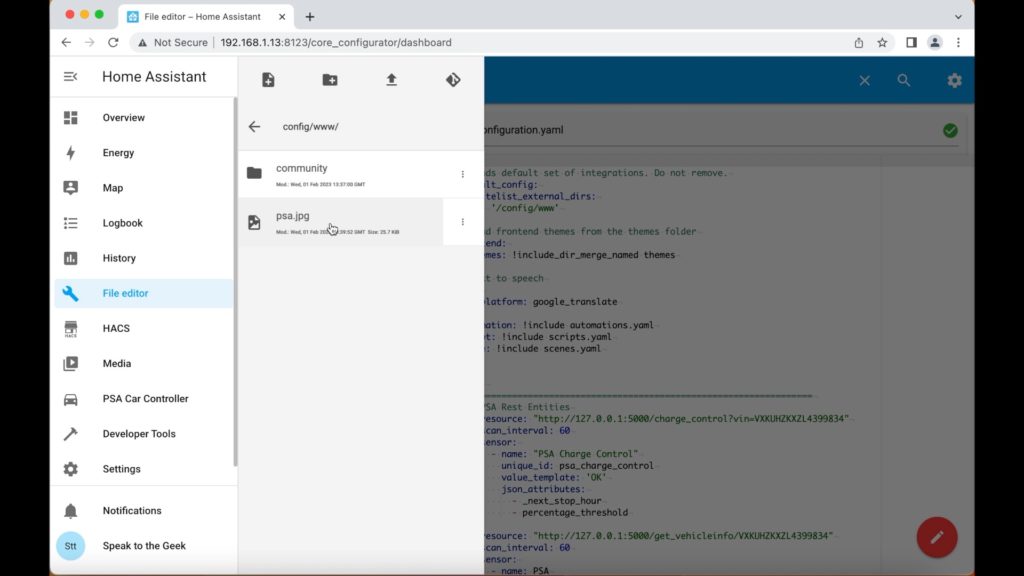
There's one final detail to finish this off - go and grab a photo of your car. I suggest you edit it to reduce its size, crop it as needed, and add a washed-out effect to it. The more faded / transparent looking it is, the more visible the controls will appear overlaying on the image. Name the image psa.jpg, open the File editor add-on, click on the Browse Filesystems icon at the top, locate the 'www' folder and select it. Click on the Upload File button at the top, browse to find your psa.jpg file, select it and upload it. Remember that little 'whitelist_external_dirs' configuration item we added near the beginning? Well that line enabled Home Assistant to display files within the www folder here. Go back to your dashboard, refresh the page and the image should appear in the background of the card.