
IKEA Tradfri Brightness Control with Home Assistant

IKEA’s range of smart products is expanding rapidly and includes some of the best value zigbee devices around. If you’re using Home Assistant instead of IKEA’s own smart hub though then you might be missing out on one critical feature - dimming lights using their smart remotes/switches. Well, there is a workaround so keep reading to find out!
All of IKEA’s Tradfri light bulbs support dimming, and if you’ve got them connected to Home Assistant then you can probably adjust their brightness levels using your phone anyway, but it’s usually a lot more convenient to control the brightness using a physical button on the wall.
IKEA sell three different types of remotes or buttons that can be used to set the brightness of your lights and as luck would have it, I have all of them here to show you!
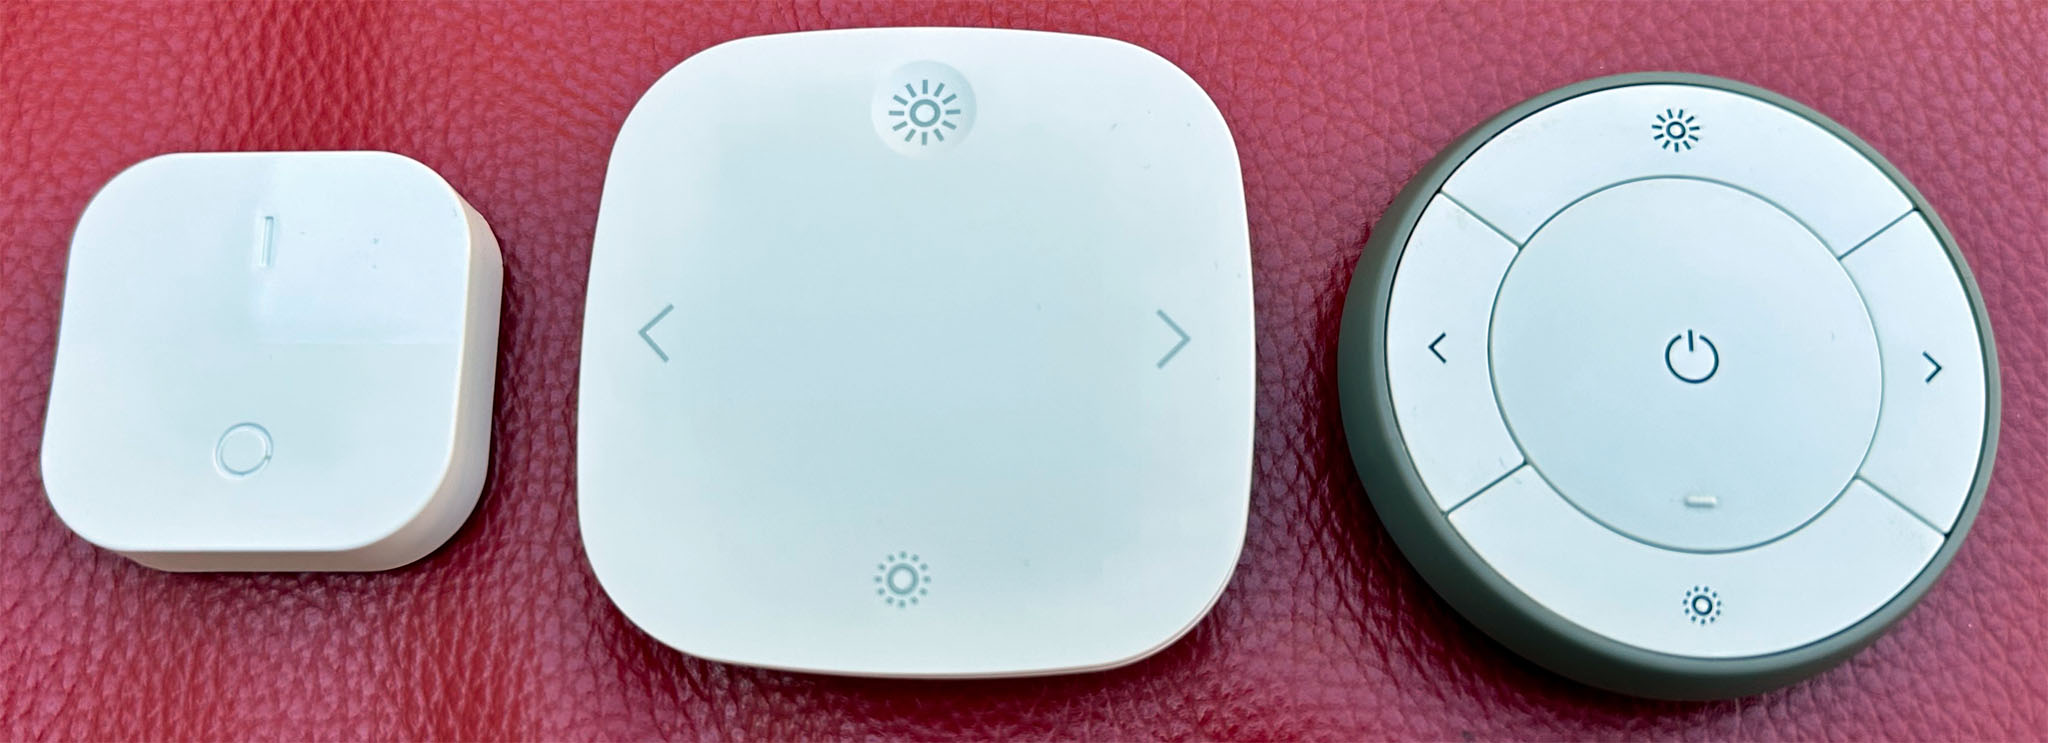
At the cheapest end of the range is their Tradfri Wireless Dimmer. It’s got just two buttons, but you can hold down each of them and they’ll send a brightness up or brightness down command to the Zigbee controller.
They also sell one called the Styrbar. It has four physical buttons on it, and all four of them support being held down for a long press too. The two light buttons at the top and bottom though are the ones that will send the brightness commands to the controller. This remote is a bit different to the others because it uses two triple-A batteries instead of a coin cell battery that the other ones use. I think these are the best looking out of all of them though. You can get this one in white, or stainless steel for a bit more money.
Lastly there’s a round Tradfri remote, which I don’t think they actually sell anymore. That’s a shame because it’s got one massive power button in the middle, plus four other buttons around the outside. All of the buttons support a long-press, and the ones at the top and bottom are the brightness control buttons.
I’m using zigbee2mqtt as my Zigbee controller, and I have it installed as an add-on in Home Assistant. I prefer this to Home Assistant’s built-in ZHA because it supports literally every device I’ve connected to it, and it also means I can restart Home Assistant without my Zigbee network reconverging. Anyway, in zigbee2mqtt amongst the settings for the IKEA buttons is an option for enabling something called simulated_brightness.
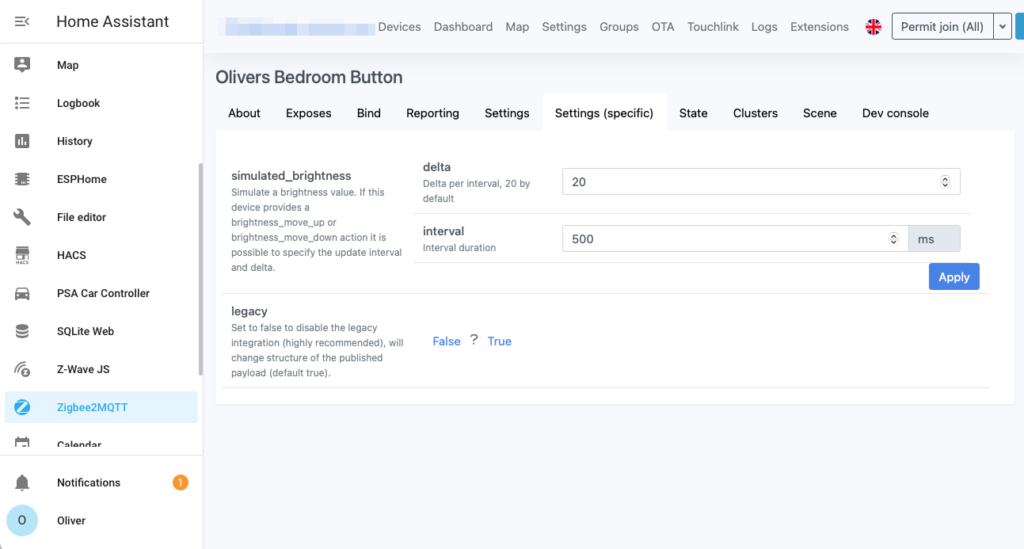
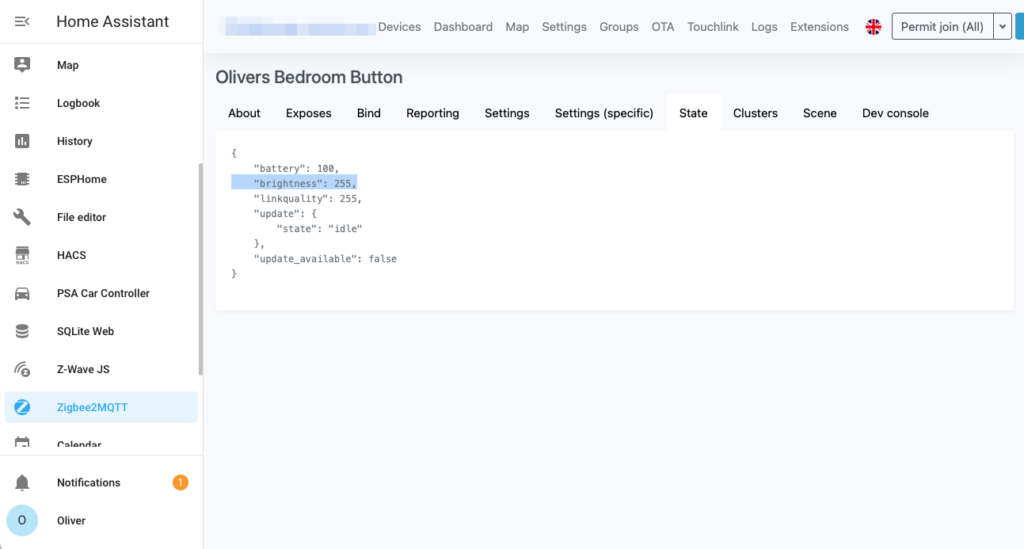
To find the simulated_brightness settings, locate your IKEA remote in the Zigbee2MQTT interface and then click on the "Settings (Specific)" tab. In there you’ll see a section labelled simulated_brightness. A default delta of 20 is fine and a half-second interval (500ms) seems to work well. That basically means that when you press and hold the brightness up or down buttons, it’ll keep track of a fake brightness value for you. If you click on the State tab, you can actually see that fake brightness value. So it’s important to remember that the brightness value is stored by the switch and not the bulb. Now you know that, it’s time to make use of that with an automation.
The automation I’m going to show you is one that I use to with the four-button Styrbar remote, and I use it in my bedroom to control a main ceiling light (to those of you in the UK, it's what we call "the big light" 🙂 ), and also to control a bedside lamp. It's the IKEA Tradfri bulb in the bedside lamp which supports dimming.

# Version History
# 2022-10-13: Initial version
# 2022-10-19: Added condition to brightness control to make sure light is already on. Prevents light turning on after every HA restart.
alias: Bedroom Button
description: Bedroom Button
trigger:
  - platform: state
    entity_id:
      - sensor.bedroom_button_action
    attribute: brightness
    id: brightness
  - platform: state
    entity_id:
      - sensor.bedroom_button_action
    to: "on"
    id: "on"
  - platform: state
    entity_id:
      - sensor.bedroom_button_action
    to: "off"
    id: "off"
condition: []
action:
  - choose:
      - conditions:
          - condition: trigger
            id: "on"
        sequence:
          - service: light.toggle
            data: {}
            target:
              entity_id: light.bedroom_light
      - conditions:
          - condition: trigger
            id: "off"
        sequence:
          - service: light.toggle
            data:
              color_temp: 352
            target:
              entity_id: light.bedside_light
      - conditions:
          - condition: trigger
            id: brightness
          - condition: state
            entity_id: light.bedside_light
            state: "on"
        sequence:
          - service: light.turn_on
            data:
              brightness: >-
                {{ state_attr('sensor.bedroom_button_action','brightness') }}
              transition: 0.4
            target:
              entity_id: light.bedside_light
mode: single
So take a look at the triggers at the top: the first one triggers when the button action has an attribute of 'brightness'. Note that I’ve given it a trigger ID of 'brightness' too. Using trigger IDs means that we can have multiple triggers in this automation, and later on in the actions we only call those actions associated with this specific trigger. This means you don’t need separate automations for each of the buttons, just one automation instead of four or more. There’s also a trigger for when the button action turns on, and another for when the action turns off, and both of those have trigger IDs of on and off accordingly.
Now down in the Actions section you can see if the On button is pressed, it toggles the main bedroom light. This isn’t an IKEA bulb, it’s actually a Z-wave switch module, but it doesn’t really matter. All I’m trying to demonstrate here is that you can use this remote to control loads of different devices all from within the same automation. The second set of actions is triggered if you press the Off button, and that toggles my bedside light on or off.
Let’s get on to the interesting part - controlling the brightness. This is where the GUI stops being useful unfortunately and you need to jump to editing YAML (I've only provided the YAML in this article, but check out the video to see the GUI) - when a brightness button action is received, which you do by holding down the on or off buttons with a long press, then this action is executed. It calls the light.turn_on service, targeting the IKEA lightbulb, and passing in the simulated brightness value from the physical switch. Remember that the switch itself is storing the required brightness value, and all we’re doing here is sending that value to the bulb. I’ve given it a transition time of 0.4 seconds too which smooths out the change because otherwise it jumps in steps which looks a bit weird.
It really is that simple, but there’s a small gotcha that you need to remember: if you start adjusting the brightness using something else like the Home Assistant dashboard or app, or HomeKit, then the brightness of the bulb will become out of sync with the simulated brightness setting in the switch. When that happens, if you use the physical switch again then the brightness level of the bulb will jump around to suddenly match the previously stored simulated brightness level. It’ll sort itself out eventually but I thought I should mention it because it can be unexpected!
You can expand on this automation to listen for triggers from the left and right arrow buttons too if you wished, but I’ve not included those here so as you can easily apply this automation to the standard IKEA dimmer button too which doesn’t have those buttons.