
Power Flow Cards for Home Assistant

(UPDATE! check out this video I have put together about the Power Flow Card Plus. It fixes a lot of the issues and compromises of the two cards discussed in this article: https://youtu.be/C4Zh35E9wJE)
Home Assistant is increasing in popularity, and a lot of people are using it to monitor their energy use. The Energy Dashboard built-in to Home Assistant is brilliant and provides an easy to navigate graphical history of your energy consumption. But what if you want to know how much *power* you are using right now? You can use a series of gauges if you like, but it’s much more intuitive to look at a power flow diagram. There’s nothing built-in to Home Assistant to do this, but there are two third-party components that you can install. In this article I’m going to go over how you configure each them, and highlight their advantages and disadvantages compared to each other.
Power Flow cards on your dashboard look great and give you a lot of information while also making efficient use of screen space. You can see at a glance where your energy is flowing to and from, overlay other information such as battery charge and energy values too.
There are two main options that I’ve found so far, and please, if there are others out there then let me know. Option 1 is the Tesla Style Solar Power Card by reptilex; and Option 2 is the Power Flow Card by ulic75.
They are both similar and unique at the same time, and both require the installation of HACS first. If you already know about HACS and have that installed then you’re all set to go, but if you don’t, then check out my “how to install HACS” video first.
Before you even start with displaying data in these power flow cards, you of course need to make sure that you have the live power data in the first place. Most solar inverters and battery systems have some sort of smart interface that you can connect into, and as for live grid data, if you have a smart meter then you can use a third party device such as the Hildebrand Glow display that I use.
Tesla Style Solar Power Card
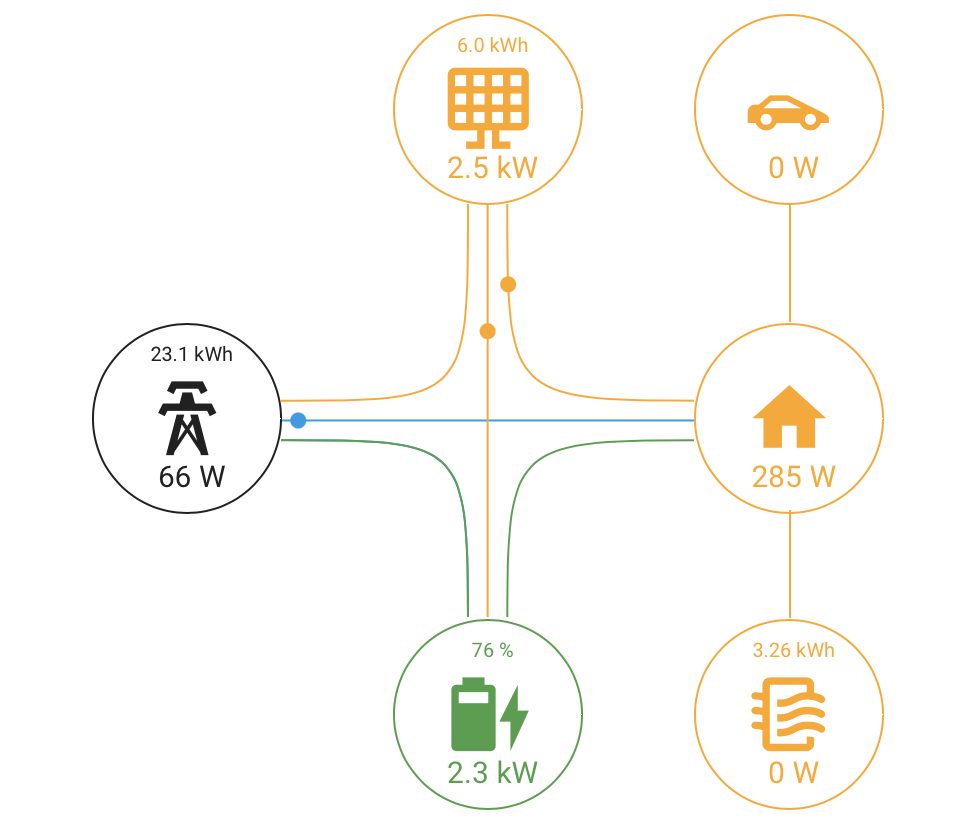
The Tesla Style card is perhaps at the time of recording this video the most flexible and feature-rich card. At a minimum you get two bubbles, one for the home and another for the grid. I’ve got it configured in full with every possible option enabled. Hanging off the home is my Pod Point EV charger at the top, and my Eddi hot water heater at the bottom. I’ve added additional information above some of the icons showing total energy consumption for the day, and you can click on each of the bubbles to open up more information on the power flow associated with that entity.
This card is NOT straightforward to configure. Each of the power flows must be provided to the card, so you need to create a number of template sensors first in your configuration files. Make sure you have some way of editing your configuration.yaml file, I suggest the File Editor add-on is an easy way to do that, and that’s what I’ll be using in this demonstration.
template:
  - sensor:
# Calculate the power used by the home from known values of solar generation, battery charge/discharge, and grid demand
      - name: "Home Power"
        unit_of_measurement: 'W'
        device_class: 'power'
        state_class: 'measurement'
        state: >-
          {% set power = ((states('sensor.simulated_power_grid_import')|int) + (states('sensor.simulated_power_solar_generation')|int)) - (states('sensor.simulated_power_grid_export')|int) + states('sensor.simulated_power_battery')|int(default=0) %}
          {% if power > 0 %}
            {{ power }}
          {% else -%}
            0
          {% endif %}
The first thing you need to create is a sensor that knows how much power your home is using. This is the cornerstone of the whole solution and very important to get right. I make a calculation by adding together the current import power value with the current solar generation power, I then subtract from that the current exported power value and add on the current battery power. If that value is more than zero, it’s used, otherwise if it’s negative, it’s discarded and a zero value is reported. Basically, it’s not possible for your home consumption to be negative, because that power is actually being exported to the grid.
You'll need to change the entities in this sample calculation to your own entities. If you don’t have a battery, then take that part out of the calculation, but it’s important to know that in this calculation that all sensor values must be positive or zero apart from the battery entity. The battery entity must be positive when discharging and negative when charging. If you have a GivEnergy battery and are using GivTCP like me, then that’s the default anyway.
Next up I’m going to piggyback on the hard work done by AviadorLP in creating the APF sensors, or Actual PowerFlow. I’ll put a link to the original location of that in the description, but I’ve actually tweaked them a bit because I didn’t need the full accuracy of calculating the power losses and overheads of the inverters. A rough flow that adds up to the total is good enough for me and removes a lot of the complexity. I’ll stick my version of the template sensors on my web site, but if you crave the detail then please check out AviadorLP’s original work.
template:
  - sensor:
# Templates for Actual Powerflow transfer charts (APF - Actual PowerFlow)
#
# Developed by AviadorLP
#
# If your sensor is negative when it should be positive replace that complete line with
#         state: "{{ 0 - states('ReplaceWithYourSensor')|int(default=0) }}"
#
# If you don't have a battery replace that complete line with
#         state: "{{ 0 }}"

  # grid sensor must be negative when importing and positive when exporting
    - name: APF Grid Entity
      device_class: power
      state_class: measurement
      unit_of_measurement: W
      state: "{{ 0 - states('sensor.simulated_power_grid')|int(default=0) }}"

  # sensor must always be 0 or positive (i think they always are). Does not include battery consumption
    - name: APF House Entity
      device_class: power
      state_class: measurement
      unit_of_measurement: W
      state: "{{ states('sensor.home_power')|int(default=0) }}"

  # sensor must always be 0 or positive (i think they always are)
    - name: APF Generation Entity
      device_class: power
      state_class: measurement
      unit_of_measurement: W
      state: "{{ states('sensor.simulated_power_solar_generation')|int(default=0) }}"

  # battery sensor must be positive when charging and negative when discharging
    - name: APF Battery Entity
      device_class: power
      state_class: measurement
      unit_of_measurement: W
  #    state: "{{ 0 }}"
      state: "{{ 0 - states('sensor.simulated_power_battery')|int(default=0) }}"

  # Required to reduce code later on
    - name: APF Grid Import
      device_class: power
      state_class: measurement
      unit_of_measurement: W
      state: >
        {% if states('sensor.apf_grid_entity')|int(default=0) < 0 %}
          {{ states('sensor.apf_grid_entity')|int(default=0)|abs }}
        {% else %}
          0
        {% endif %}

    - name: APF Grid2House
      device_class: power
      state_class: measurement
      unit_of_measurement: W
      state:  >
        {% if states('sensor.apf_grid_import')|int(default=0) > states('sensor.apf_house_entity')|int(default=0) %}
          {{ states('sensor.apf_house_entity')|int(default=0) }}
        {% else %}
          {{ states('sensor.apf_grid_import')|int(default=0) }}
        {% endif %}

    - name: APF Grid2Batt
      device_class: power
      state_class: measurement
      unit_of_measurement: W
      state: >
        {% if states('sensor.apf_grid_import')|int(default=0) > states('sensor.apf_house_entity')|int(default=0) %}
          {{ states('sensor.apf_grid_import')|int(default=0) - states('sensor.apf_house_entity')|int(default=0) }}
        {% else %}
          0
        {% endif %}

    - name: APF Batt2House
      device_class: power
      state_class: measurement
      unit_of_measurement: W
      state: >
        {% if states('sensor.apf_battery_entity')|int(default=0) < 0 %}
          {% if states('sensor.apf_battery_entity')|int(default=0)|abs > states('sensor.apf_house_entity')|int(default=0) %}
            {{ states('sensor.apf_house_entity')|int(default=0) }}
          {% else %}
            {{ states('sensor.apf_battery_entity')|int(default=0)|abs }}
          {% endif %}
        {% else %}
          0
        {% endif %}

  # This might be called house to grid, and can happen in rare circumstances,
  # like when the inverter is not able to do a precise adjustment of power fast enough
  # or when you want to force a discharge of the battery or something...
  # But it only happens with battery or other power generator users.
    - name: APF Batt2Grid
      device_class: power
      state_class: measurement
      unit_of_measurement: W
      state: >
        {% if states('sensor.apf_battery_entity')|int(default=0) < 0 %}
          {% if states('sensor.apf_battery_entity')|int(default=0)|abs > states('sensor.apf_house_entity')|int(default=0) %}
            {{ states('sensor.apf_battery_entity')|int(default=0)|abs - states('sensor.apf_house_entity')|int(default=0) }}
          {% else %}
            0
          {% endif %}
        {% else %}
          0
        {% endif %}

    - name: APF Solar2Grid
      device_class: power
      state_class: measurement
      unit_of_measurement: W
      state: >
        {% if states('sensor.apf_grid_entity')|int(default=0) > states('sensor.apf_batt2grid')|int(default=0) %}
          {{ states('sensor.apf_grid_entity')|int(default=0) - states('sensor.apf_batt2grid')|int(default=0) }}
        {% else %}
          0
        {% endif %}

    - name: APF Solar2House
      device_class: power
      state_class: measurement
      unit_of_measurement: W
      state: >
        {% if states('sensor.apf_generation_entity')|int(default=0) > 0 and states('sensor.apf_house_entity')|int(default=0) > states('sensor.apf_batt2house')|int(default=0) + states('sensor.apf_grid_import')|int(default=0) %}
          {% if states('sensor.apf_generation_entity')|int(default=0) > states('sensor.apf_house_entity')|int(default=0) - states('sensor.apf_batt2house')|int(default=0) - states('sensor.apf_grid2house')|int(default=0) %}
            {{ states('sensor.apf_house_entity')|int(default=0) - states('sensor.apf_batt2house')|int(default=0) - states('sensor.apf_grid2house')|int(default=0) }}
          {% else %}
            {{ states('sensor.apf_generation_entity')|int(default=0) }}
          {% endif %}
        {% else %}
          0
        {% endif %}

    - name: APF Solar2Batt
      device_class: power
      state_class: measurement
      unit_of_measurement: W
      state: >
        {% if states('sensor.apf_generation_entity')|int(default=0) > 0 and states('sensor.apf_battery_entity')|int(default=0) > 0 %}
          {% if states('sensor.apf_battery_entity')|int(default=0) > states('sensor.apf_grid2batt')|int(default=0) %}
            {% if states('sensor.apf_generation_entity')|int(default=0) - states('sensor.apf_solar2house')|int(default=0) > states('sensor.apf_battery_entity')|int(default=0) - states('sensor.apf_grid2batt')|int(default=0) %}
              {{ states('sensor.apf_battery_entity')|int(default=0) - states('sensor.apf_grid2batt')|int(default=0) }}
            {% else %}
              {{ states('sensor.apf_generation_entity')|int(default=0) - states('sensor.apf_solar2house')|int(default=0) - states('sensor.apf_solar2grid')|int(default=0) }}
            {% endif %}
          {% else %}
            0
          {% endif %}
        {% else %}
          0
        {% endif %}
Paste in the APF template sensors, and we’re going to concentrate on just the first four. All of the others are self-referencing providing that you don’t change their names, but the first four need some customisation.
For the APF Grid Entity sensor you need to change the entity to your main grid feed power sensor entity. If the entity value is positive when importing and negative when exporting then you’re all good to go substituting that entity, but if it’s negative when importing and positive when exporting, you must delete the ‘0 -‘ part.
The APF House entity is basically just referencing the Home Power you created previously. I know it seems silly having two sensors exactly the same, but the idea is that the APF entities are all self contained and you could re-use your home power entity elsewhere and that functionality wouldn’t be affected if you decided to delete all of the APF config.
The Generation Entity needs to be set to your solar power output, and finally the battery entity must be the same battery power entity you used to calculate Home Power. If you don’t have a battery, comment out the state line and uncomment the static zero output line instead rather than just deleting this entity because way the calculations will all still work without any further changes.
Save the file, then head on over to HACS to install the card itself. You’ll do this in the Frontend section of HACS, click on the blue Explore and Download Repositories button, and search for the Tesla Style Solar Power Card, select it, then click on the blue Download buttons to get it installed. Once you’ve done all that, you’ll need to restart Home Assistant to load the new sensors you’ve created, so head over to developer tools, check the configuration and restart.
Now you need to put this all together into a card on the dashboard. This all has to be done in YAML I’m afraid, but it’s not that scary. Edit the dashboard, click on Add Card, scroll all the way to the bottom and click on Manual.
type: custom:tesla-style-solar-power-card
grid_to_house_entity: sensor.apf_grid2house
grid_to_battery_entity: sensor.apf_grid2batt
generation_to_grid_entity: sensor.apf_solar2grid
generation_to_battery_entity: sensor.apf_solar2batt
generation_to_house_entity: sensor.apf_solar2house
battery_to_house_entity: sensor.apf_batt2house
battery_to_grid_entity: sensor.apf_batt2grid
appliance1_consumption_entity: sensor.simulated_power_car
appliance2_consumption_entity: sensor.simulated_power_hot_water
grid_entity: sensor.simulated_power_grid
house_entity: sensor.home_power
generation_entity: sensor.simulated_power_solar_generation
battery_entity: sensor.apf_battery_entity
grid_extra_entity: sensor.simulated_grid_energy_import_today
battery_extra_entity: sensor.simulated_battery_soc
change_house_bubble_color_with_flow: 1
threshold_in_k: 1
show_gap: true
style: |
  div.acc_text_extra {
    font-size: 0.7em !important;
  }
Paste in my known-working configuration into the Manual card input area. If you’ve used the APF sensors then all of the power flow entities are all defined for you here in my configuration already.
appliance1_consumption_entity and appliance2_consumption_entity are by default a car icon and a water heater icon. If you have power entities for those items, type in the entity names here replacing my simulated values. If you don't have any such entities, delete these lines totally and the bubbles will not appear on the diagram.
The next lines for grid_entity down to battery_entity all define which entity data is shown when you click on those bubbles. Change these entities as required, or delete the lines totally if you don't wish them to be clickable. The ‘extra’ entities tell the card to display extra data above each of the icons in the bubbles. I am showing the total energy imported today inside the grid bubble, and the battery charge percentage in the battery bubble for example. Once again, delete these lines if you're not interested in this feature. I'm just showing you every possible option for the sake of completeness.
Finally, I found that the text was a bit too big for my liking, so I also installed the card-mod component in HACS which lets you add CSS adjustments to a card. This style element here just reduces the size of the font for the additional data in the bubbles. Delete the style section if you don't need it...
There are many other parameters you can play with if you want to so I suggest you have a look at the readme on the card’s Github page.
Power Flow Card
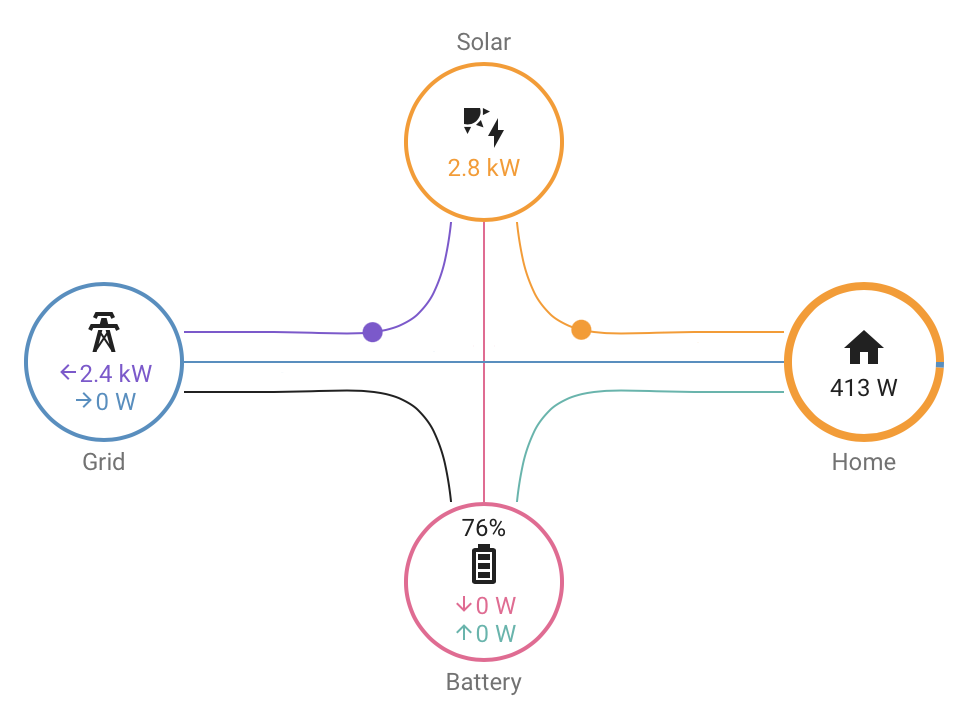
The other option is the Power Flow Card. This is a lot simpler to get up and running, but it currently has fewer features. For example, you are limited to a maximum of four bubbles for grid, solar, battery and home, so you can’t show additional devices such as a car charger or immersion heater.
Use HACS to install this front-end component, click on the blue Explore and Download Repositories button, and search for the Power Flow Card, select it, then click on the blue Download buttons to get it installed. You’ll be asked to refresh the front end to get this card working so click the pop-up message to do that, but quite often you’ll need to restart Home Assistant and even clear your browser's cache to get the card working.
Once restarted, you’ll need to edit your dashboard, add a card, scroll to the bottom and choose Manual just like we did with the Tesla card.
type: custom:power-flow-card
watt_threshold: 999
w_decimals: 0
min_flow_rate: 1.5
max_flow_rate: 6
entities:
  grid: sensor.simulated_power_grid
  solar: sensor.simulated_power_solar_generation
  battery:
    consumption: sensor.simulated_power_battery_discharge
    production: sensor.simulated_power_battery_charge
  battery_charge: sensor.simulated_battery_soc
Paste in my known-working configuration which you’ll notice it’s a lot shorter!
You don’t need to define any special template entities for this one at all, you just set the entities for grid, solar and battery here. You can split out the entities into consumption and production if for example you have separate import and export entities for the grid. I’ve shown it here for the battery where I have a charge entity and a discharge entity. I could have just used a single entity though that goes positive or negative depending on the flow direction. The other entity, battery_charge, is used to display the value and the bars in the icon inside the bubble. As with the other card, there are other configuration options you can play with so check out the readme for the card if you want to know more. For most people, my values here will be fine I reckon.
Choices, choices...
So which card should you go for? Well, it’s personal preference really, let’s go over the comparison.
For the Tesla style power card there are a number of pros:
- You get extra bubbles for additional devices
- Additional data can be shown in each bubble
- Clickable bubbles
But there are also a lot of cons:
- Complicated to configure, although you only have to do this once
- It has a really big problem rendering in the browser. Sometimes the bubbles get all mashed up, end up tiny, or power flow lines start pointing all over the place!
For the Power Flow Card, the pros are:
- Very simple to set up
- Colour scheme that matches the built-in Home Assistant energy dashboard components
- A nice pie-chart style Home bubble that shows you at a glance what percentage of your current consumption is coming from what source.
However it has a few cons too:
- No additional bubbles for an EV charger or heater
- You can’t click on the bubbles for more information
- No way to add extra information into the bubbles
Honestly I’m torn between these two, and I genuinely have them both on my dashboard side-by-side. I’m leaning towards the power flow card as my favourite in terms of looks, I really like the pie-chart style Home bubble and consistent browser rendering, but I really do wish it had clickable bubbles, could allow extra templated data to be placed in the bubbles, and display additional entity bubbles - that would make it perfect.